Frequently Asked Questions
Applicant profile
How can I find my applicant ID?
Your applicant ID is a unique number assigned to you when you create an applicant account at the portal. The applicant ID helps the admission team quickly identify your record.
To find your applicant ID, do either of the following:
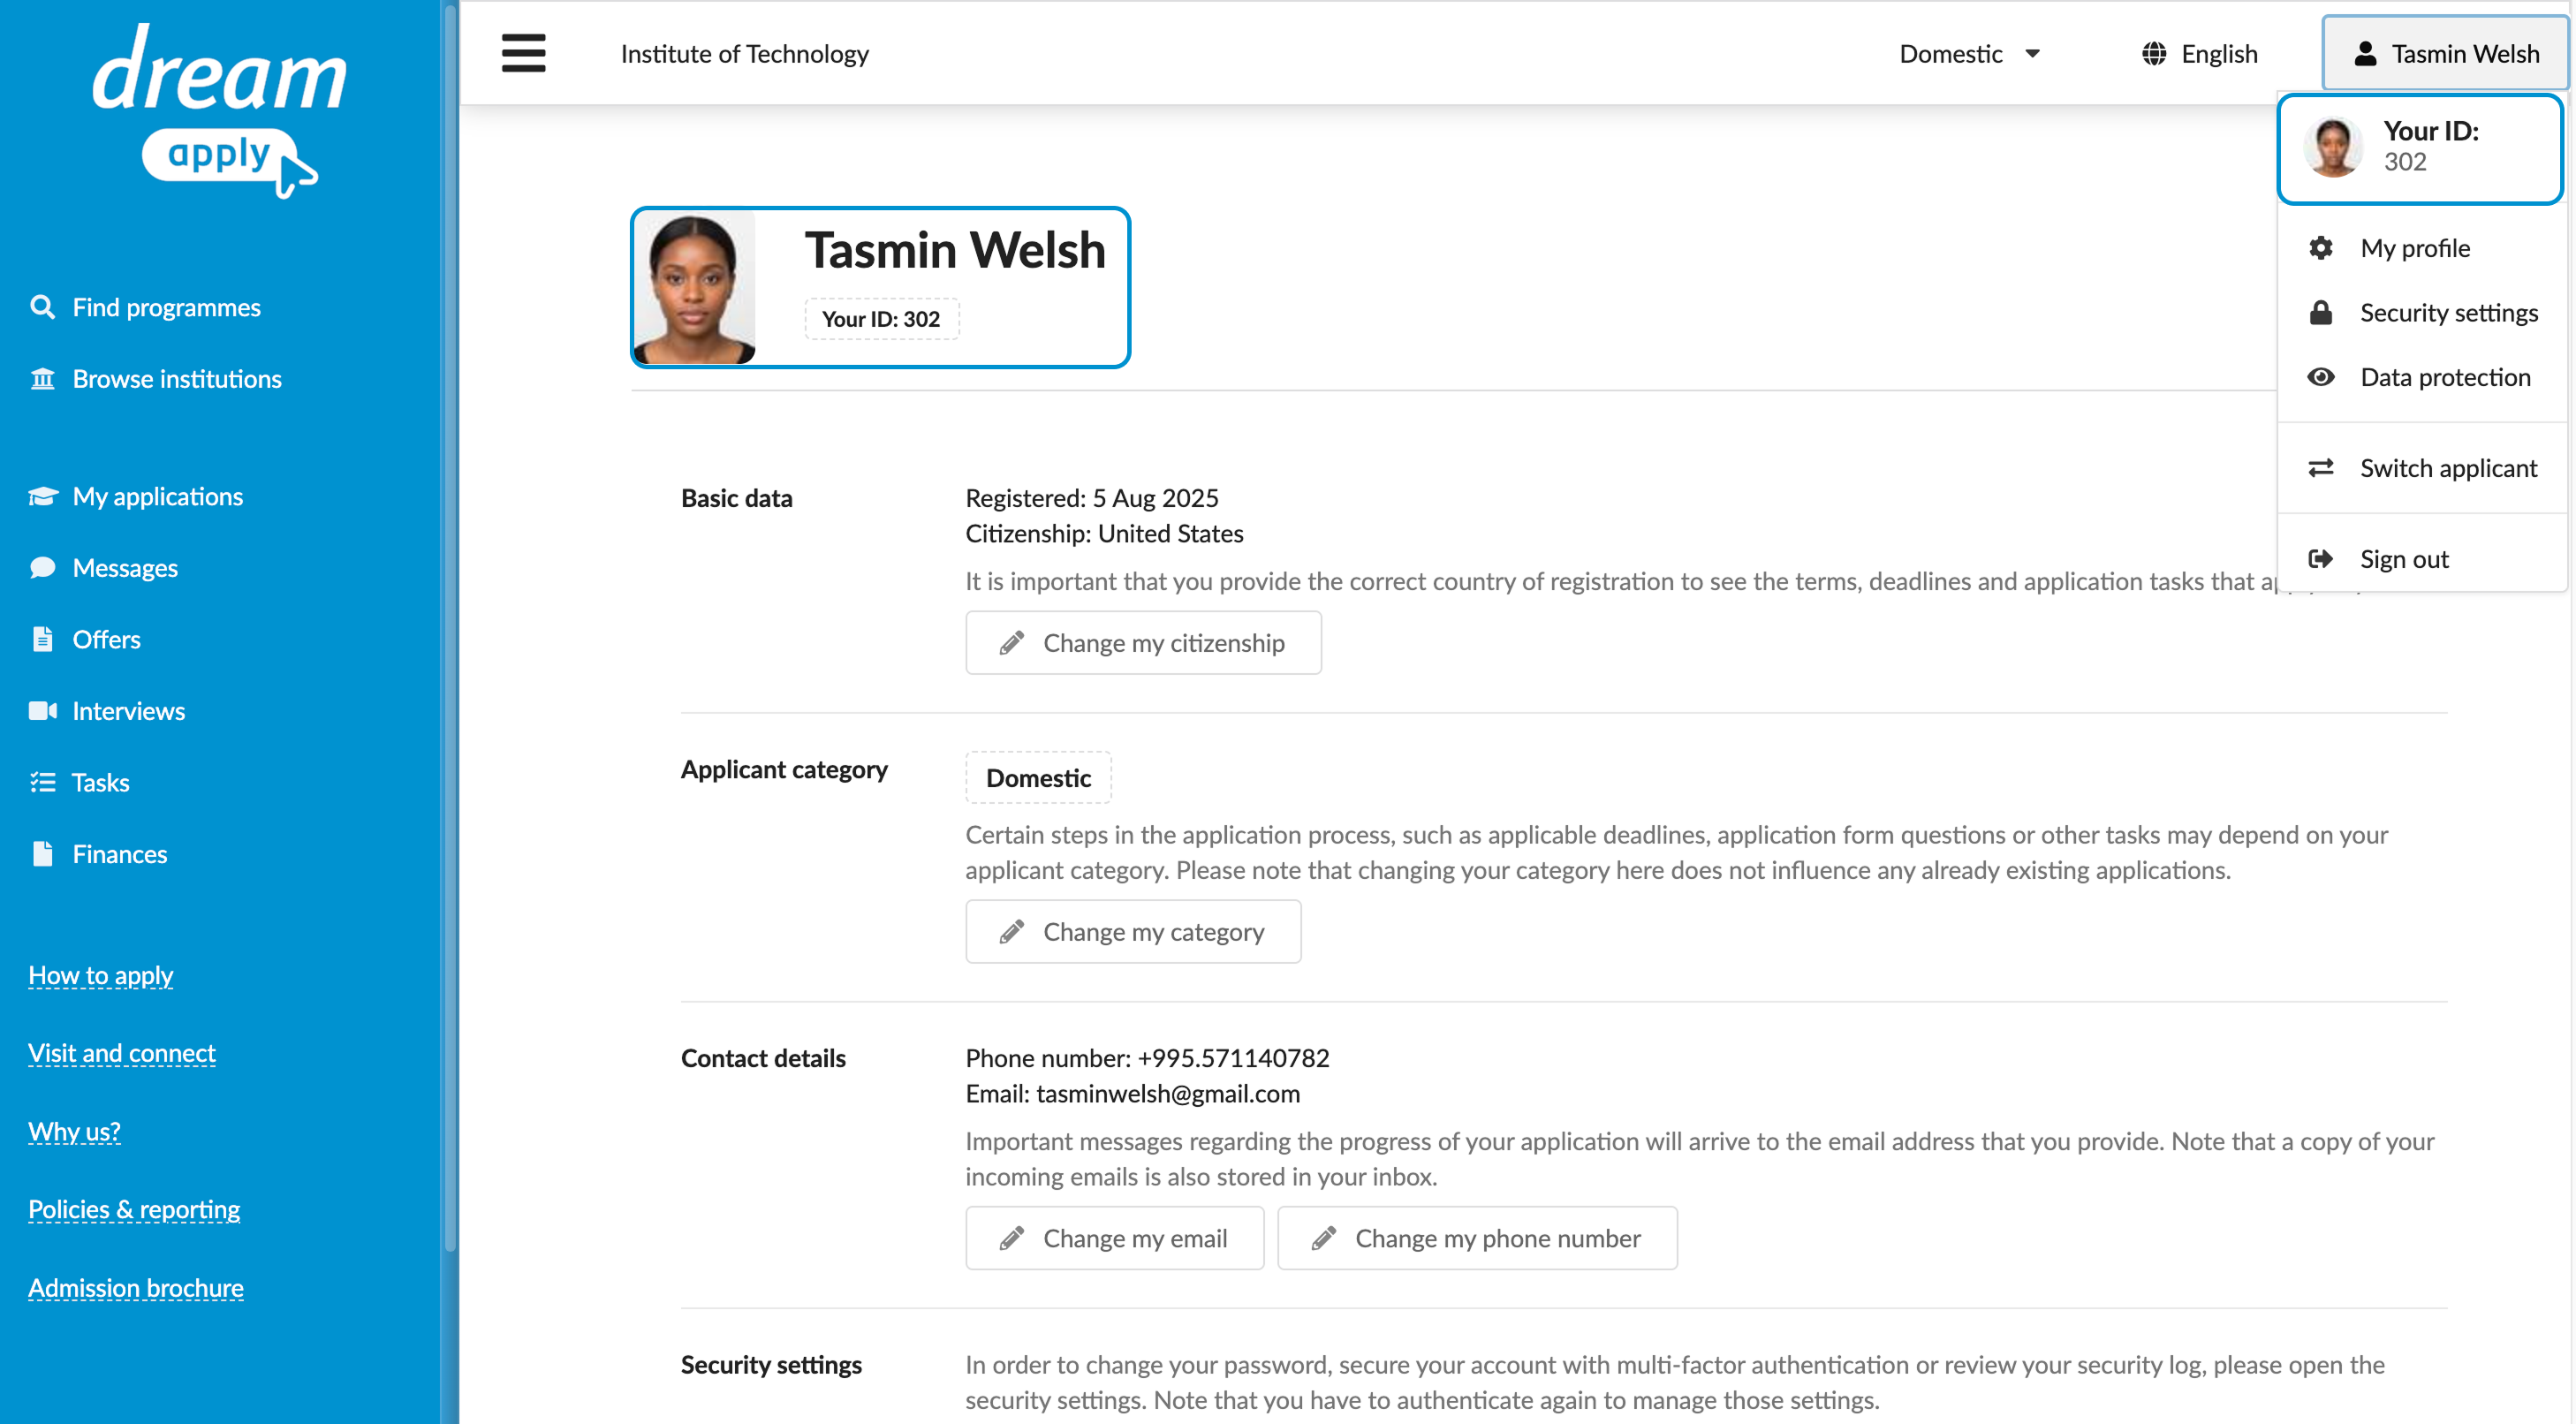
- In the top right corner of the portal, click the profile icon. Your applicant ID is displayed below your name.
- In the top right corner of the portal, click the profile icon and select My profile. Your applicant ID is displayed at the top of the main view below your name.
How can I change my name in my profile?
You may want to change your profile name if you have noticed an error or need to update how your name appears on your applications.
When you change your profile name, the update applies to your profile settings and all applications linked to your account. The admission team will see the updated name on every saved and submitted application.
Changing your profile name does not affect your login record. To change the name associated with your login record, see How can I change my name in my login record?
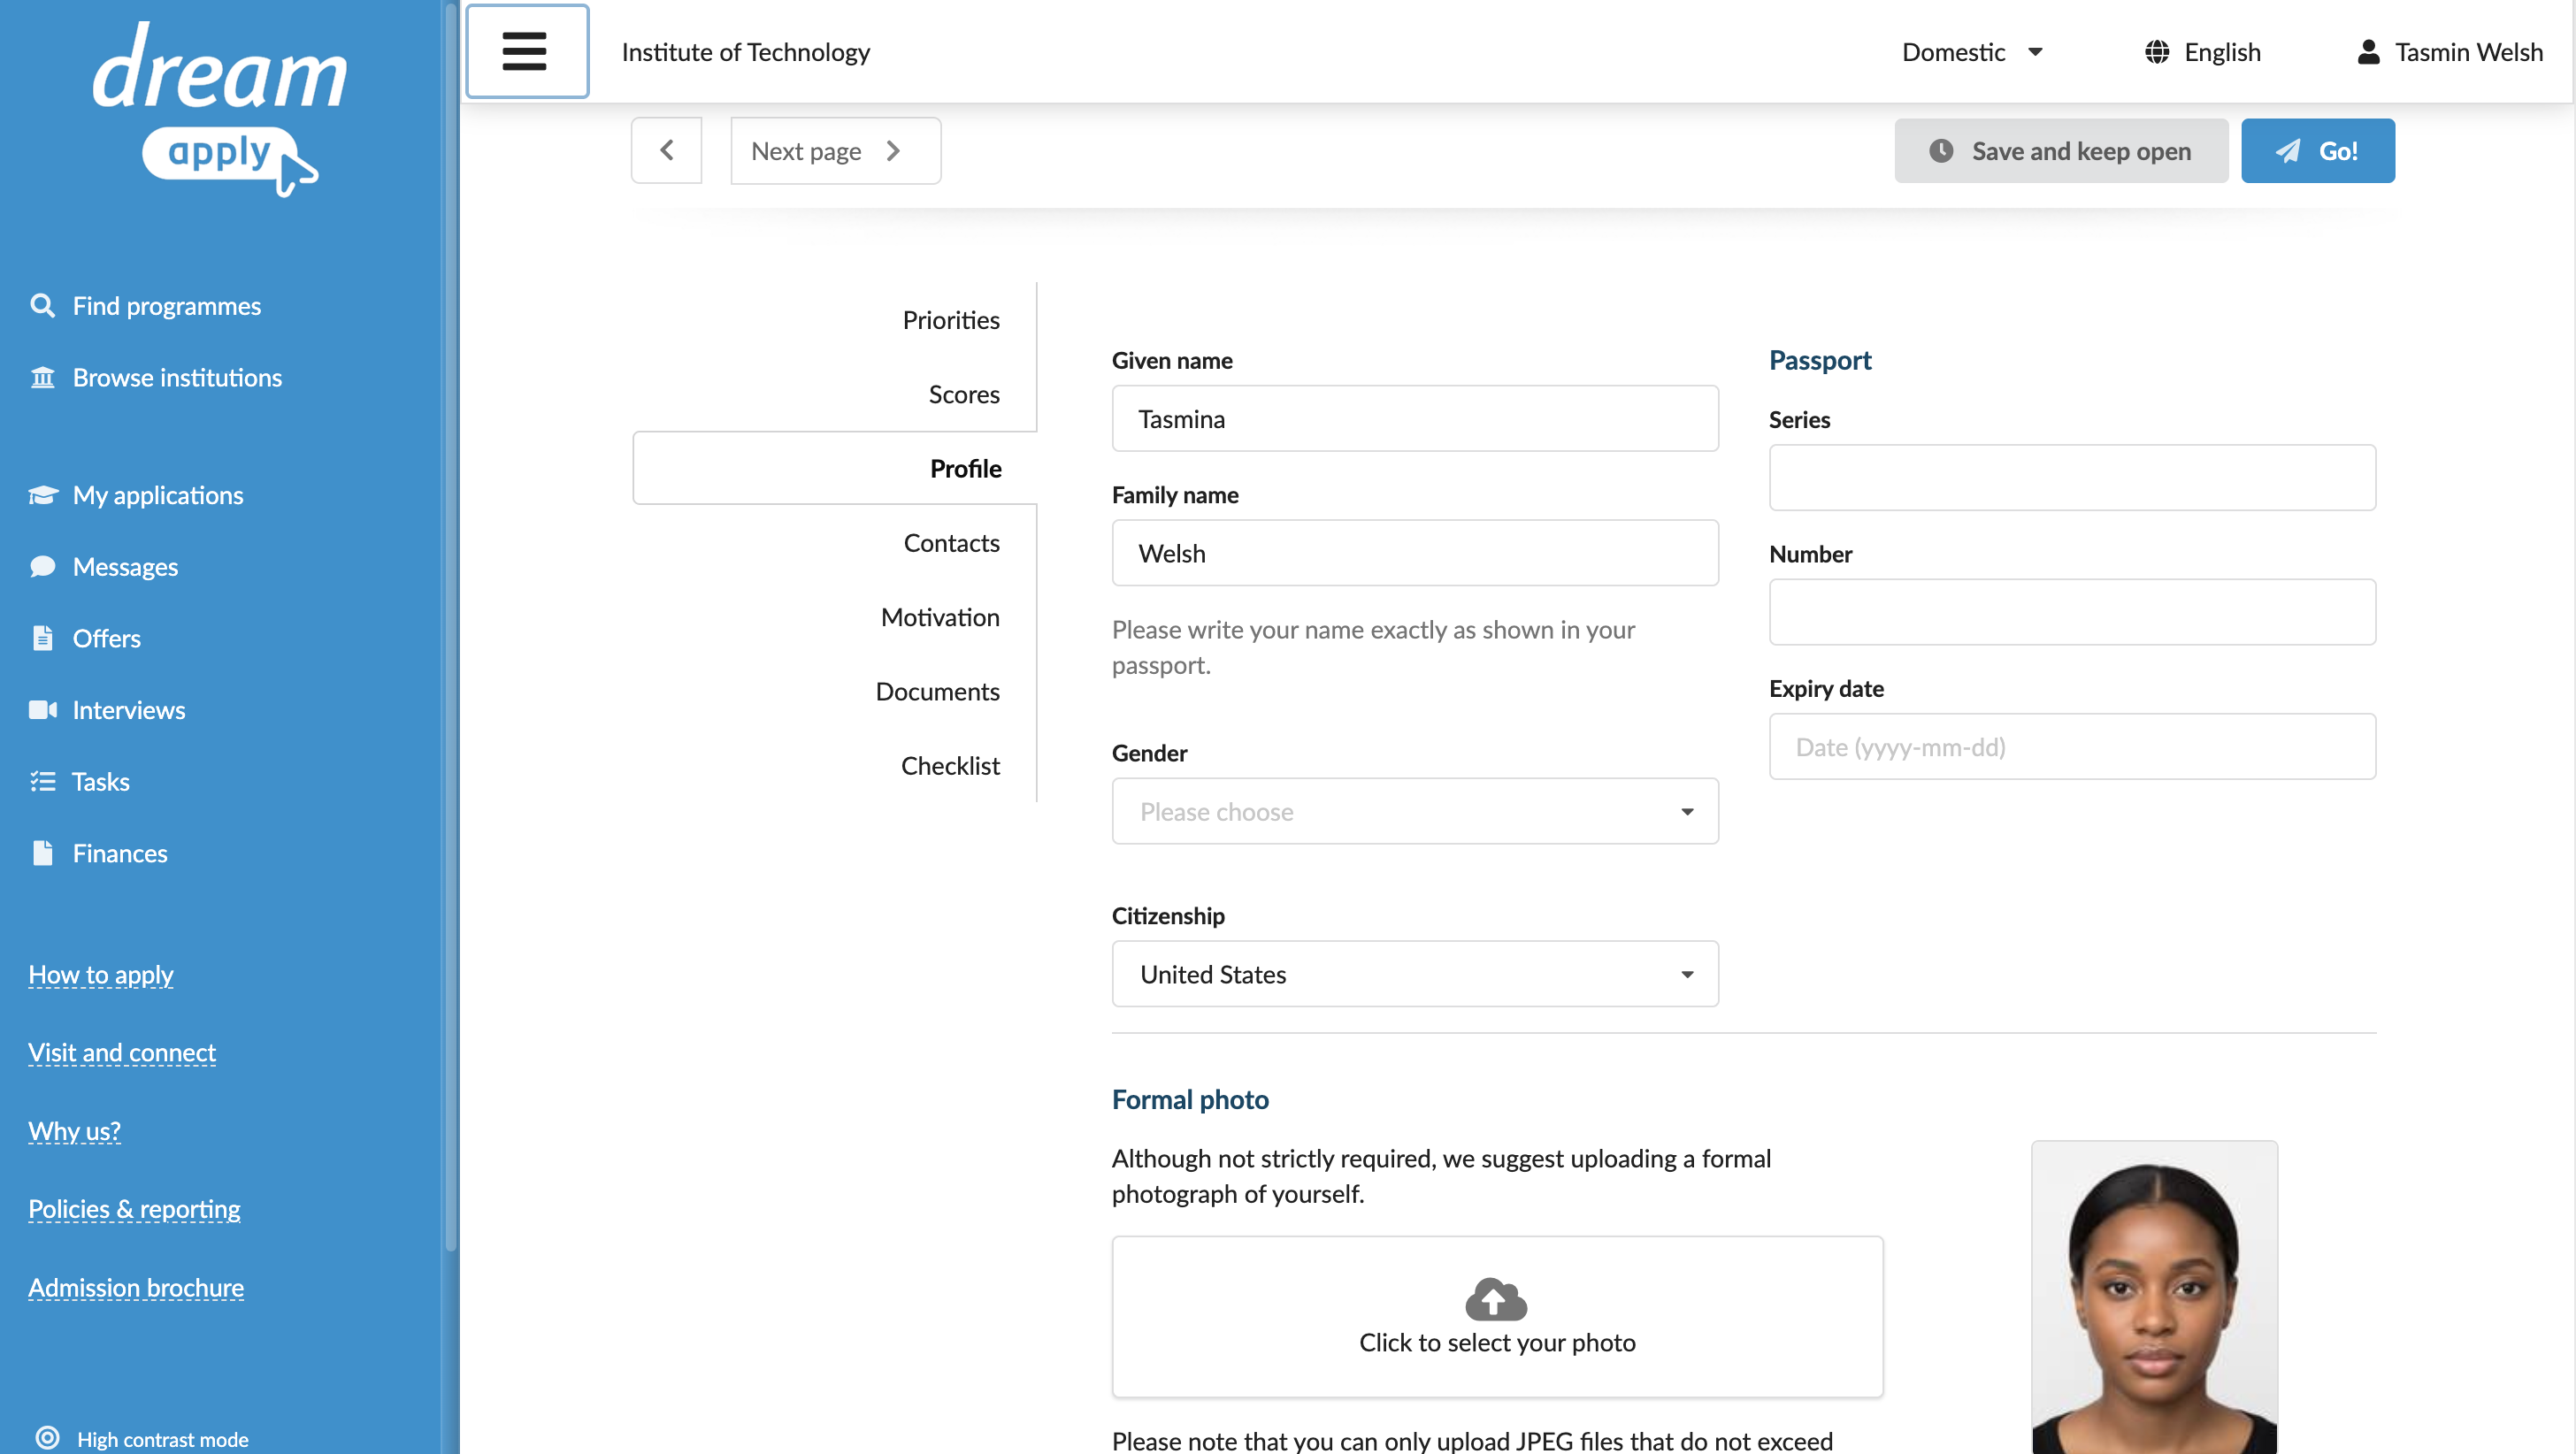
To change your profile name:
- In the main menu, select My applications.
- Choose to edit any application you have submitted or saved.
- In the Profile section, update your given name and/or family name.
- Re-submit or save your application.
How can I change my contact email address?
If you want to receive notifications and updates about the admission process at a different account, you can update your contact email.
The contact email address is used only for notifications and reminders from the institution and the portal. Changing it does not change your login email address. To change your login email address, see How can I change my login email address?
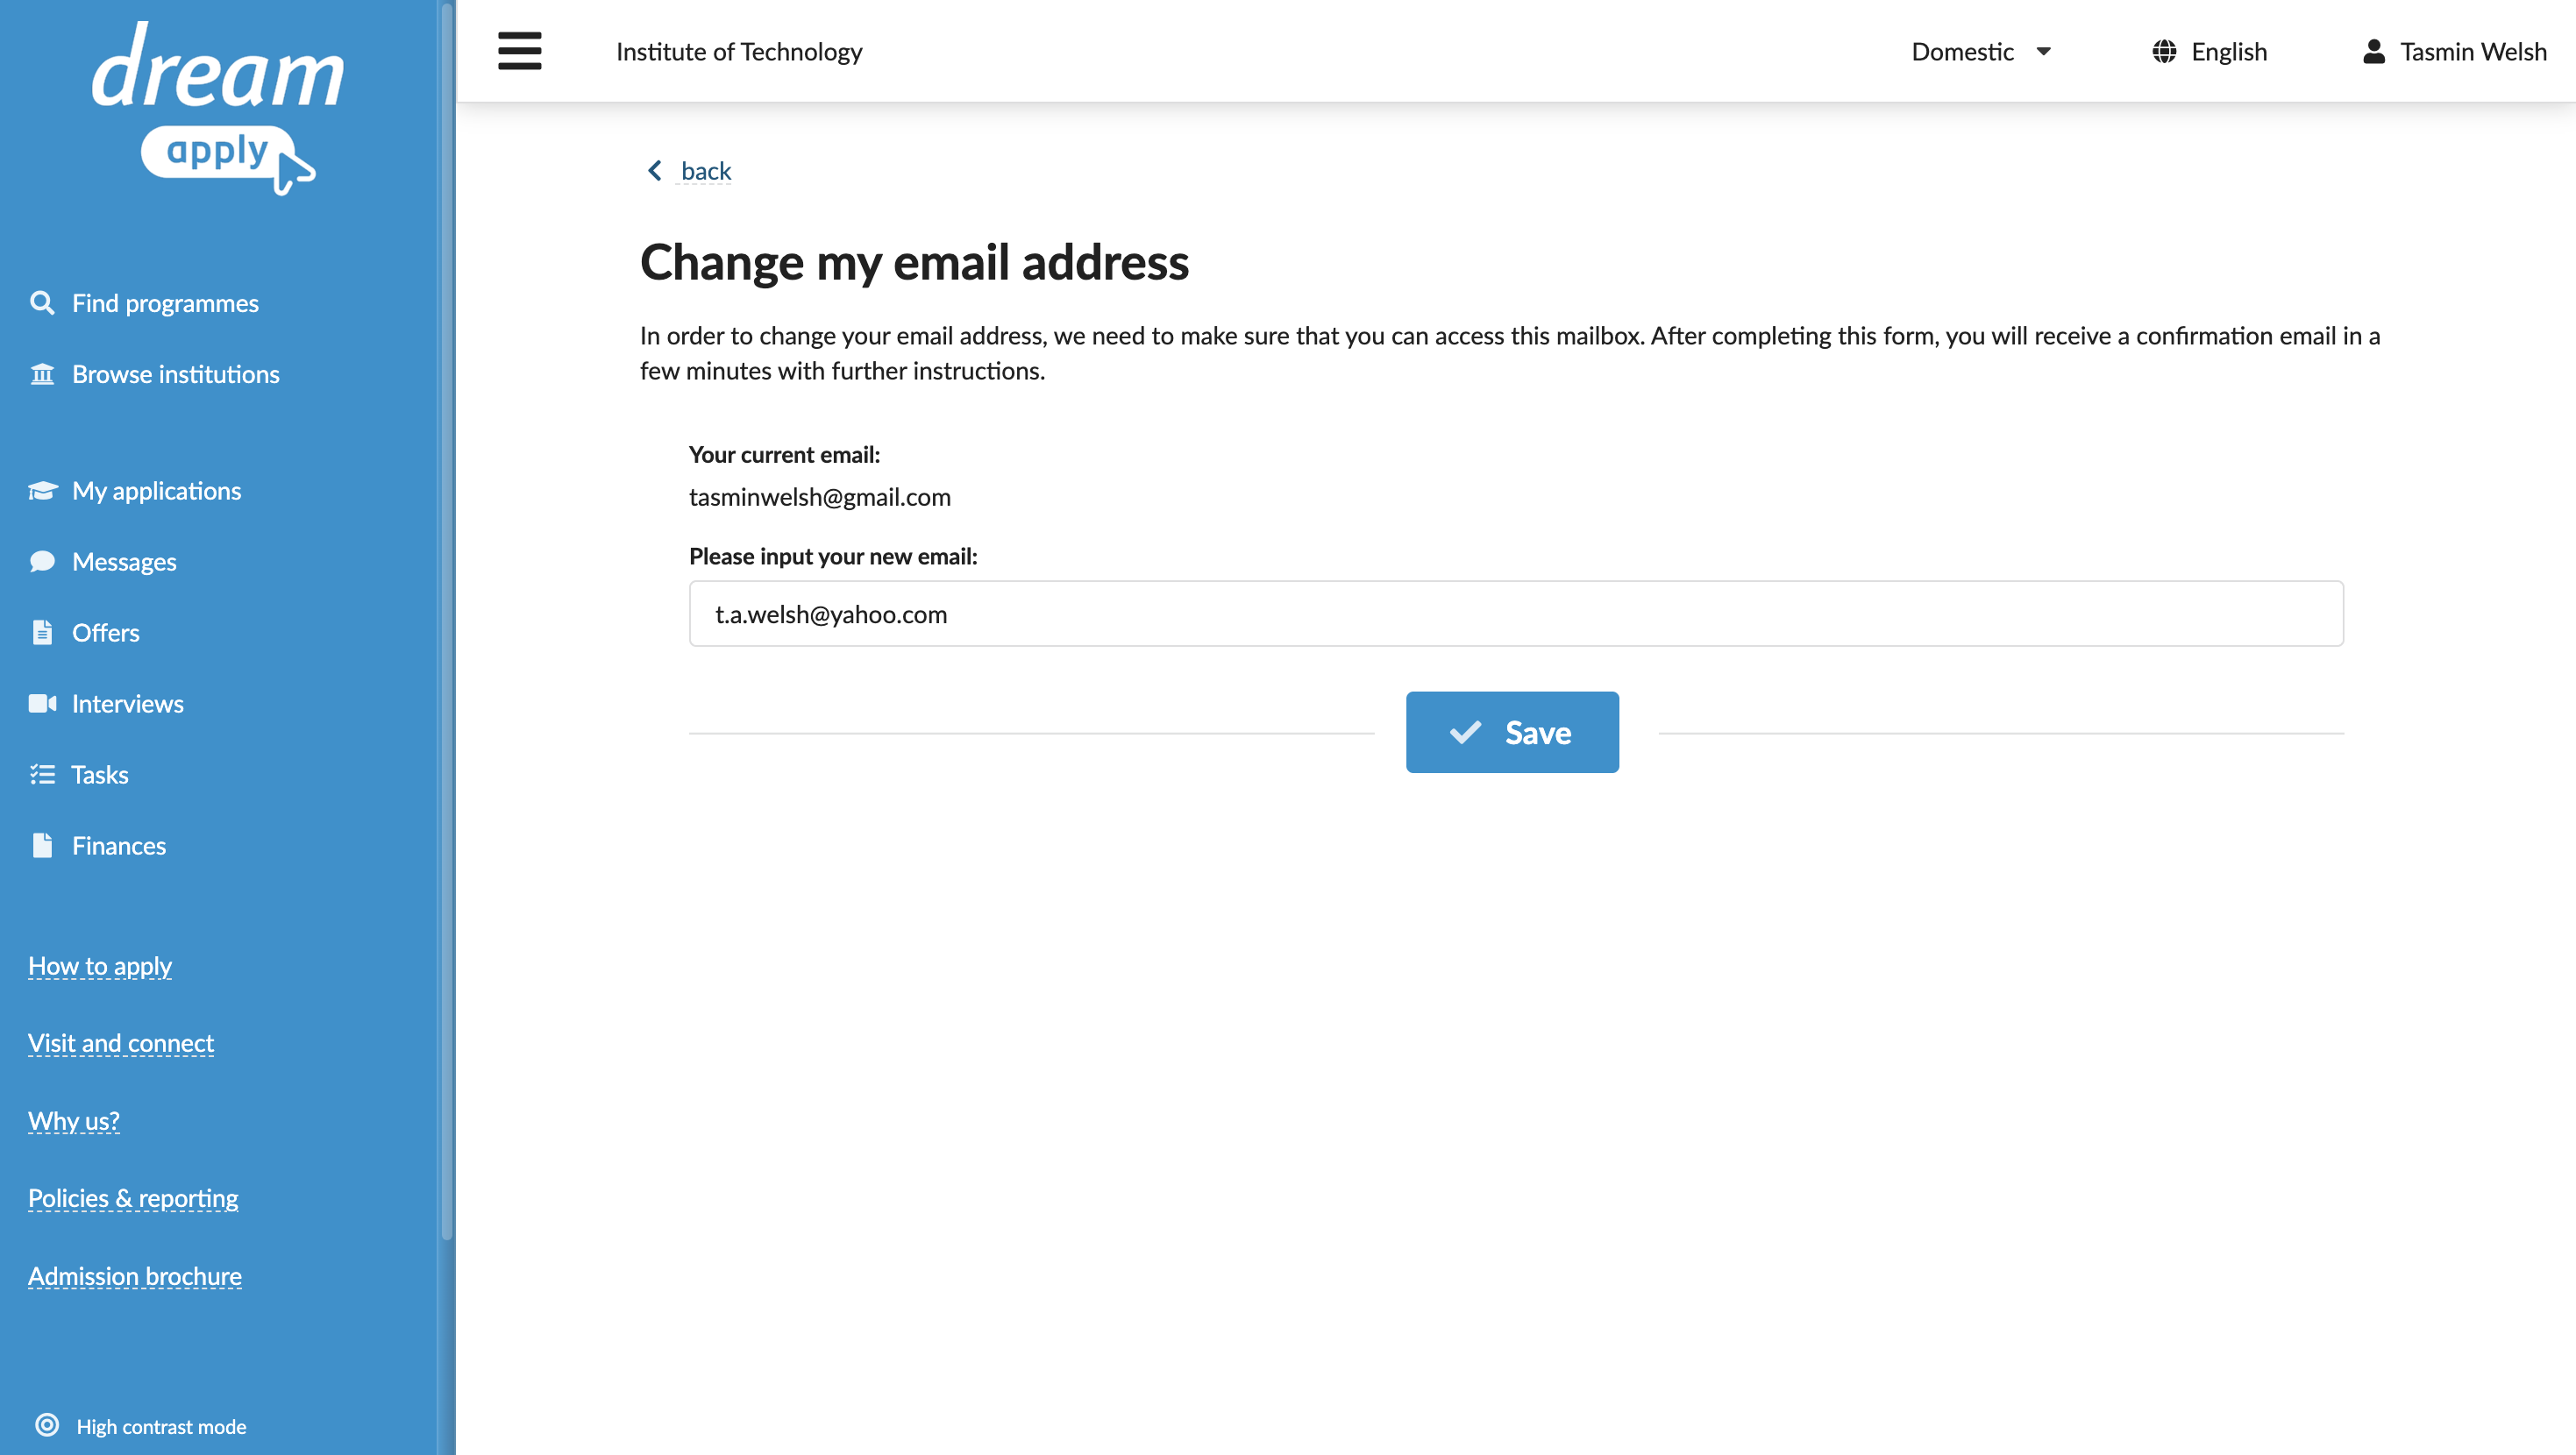
To change your contact email address:
- In the top right corner of the portal, click the profile icon and select My profile.
- In the Contact details section, click Change my email.
- Specify a new email address and click Save.
- You will receive a verification email at the new address. Once you verify the change, your contact email address will be updated.
How can I upload or replace my photo?
You may want to update your formal photo if your institution requires it as part of the admission process.
When you change your photo, the update applies to your profile settings and all applications linked to your account. The admission team will see the updated photo on every submitted and saved application.
Not all institutions ask for a formal photo. You can make this change only if the application form specifically requests a formal photo.
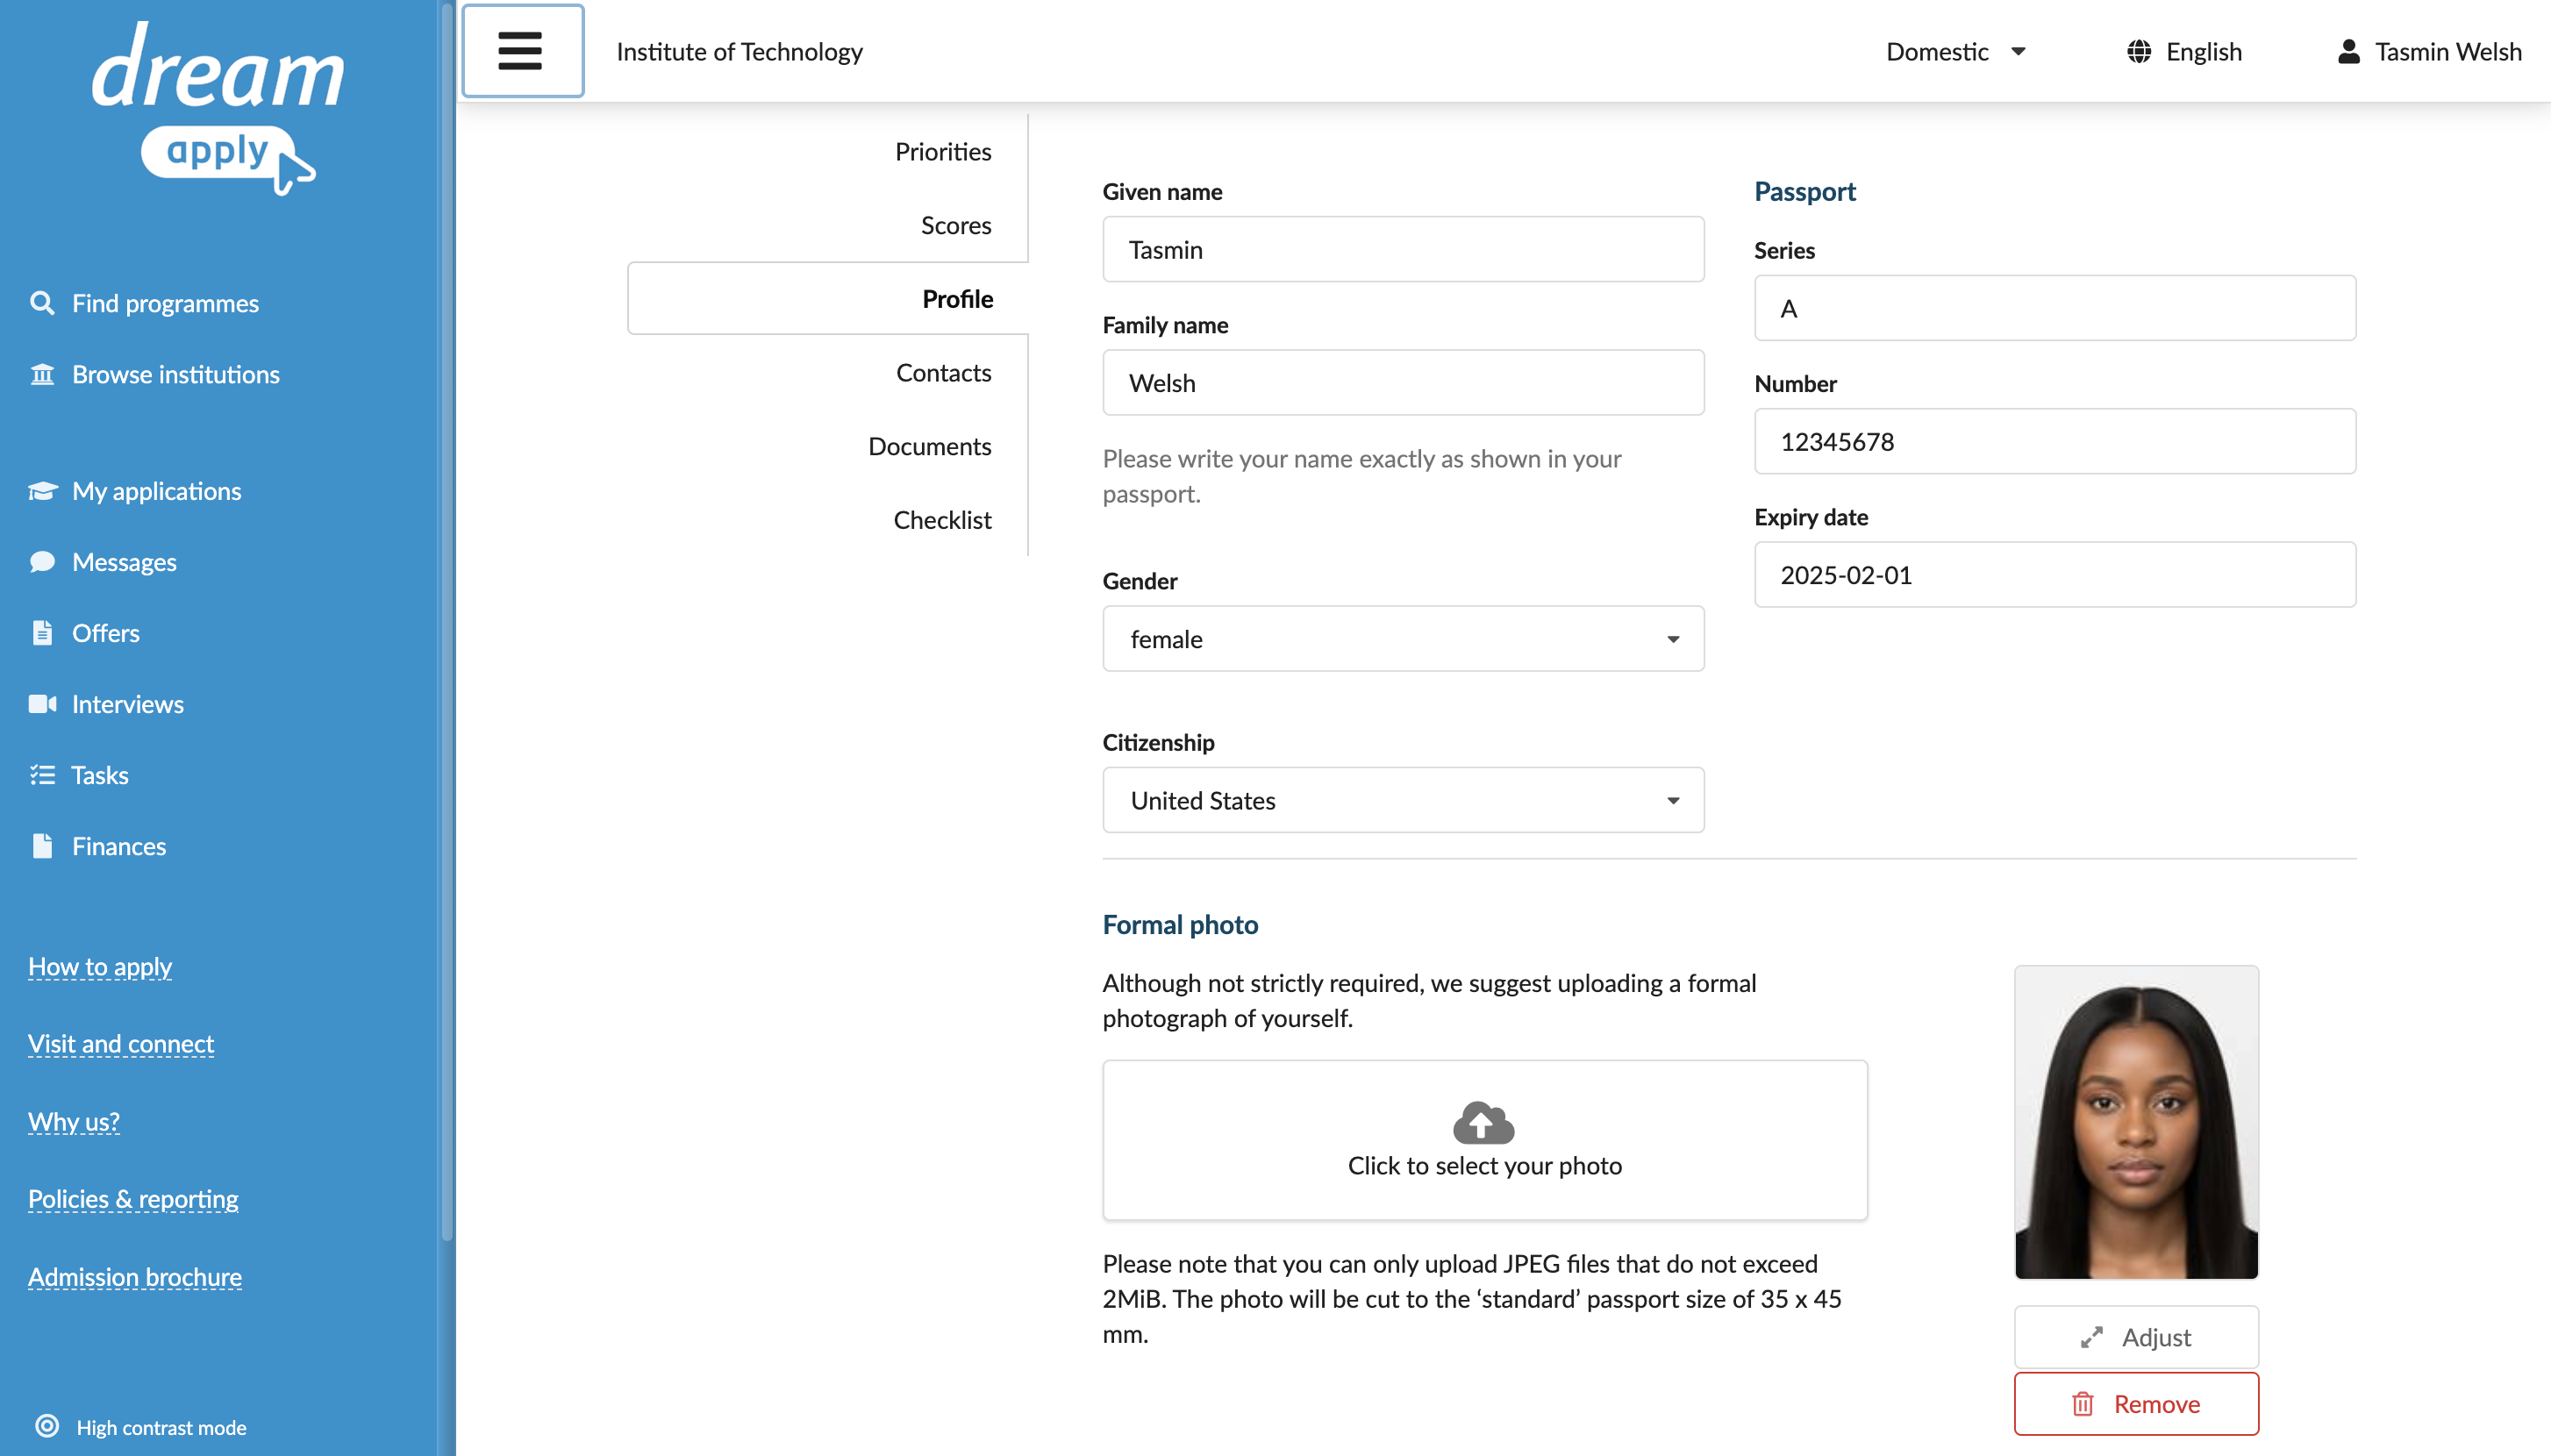
To change your photo:
- In the main menu, select My applications.
- Choose to edit any application you have submitted or saved.
- In the Profile section, remove the current photo and upload a new one.
- Re-submit or save your application.
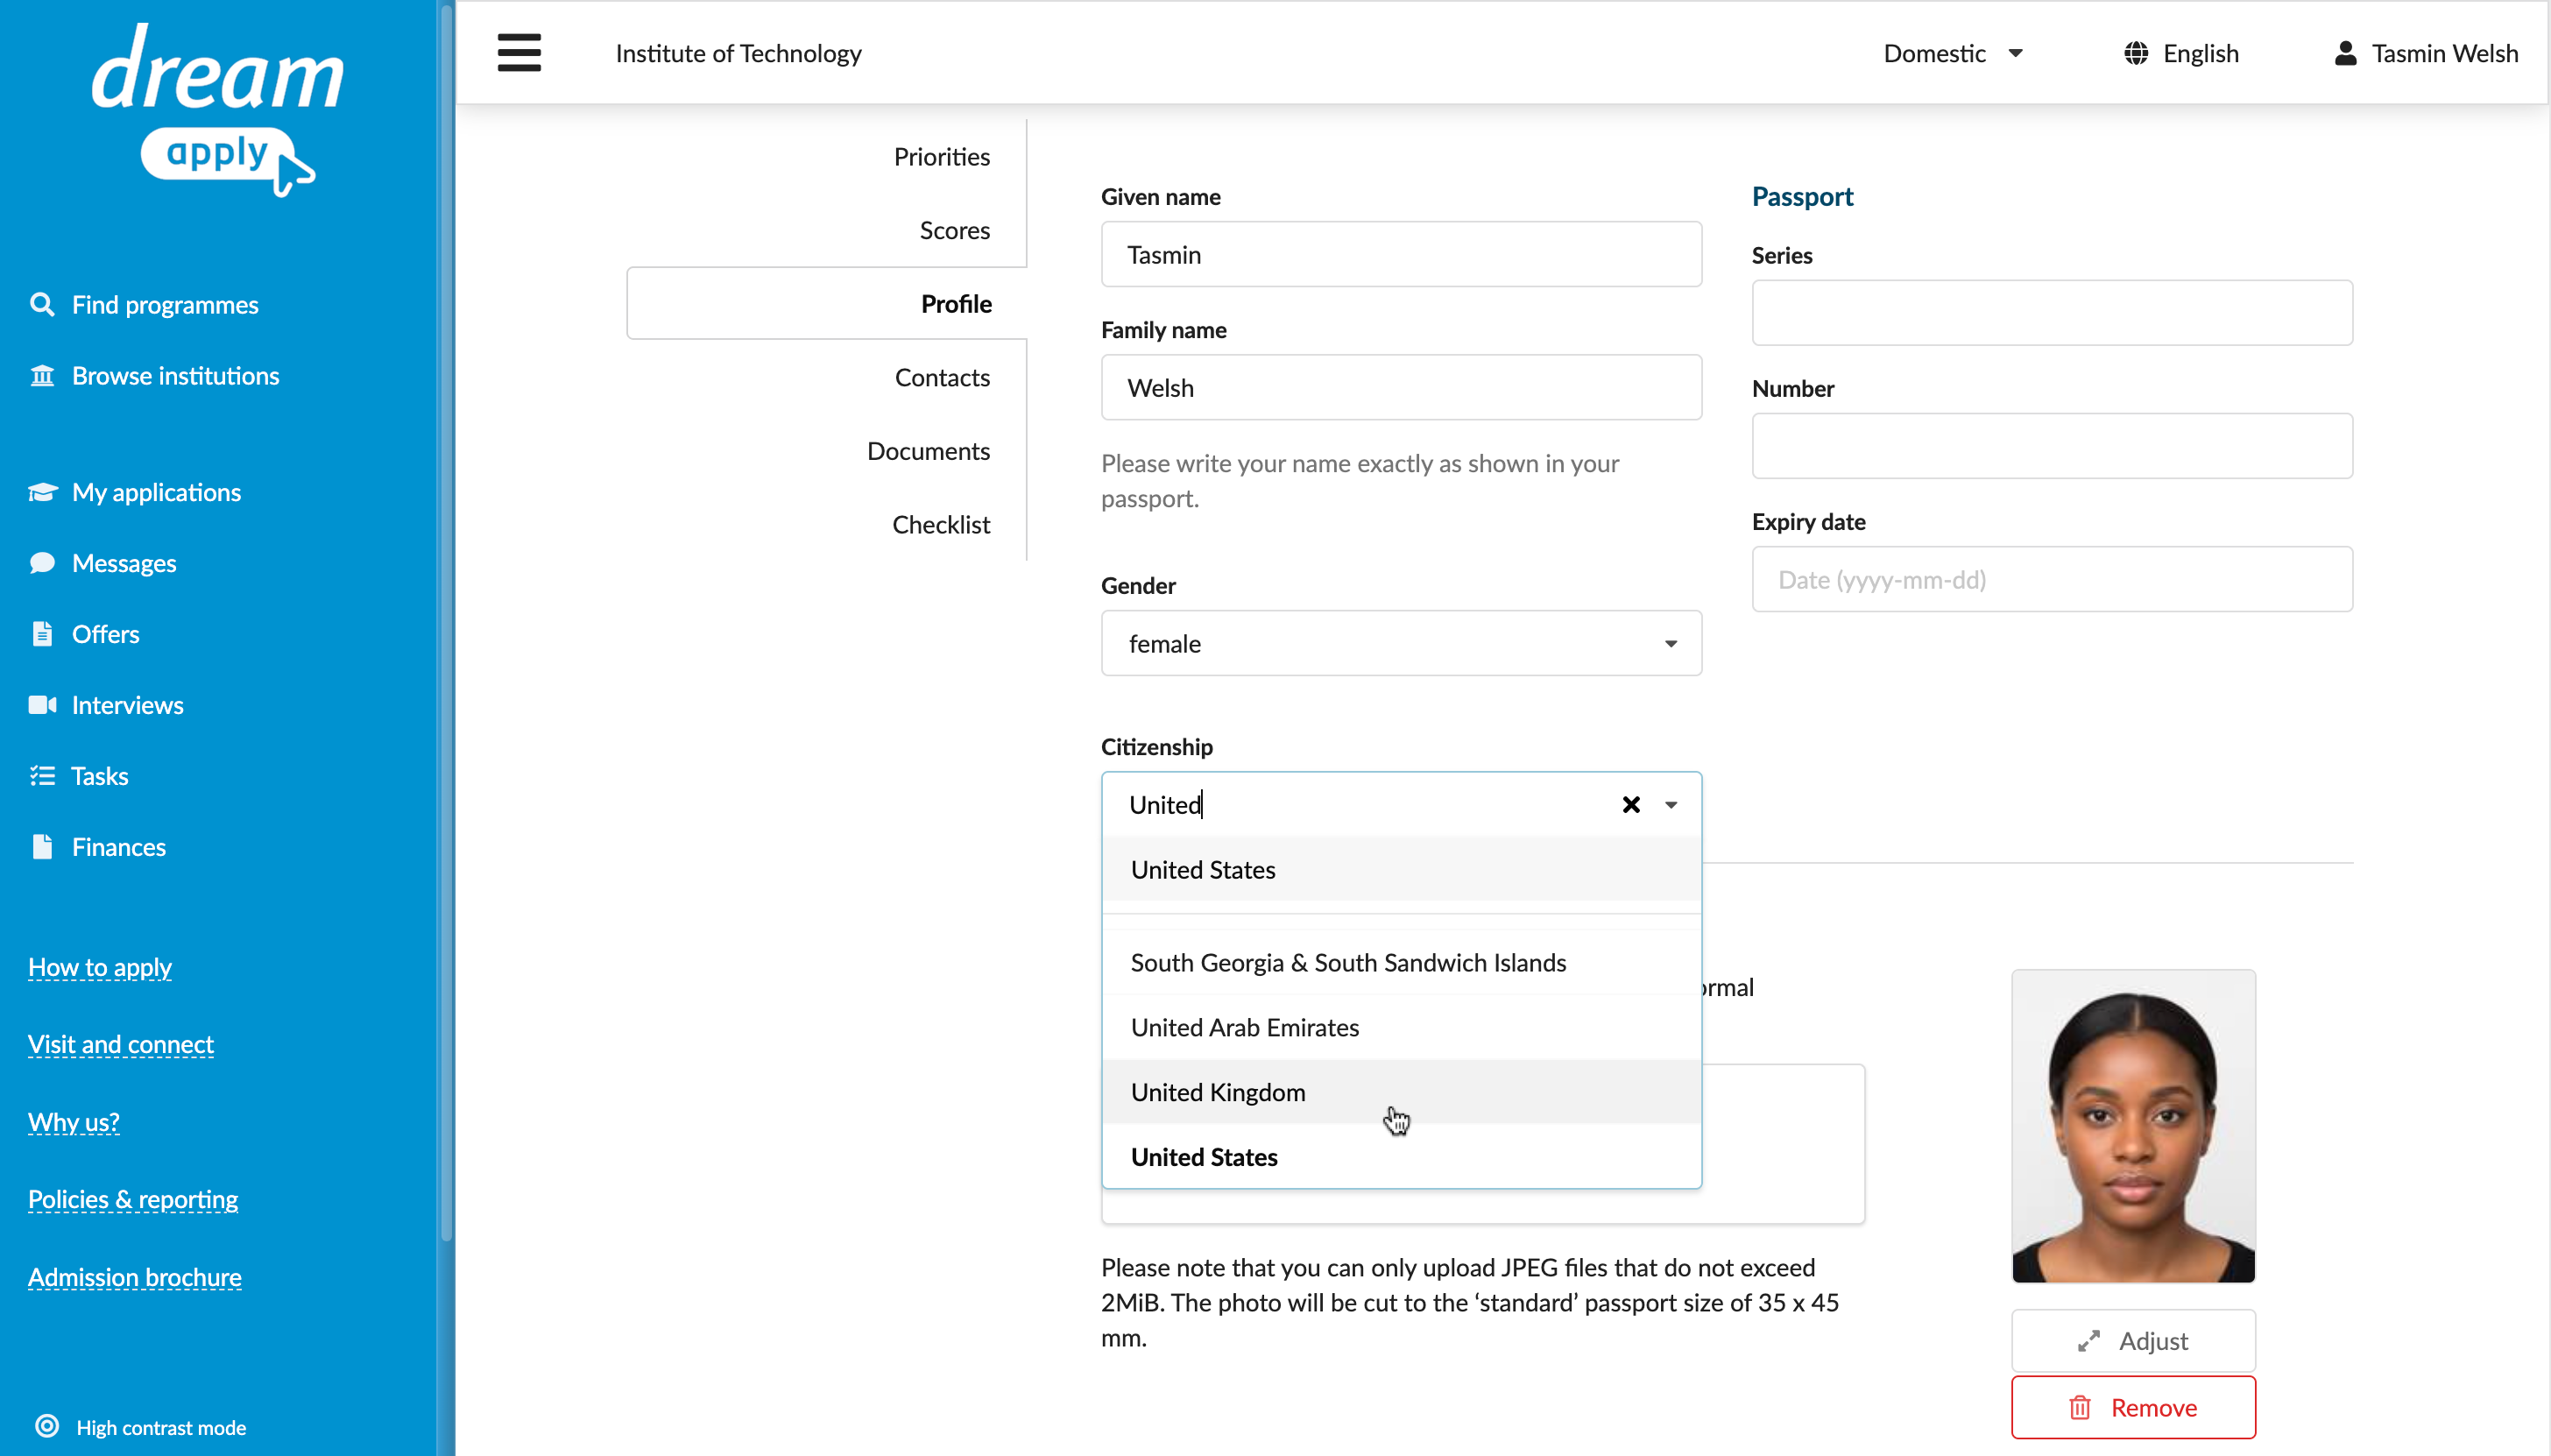
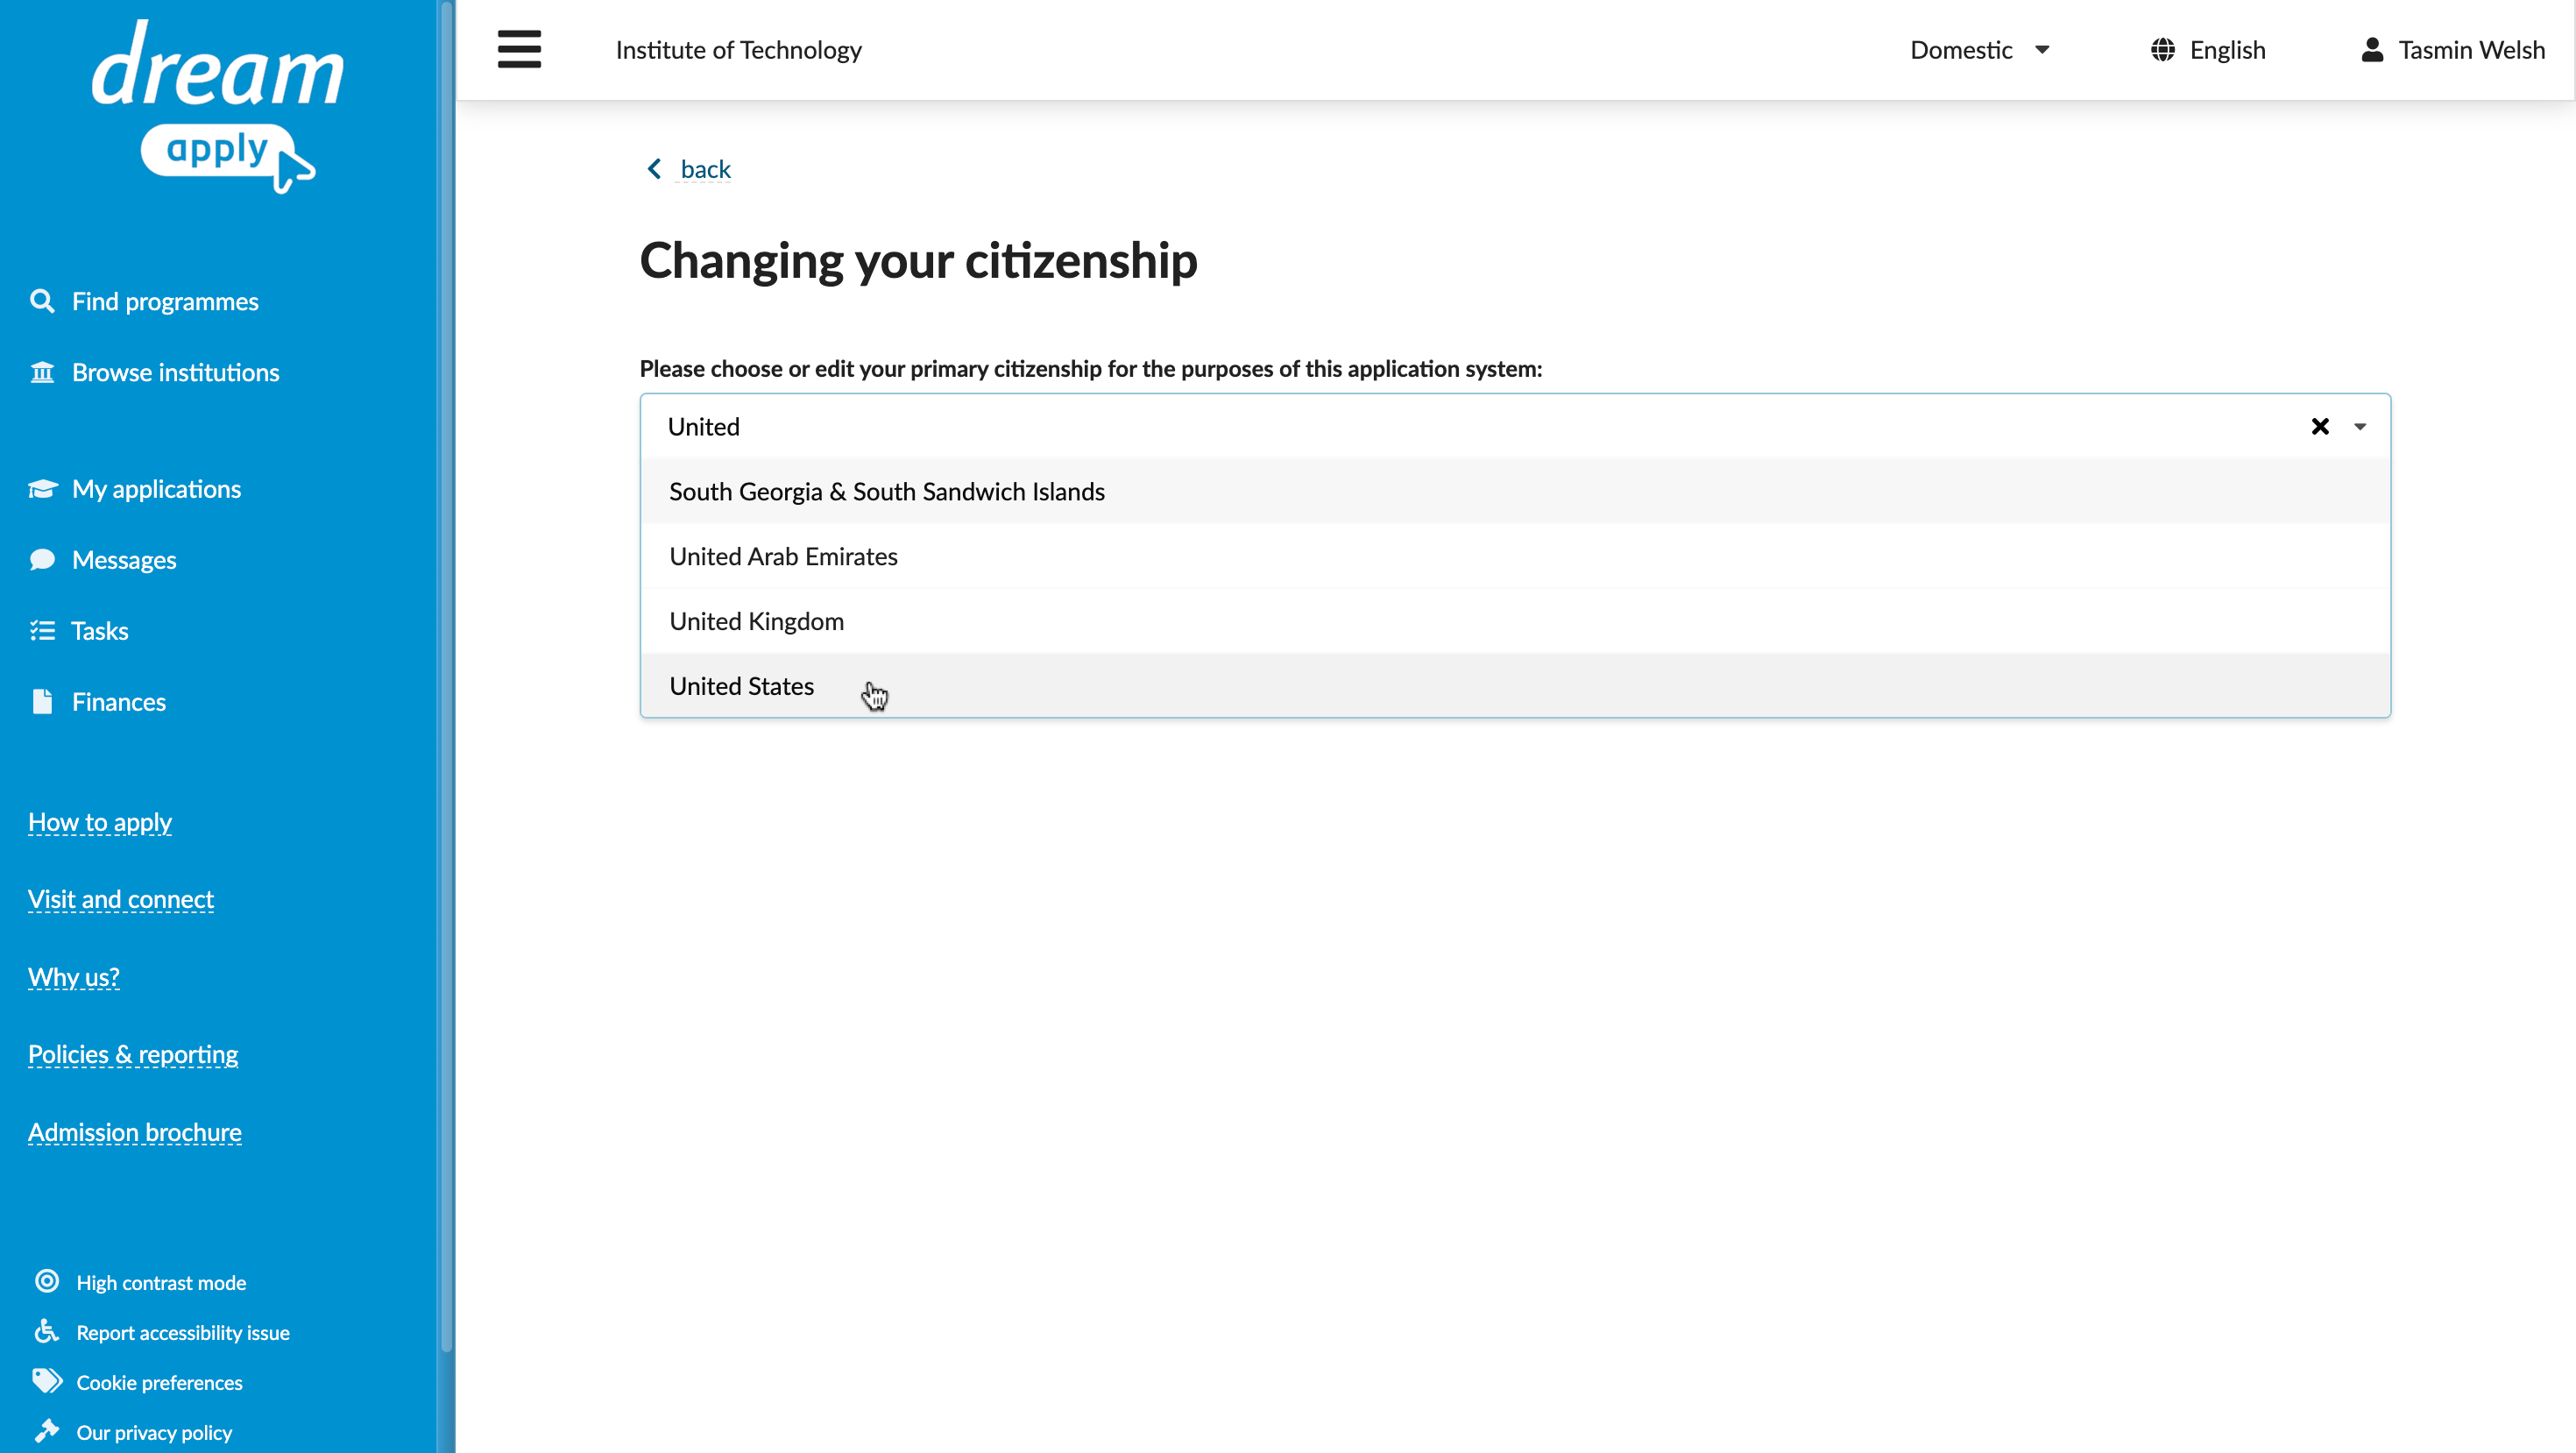
How can I update my citizenship information?
You may need to change your citizenship information if you have noticed an error in your profile or your citizenship status has changed since you applied.
The portal offers two options for changing your citizenship information, depending on whether you have already started or submitted an application:
Use this option if you have already submitted an application or created and saved it for later.
To change your citizenship information:
- In the main menu, select My applications.
- Choose to edit any application you have submitted or saved.
- In the Profile section, update your citizenship information.
- Re-submit or save your application.
Use this option if you have not yet submitted any applications.
To change your citizenship information:
- In the top right corner of the portal, click the profile icon and select My profile.
- In the Basic data section, click Change my citizenship.
- Update your citizenship information and click Continue.
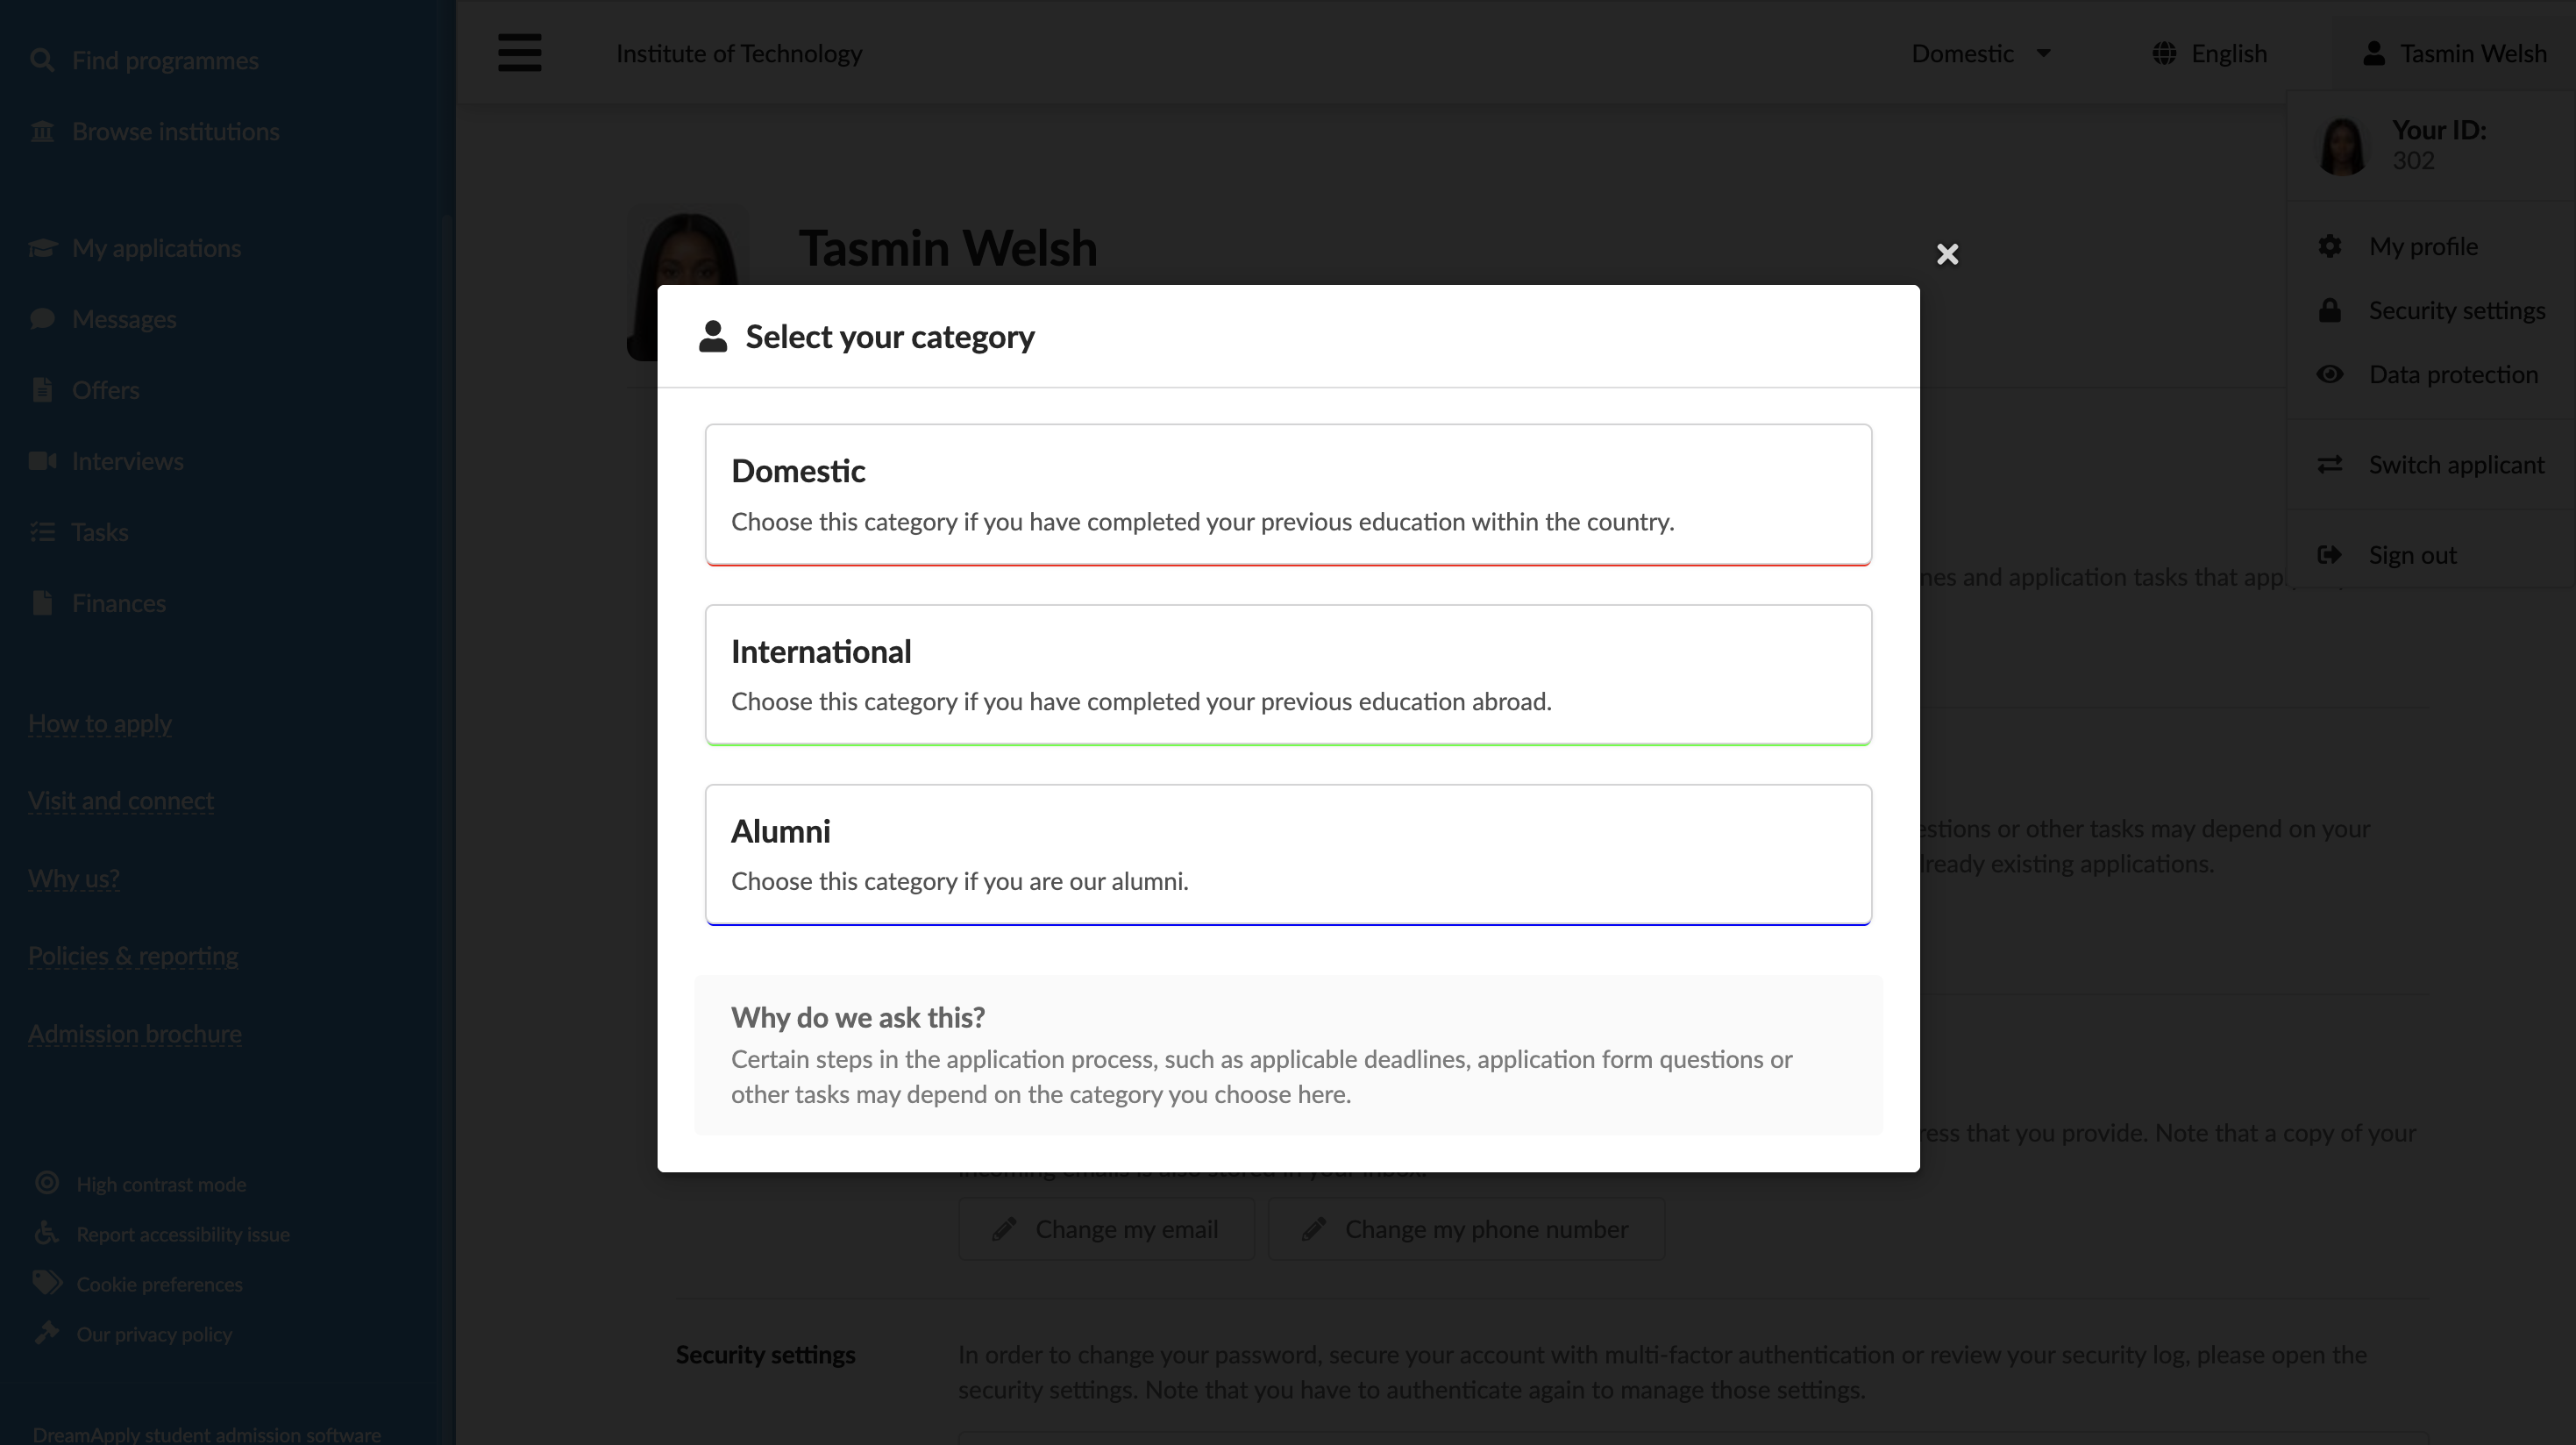
How can I change my applicant category?
You may need to change your applicant category if your study background or admission status changes. For example, you might have applied as a Domestic applicant, but later need to apply as an International applicant.
The category option is only available if your institution uses applicant categories in the admission process.
To change your category:
- For desktop: At the top right of the portal, click the category list and select a new category. Alternatively, in the top right corner, click the profile icon, select My profile and in the Applicant category section, click Change my category.
- For mobile: In the top right corner, click the profile icon, select My profile and in the Applicant category section, click Change my category.
How can I unsubscribe from emails?
If you no longer want to receive automatic email messages from the portal, you can unsubscribe from them. You will still receive the messages that you request explicitly, for example, when logging in with a one-time link.
To unsubscribe from email messages:
- In the top right corner of the portal, click the profile icon and select My profile.
- In the Email unsubscribe section, select the unsubscribe from all email messages check box.
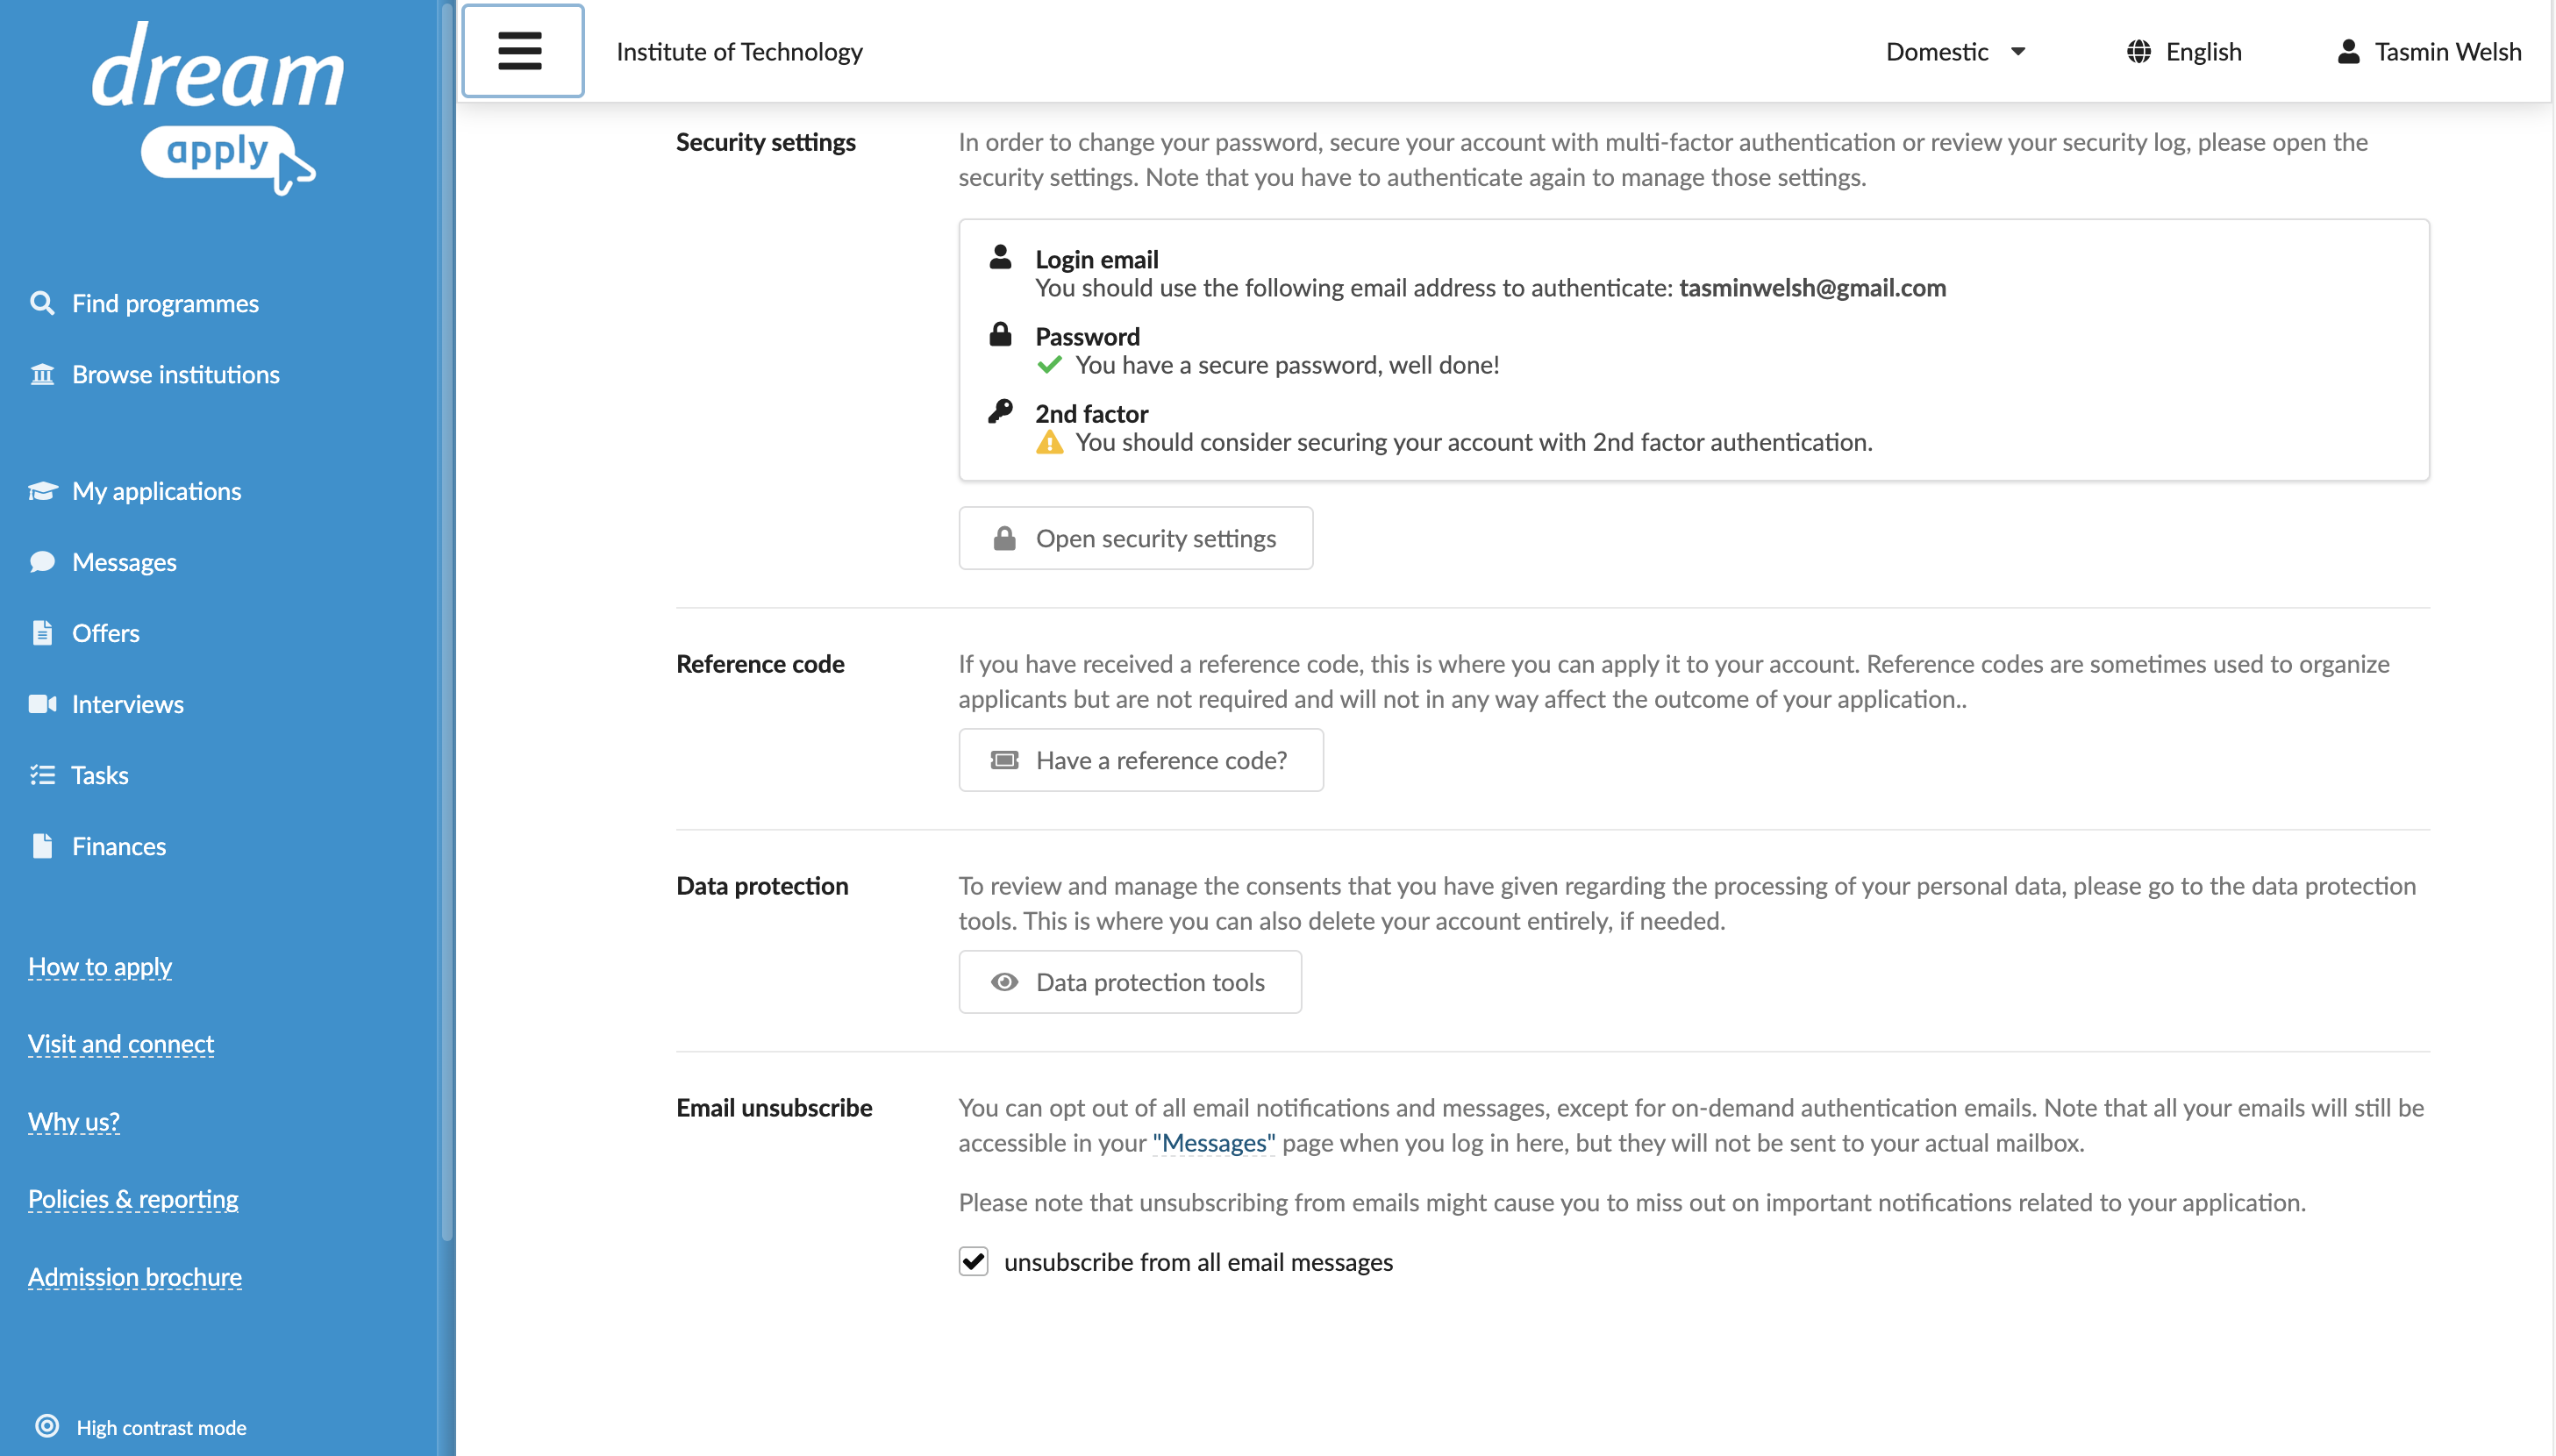
How can I enter a reference code?
You may need to enter a reference code if your institution uses campaigns or referral programs to link applicants to a specific source, event or partner organization.
The reference code option can only be applied if your institution uses campaigns in the admission process.
To enter a reference code:
- In the top right corner of the portal, click the profile icon and select My profile.
- In the Reference code section, click Have a reference code?, enter the code and click Continue.

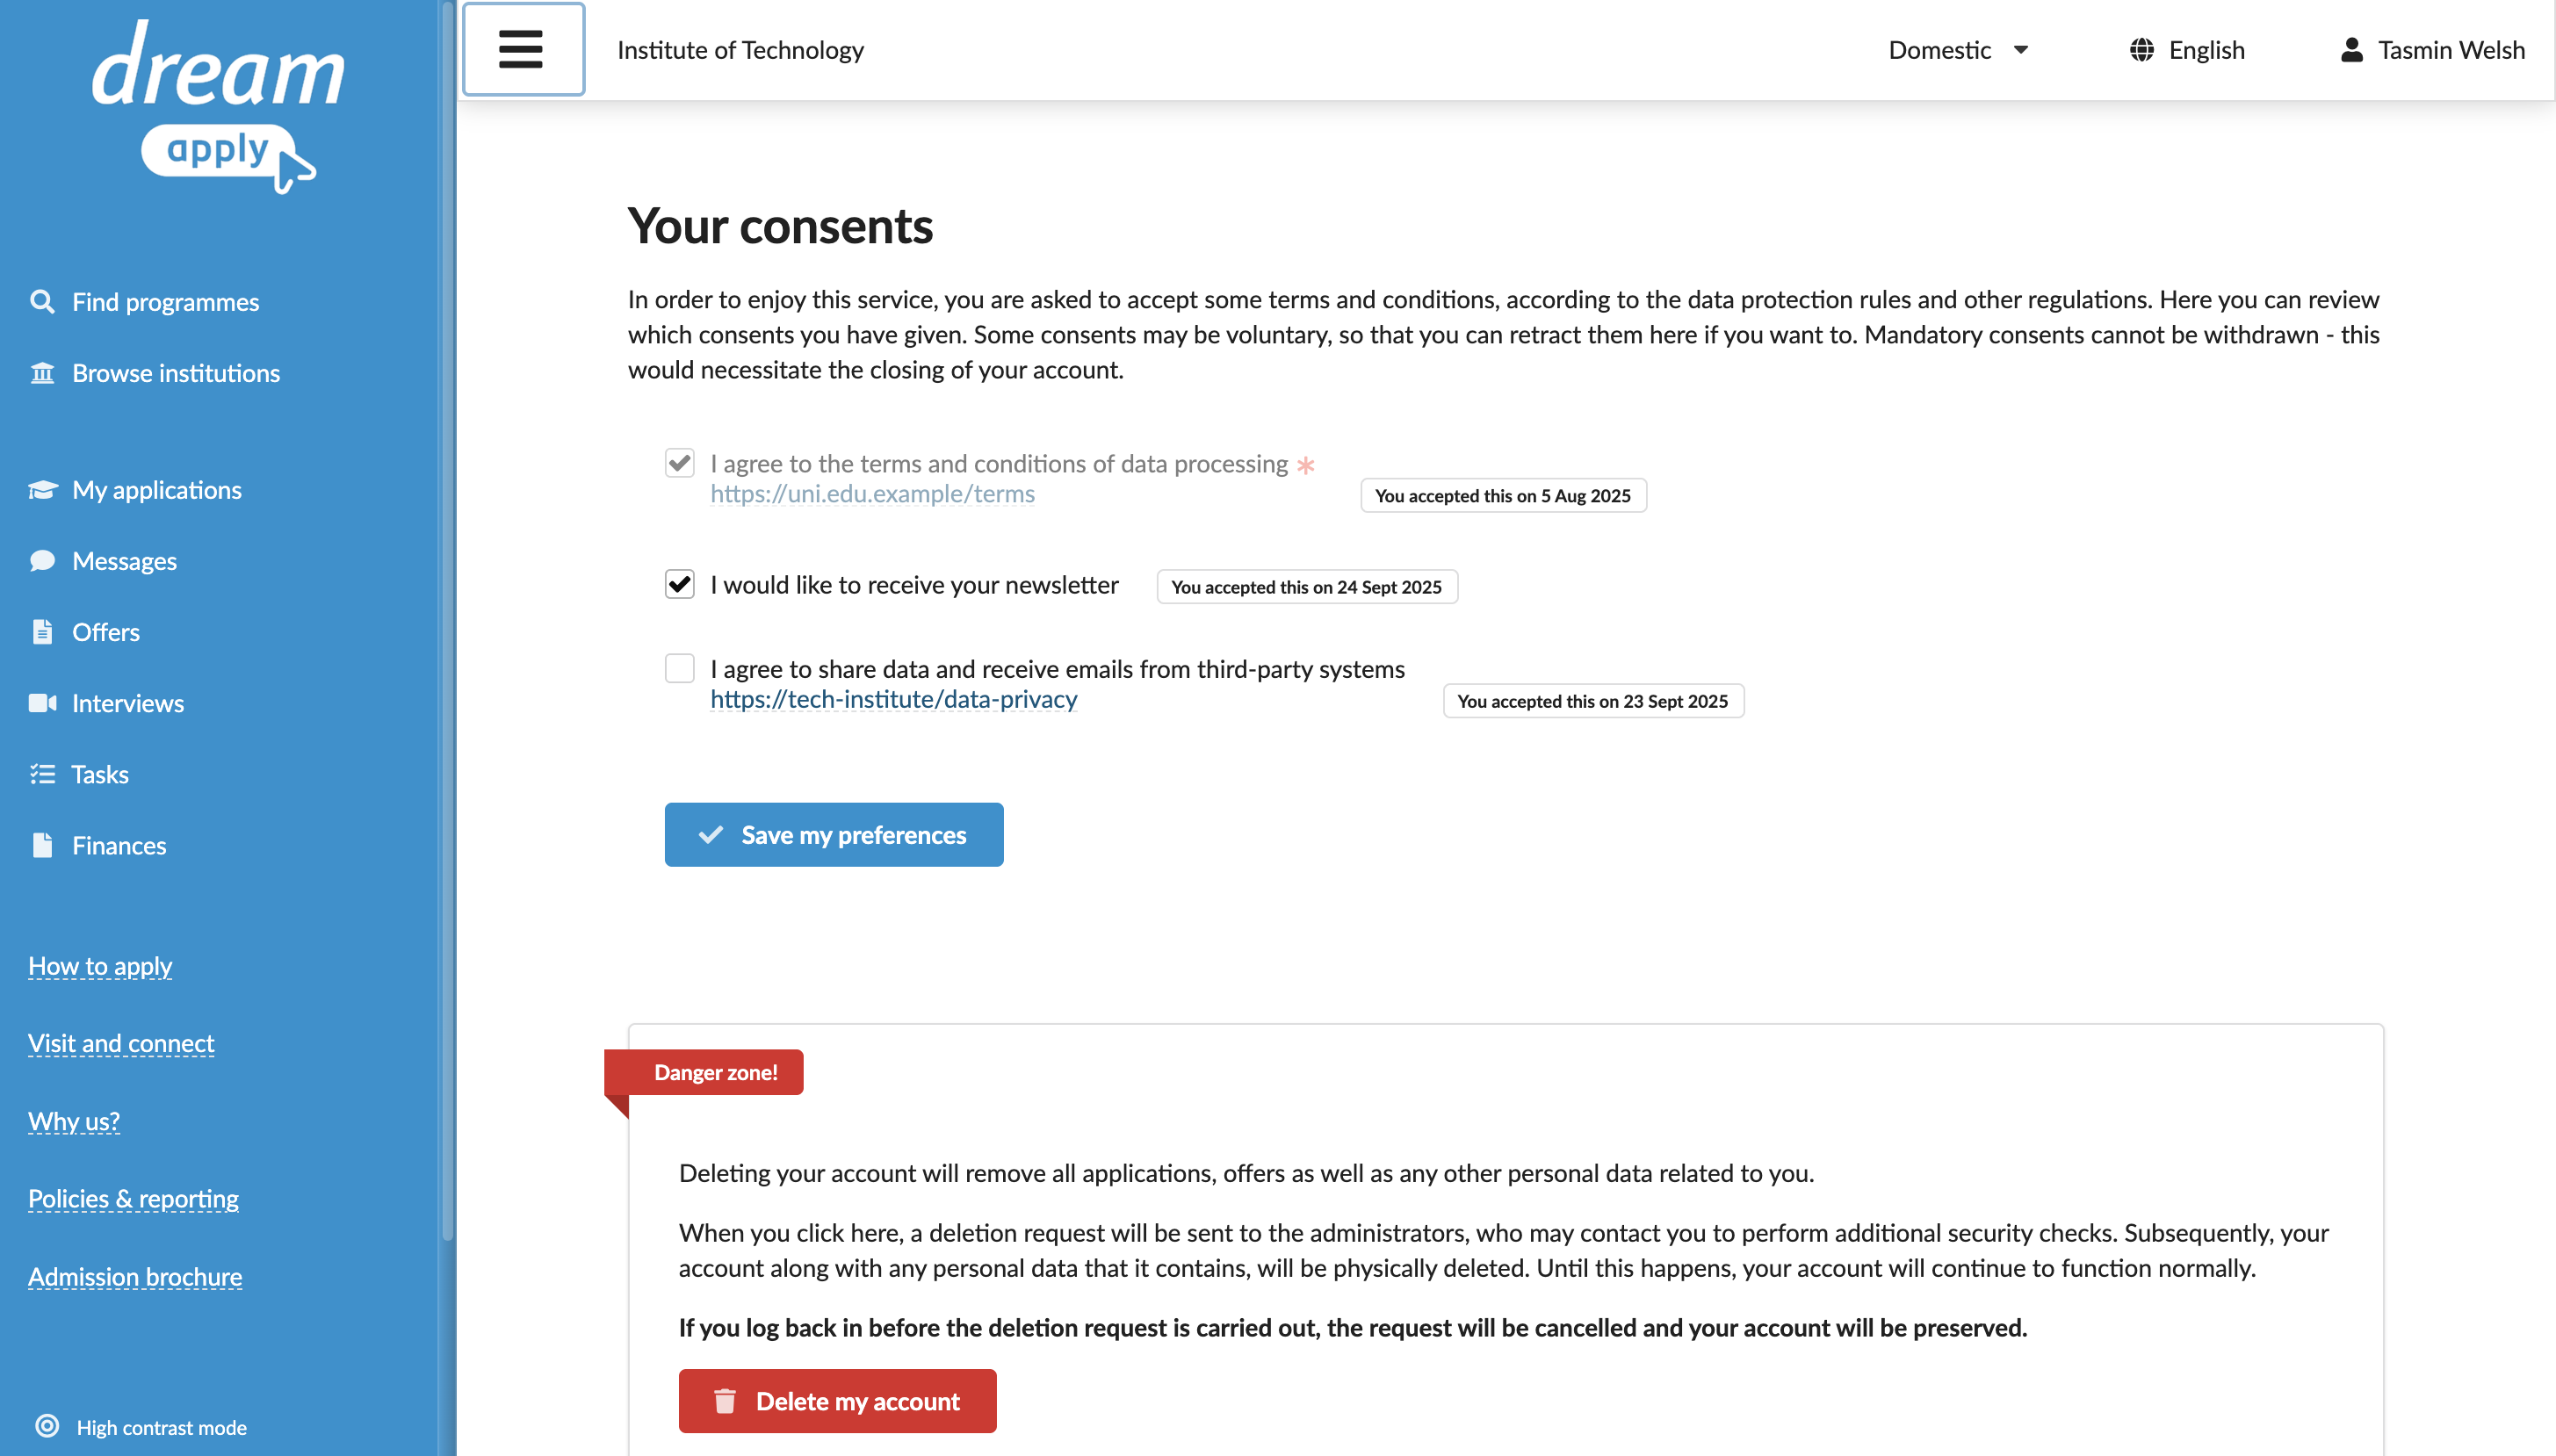
How can I manage my consent preferences?
During the registration process, you are asked to give your consent for certain actions, such as allowing the institution to send newsletters. Some consents are mandatory and are required to submit your application. Others are voluntary and can be managed at any time.
To change your decision for voluntary consents:
- In the top right corner of the portal, click the profile icon and select My profile.
- In the Data protection section section, click Data protection tools.
- Select or clear check boxes next to voluntary consents and click Save my preferences.
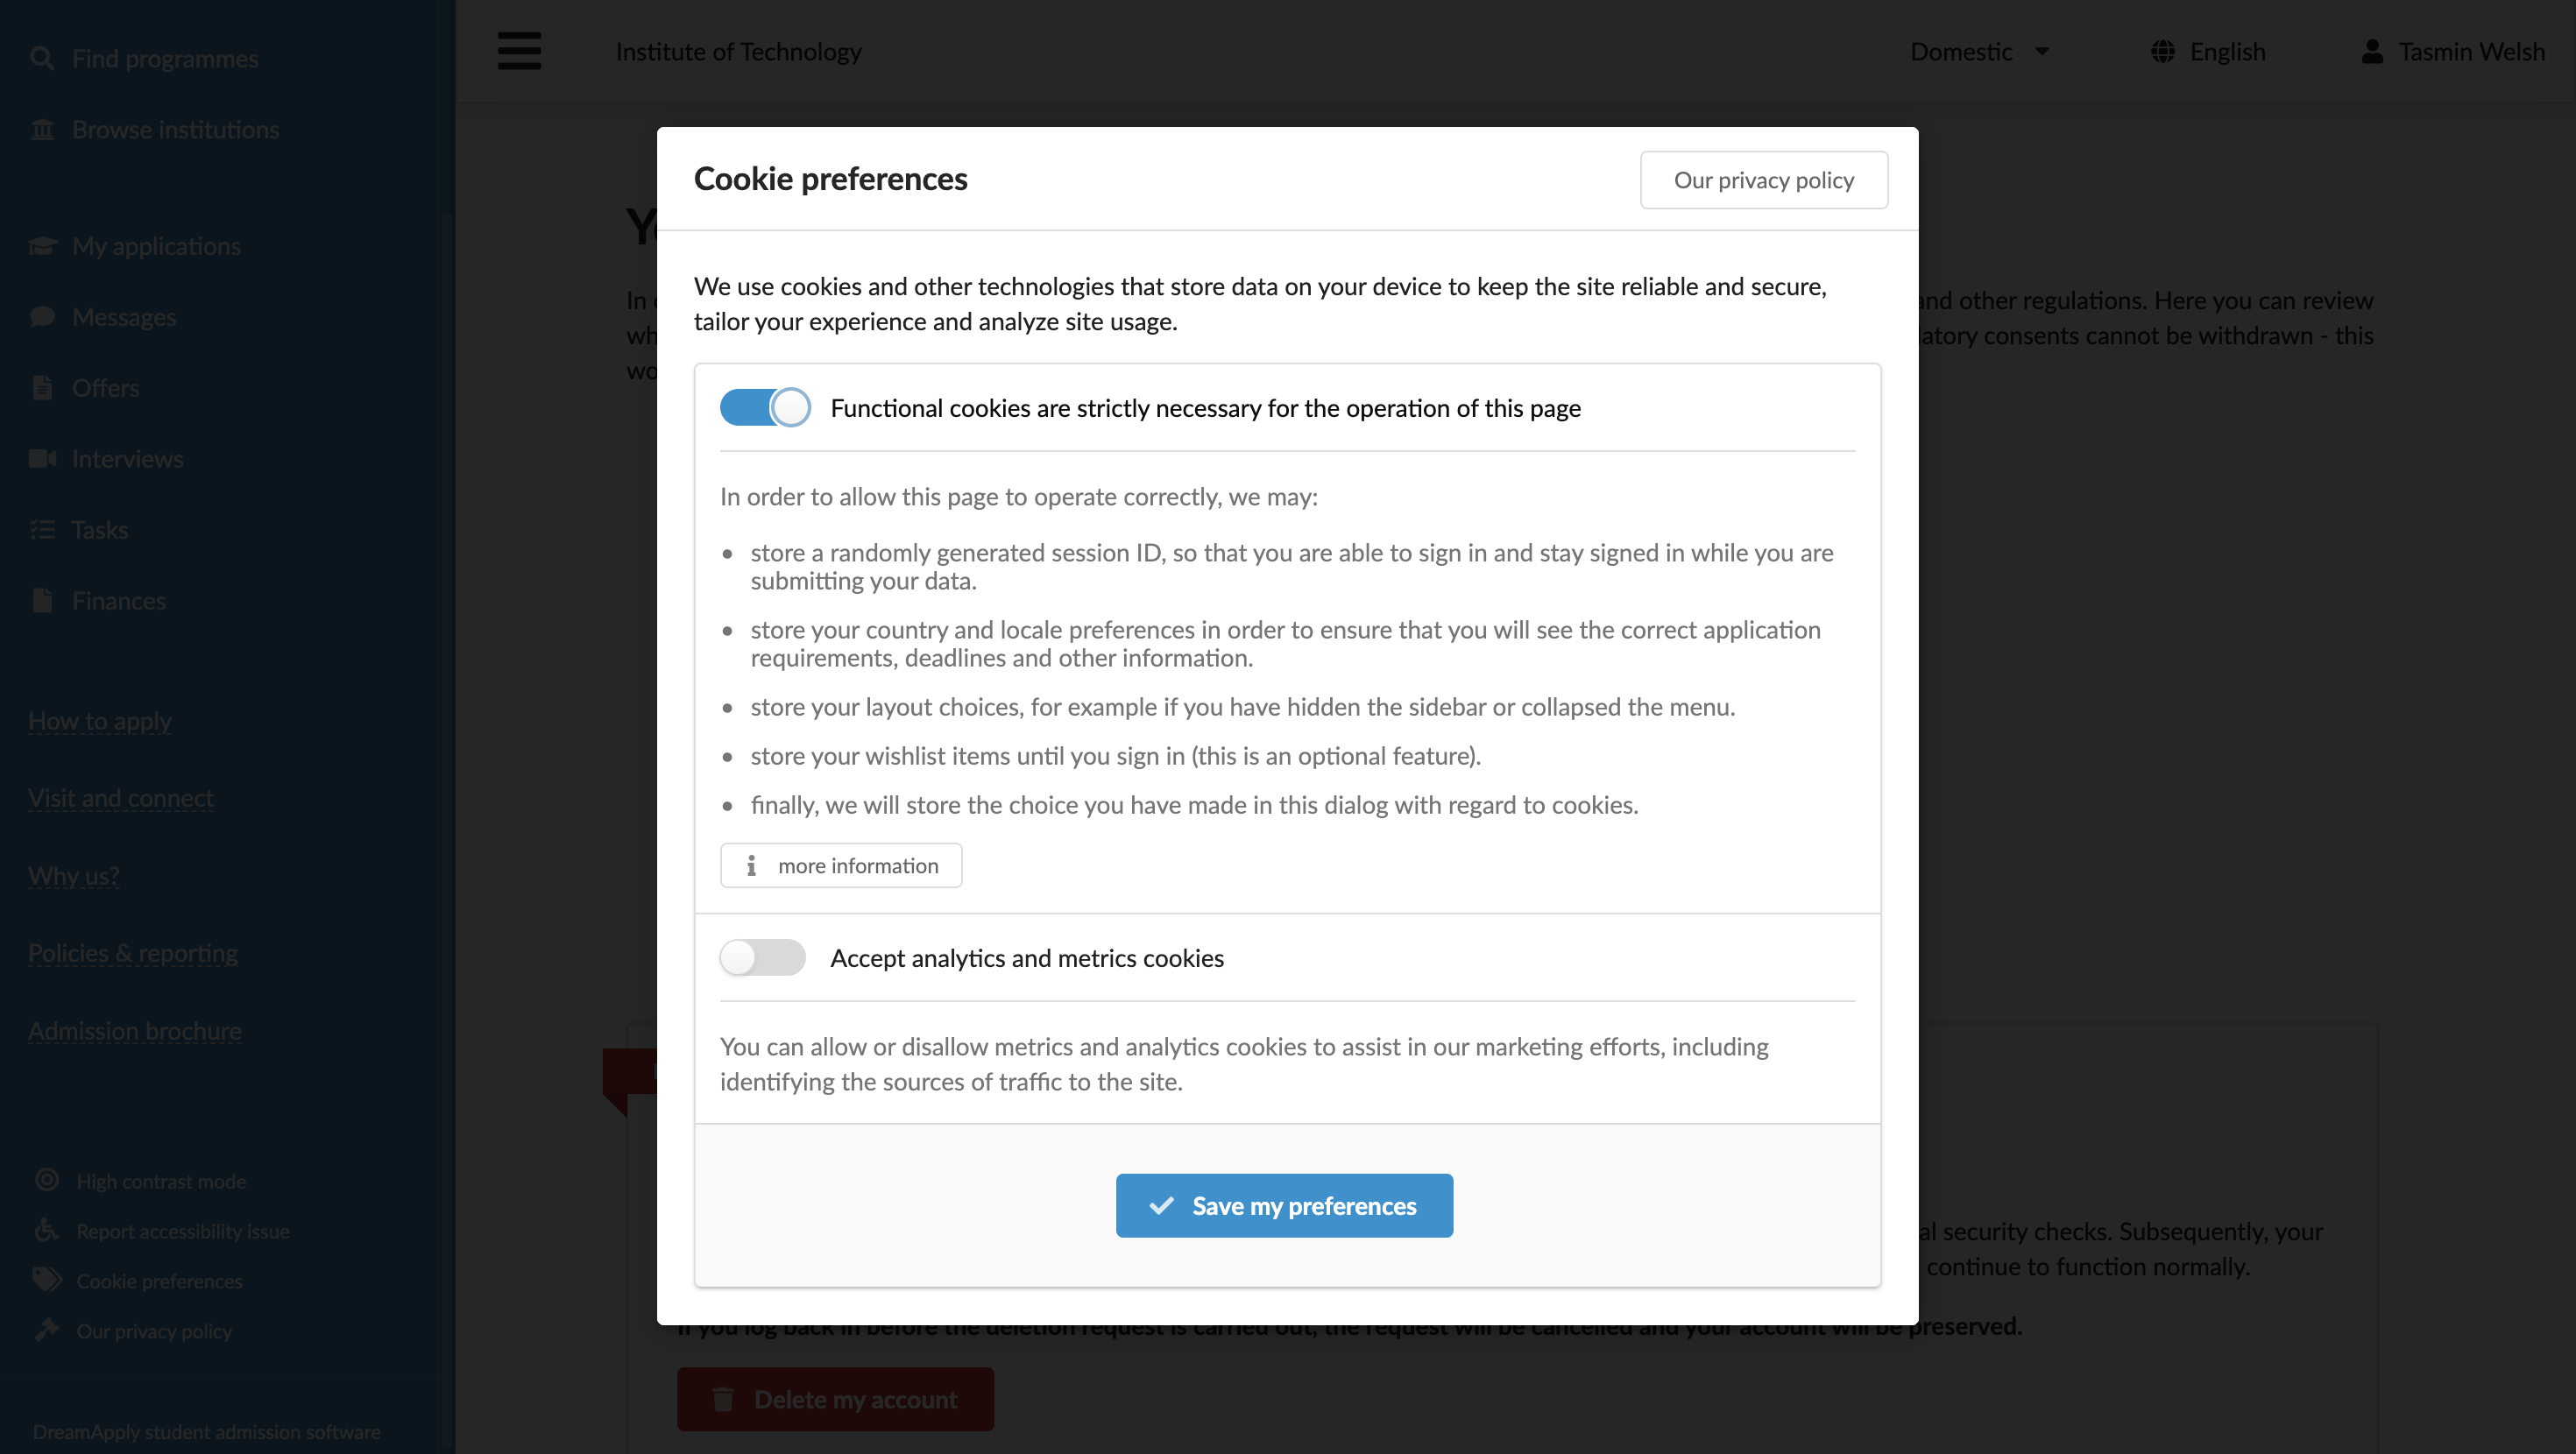
How can I manage my cookie preferences?
When you first open the portal, you see a cookie consent banner asking you to agree to how cookies are used. Cookies help the portal work properly and improve your experience. Some of them are strictly necessary for the portal to operate. Others, such as marketing cookies, are optional and are used for analytics purposes.
You can change your decision about optional cookies at any time.
To manage cookies:
- At the bottom of the main menu, click Cookie preferences.
- Specify how cookies must be used and click Save my preferences.
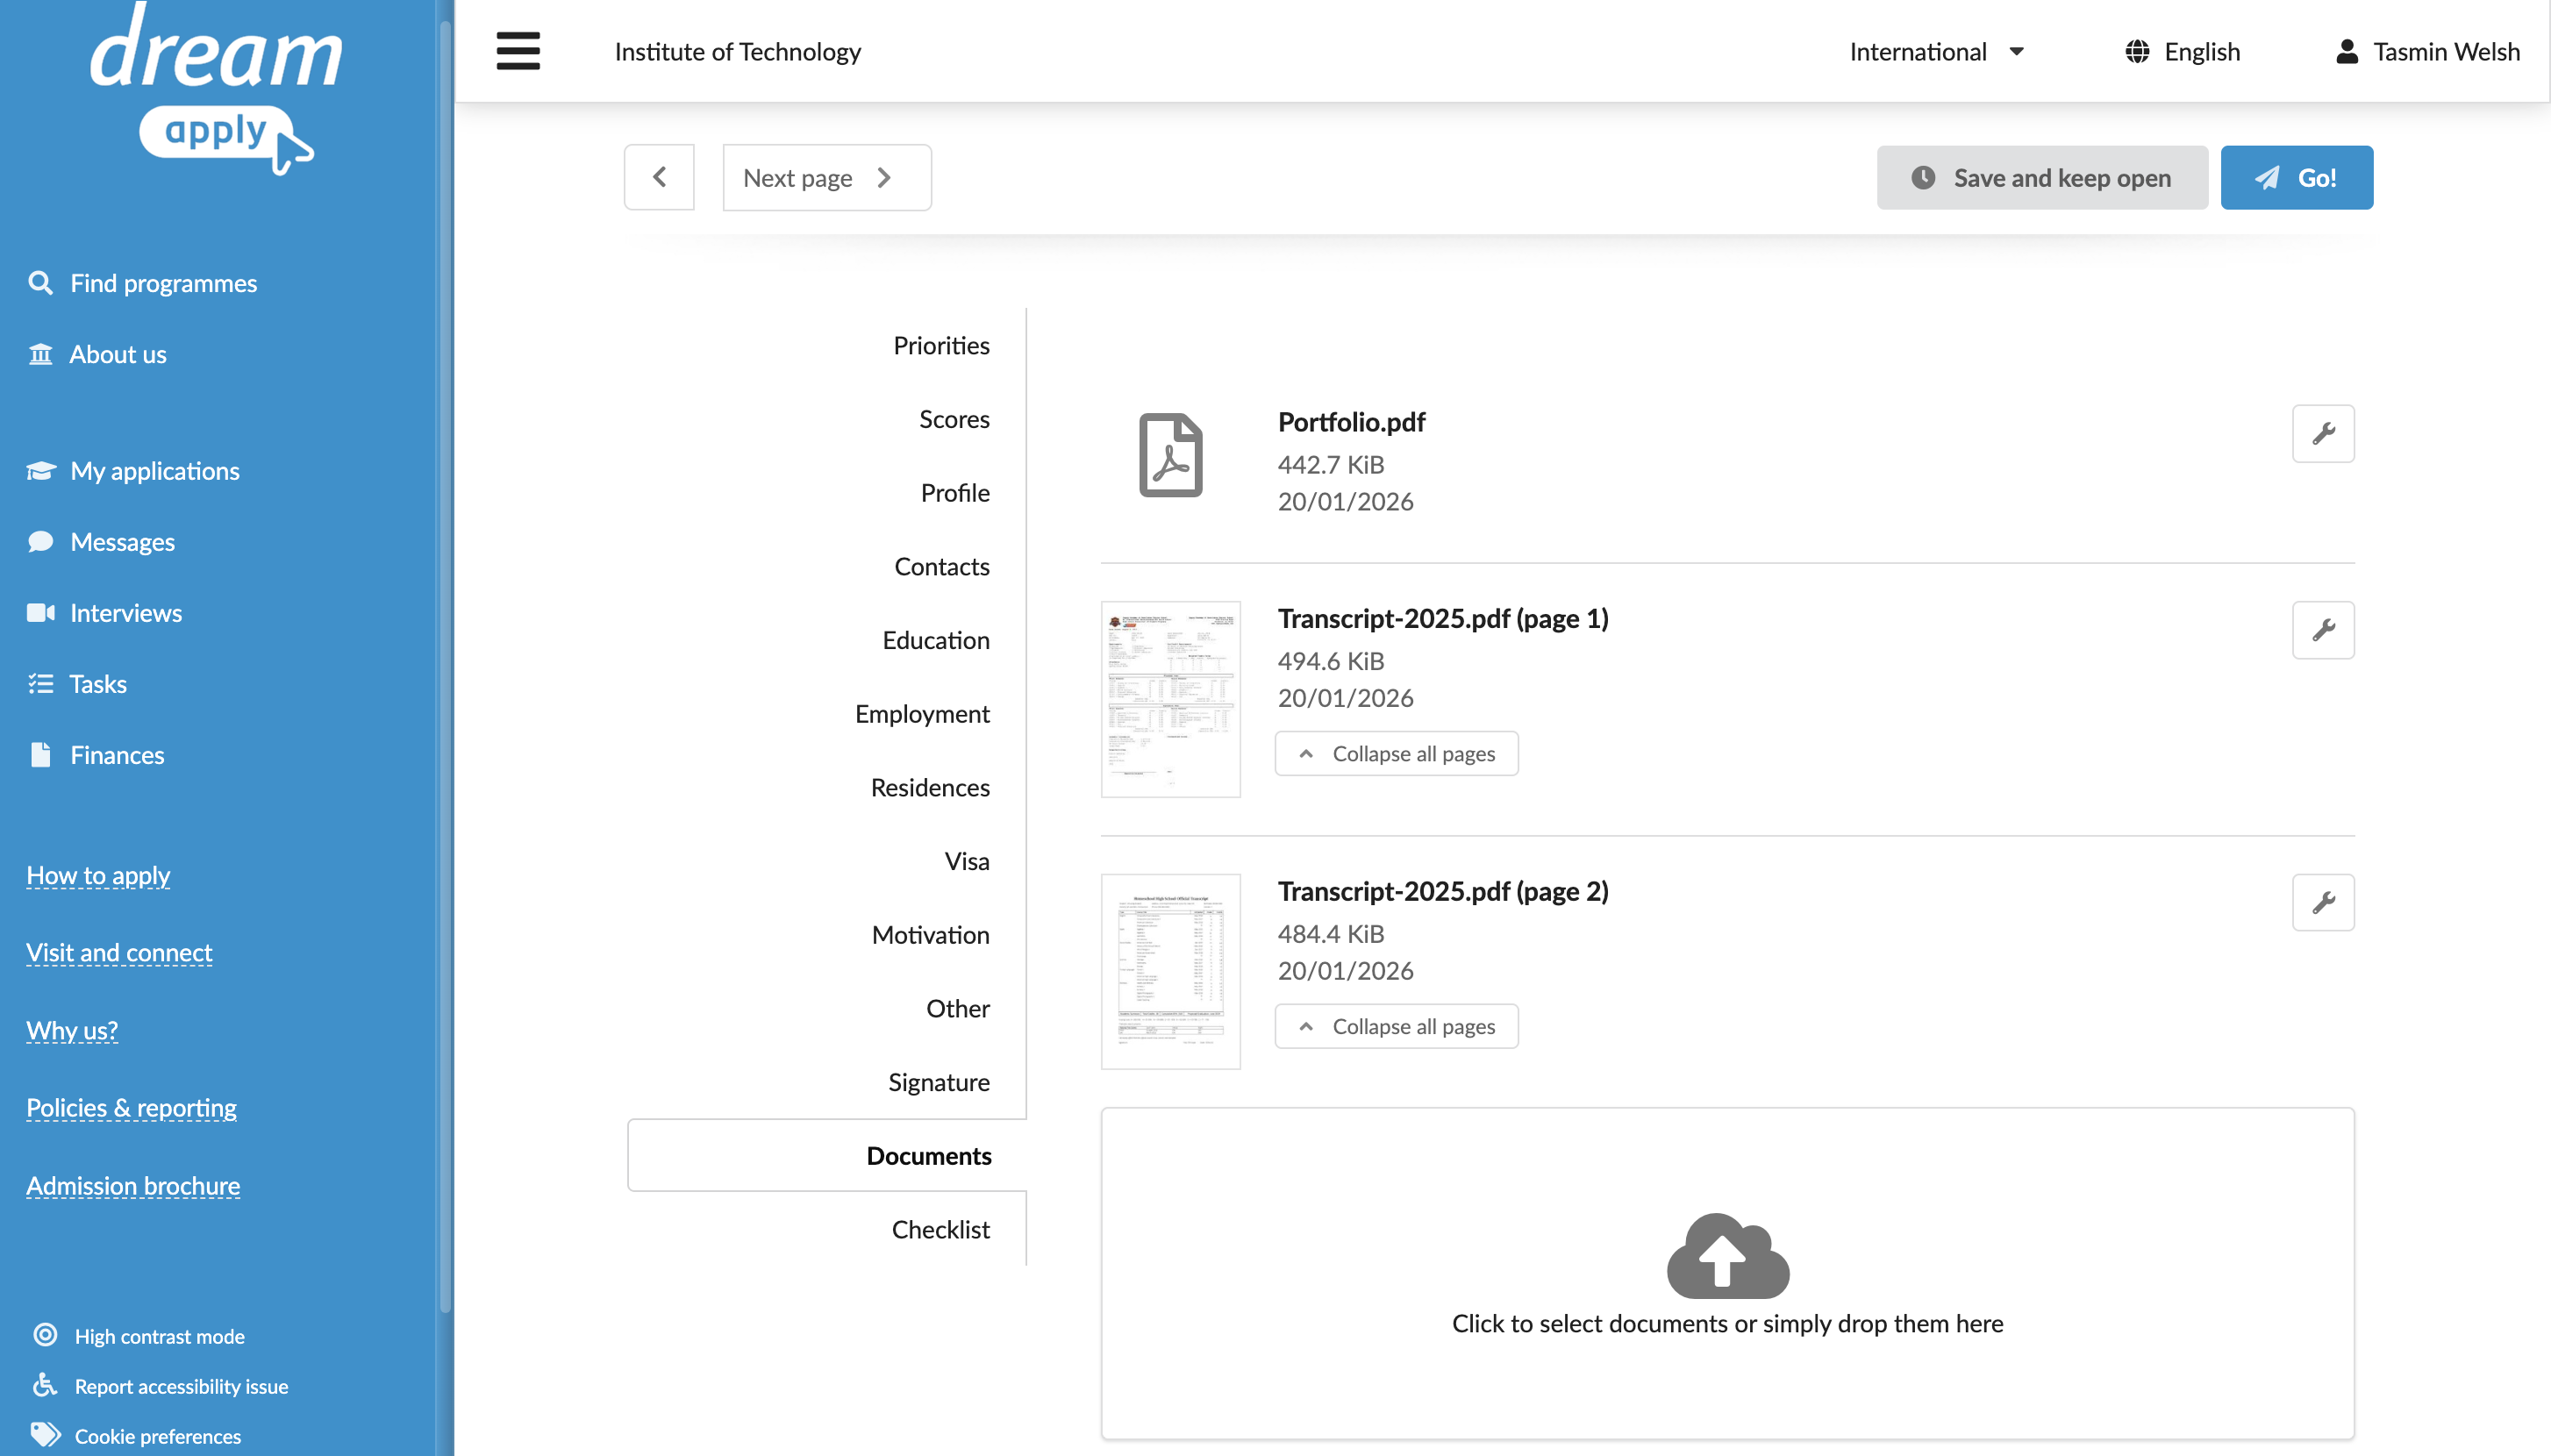
Why isn't my PDF file converted into separate JPEG previews?
When you upload documents through the application form or tasks, the portal processes PDF files based on the number of pages:
- PDFs with 9 pages or fewer: The portal converts the document into JPEG images, with one PDF page per image. In the document list, each page is presented as a separate file with a thumbnail that shows the page content for easier preview. To open the page in full preview mode, click its thumbnail.
- PDFs with more than 9 pages: The portal uploads the document as a single PDF file. In the document list, the file is shown with a PDF icon instead of an individual page thumbnail. To download a document, click it in the list.
This limit helps the portal process larger documents reliably and consistently.
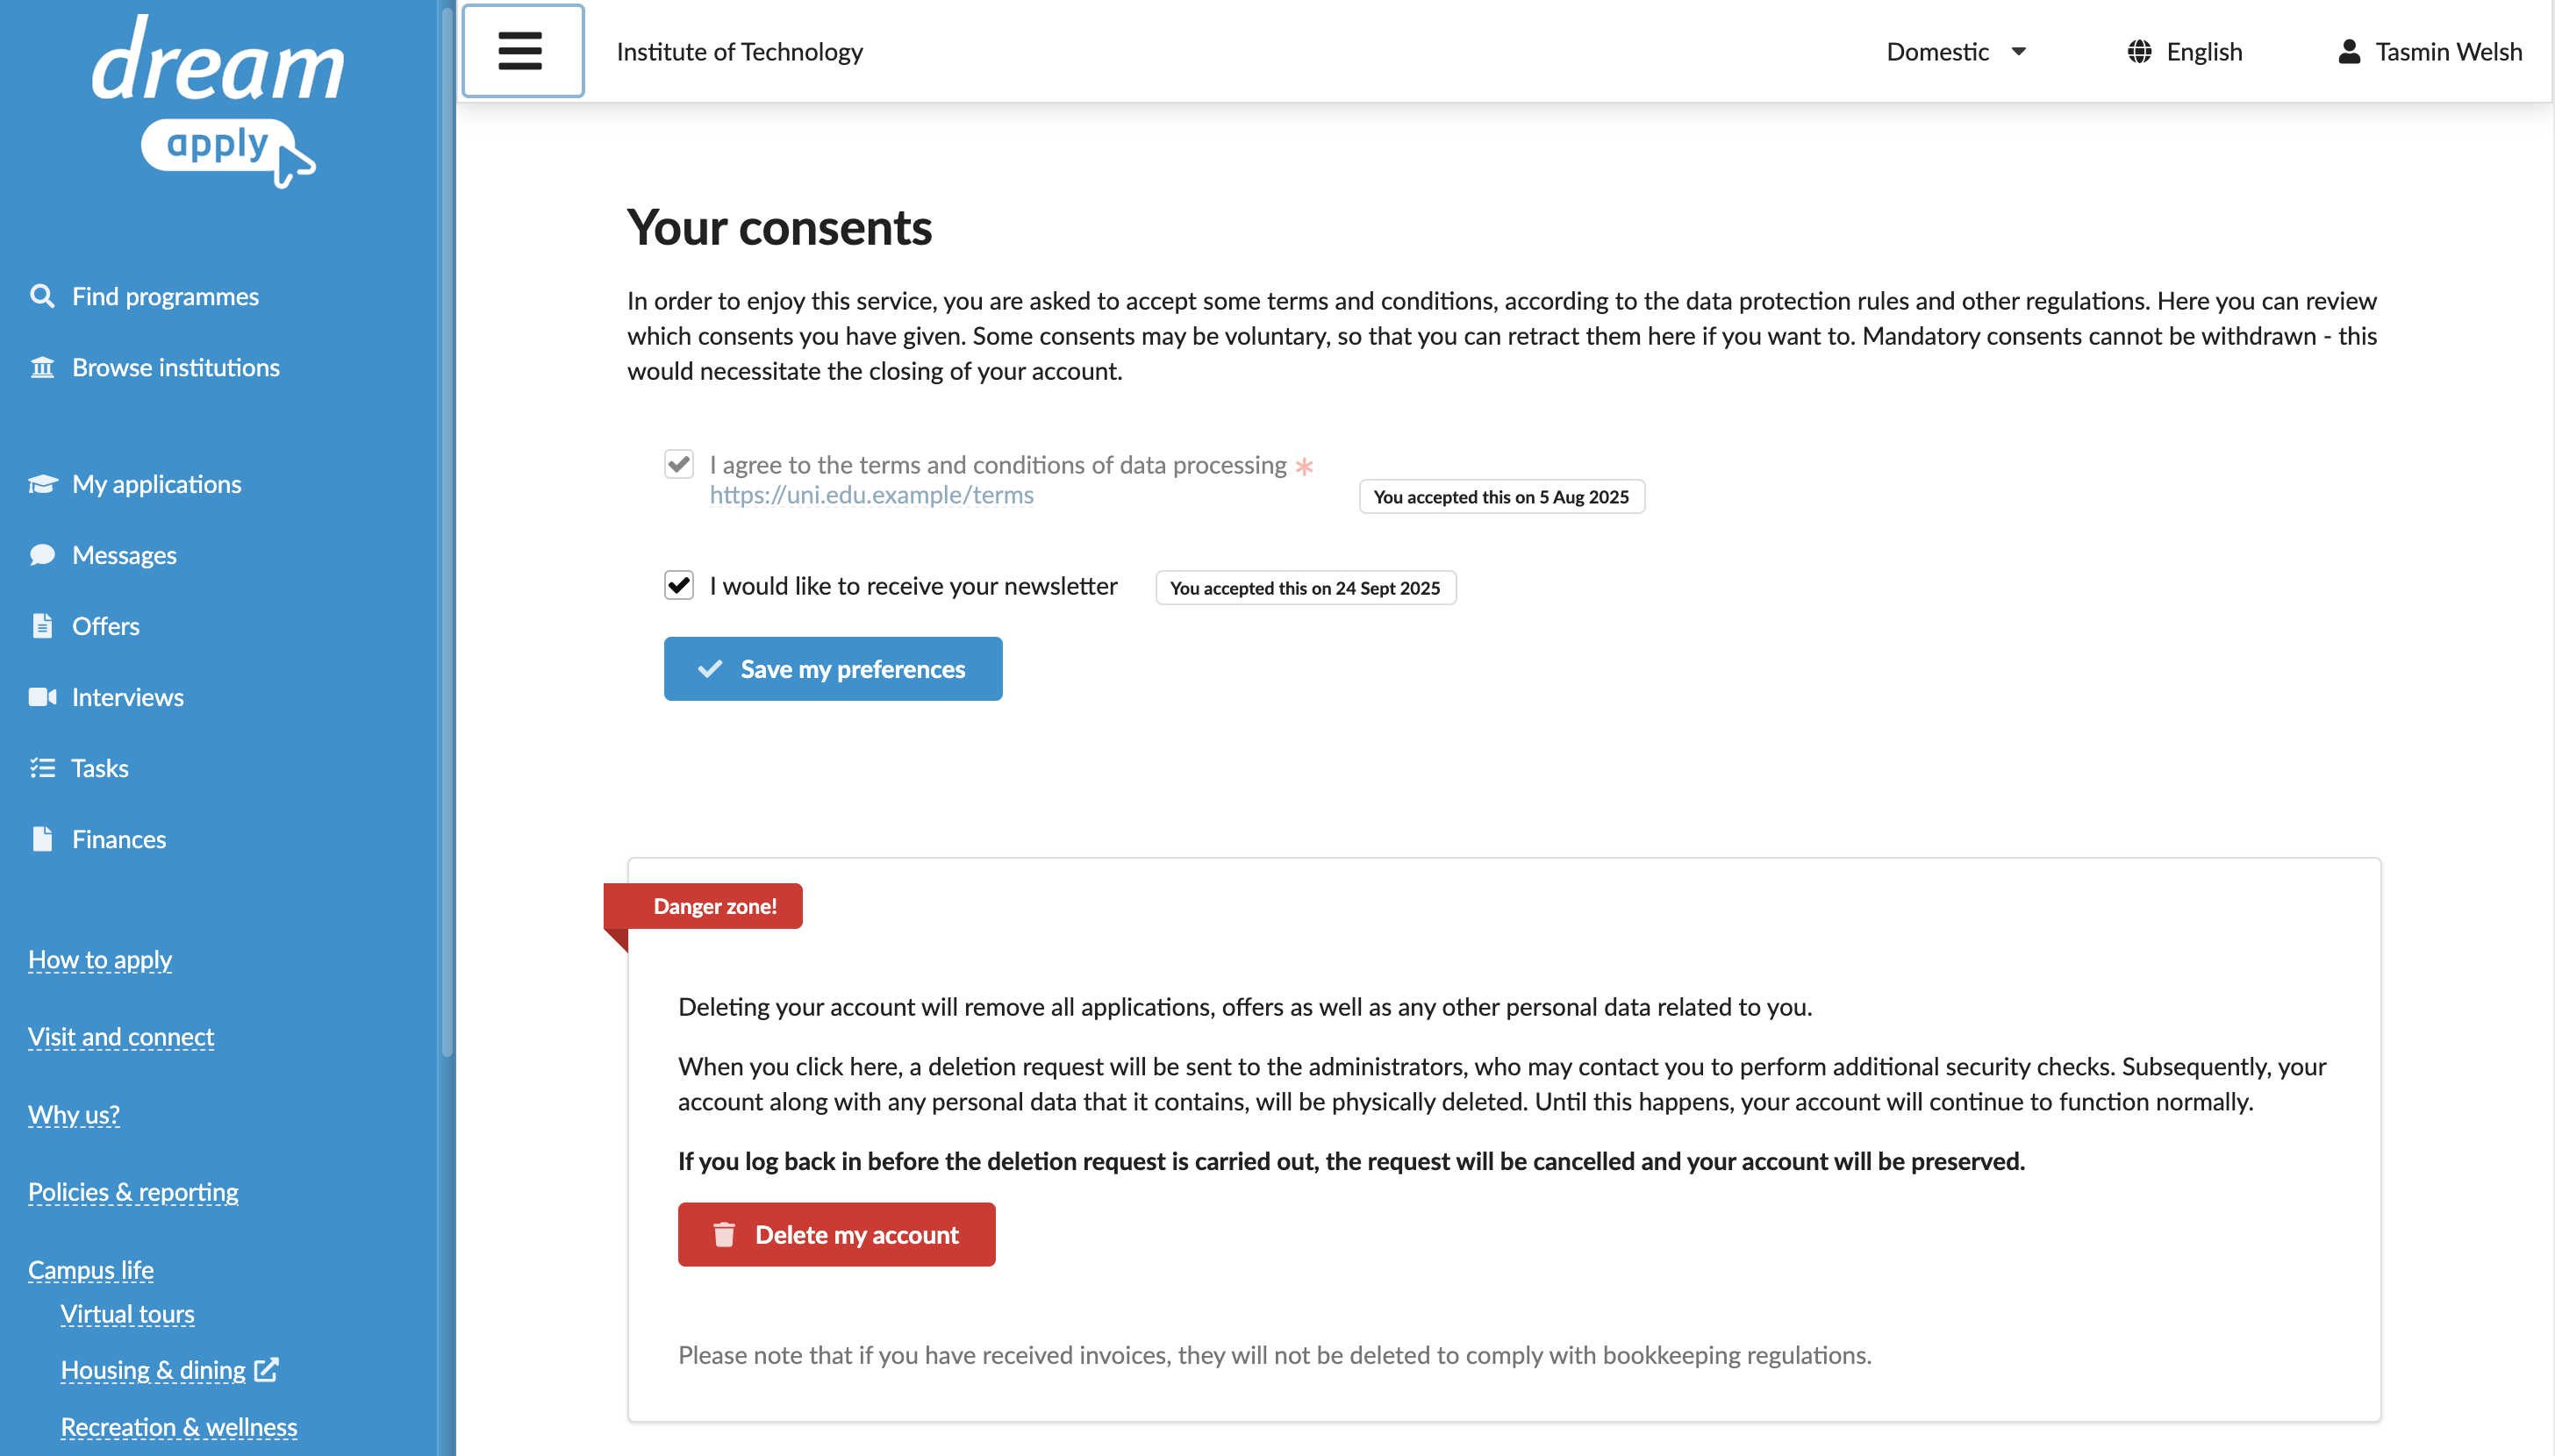
How can I delete my account and data?
If you no longer plan to apply using the portal or wish to withdraw your personal details, you can delete your account.
When you delete your account, the system deletes your personal data, application data and uploaded documents for the specific institution you are currently interacting with. However, your login record and data in other institutions (if any) remain in the system. To fully remove your presence from the portal, see How can I check my linked institutions? and How can I delete my login record?
To delete your account:
- In the top right corner of the portal, click the profile icon and select Data protection.
- In the Danger zone section, click Delete my account.
The system will create a deletion request and send it to the institution. After the institution approves the request, your account will be deleted within 24 hours.
What should I do if I deleted my account by mistake?
If you have requested to delete your account by mistake, you can log in to the portal again. This will revert the deletion request and fully restore your account.
Please log in to the portal as soon as possible. Once the institution reviews and confirms your deletion request, your account and data will be permanently removed and cannot be restored.
Applicant roles and registrations
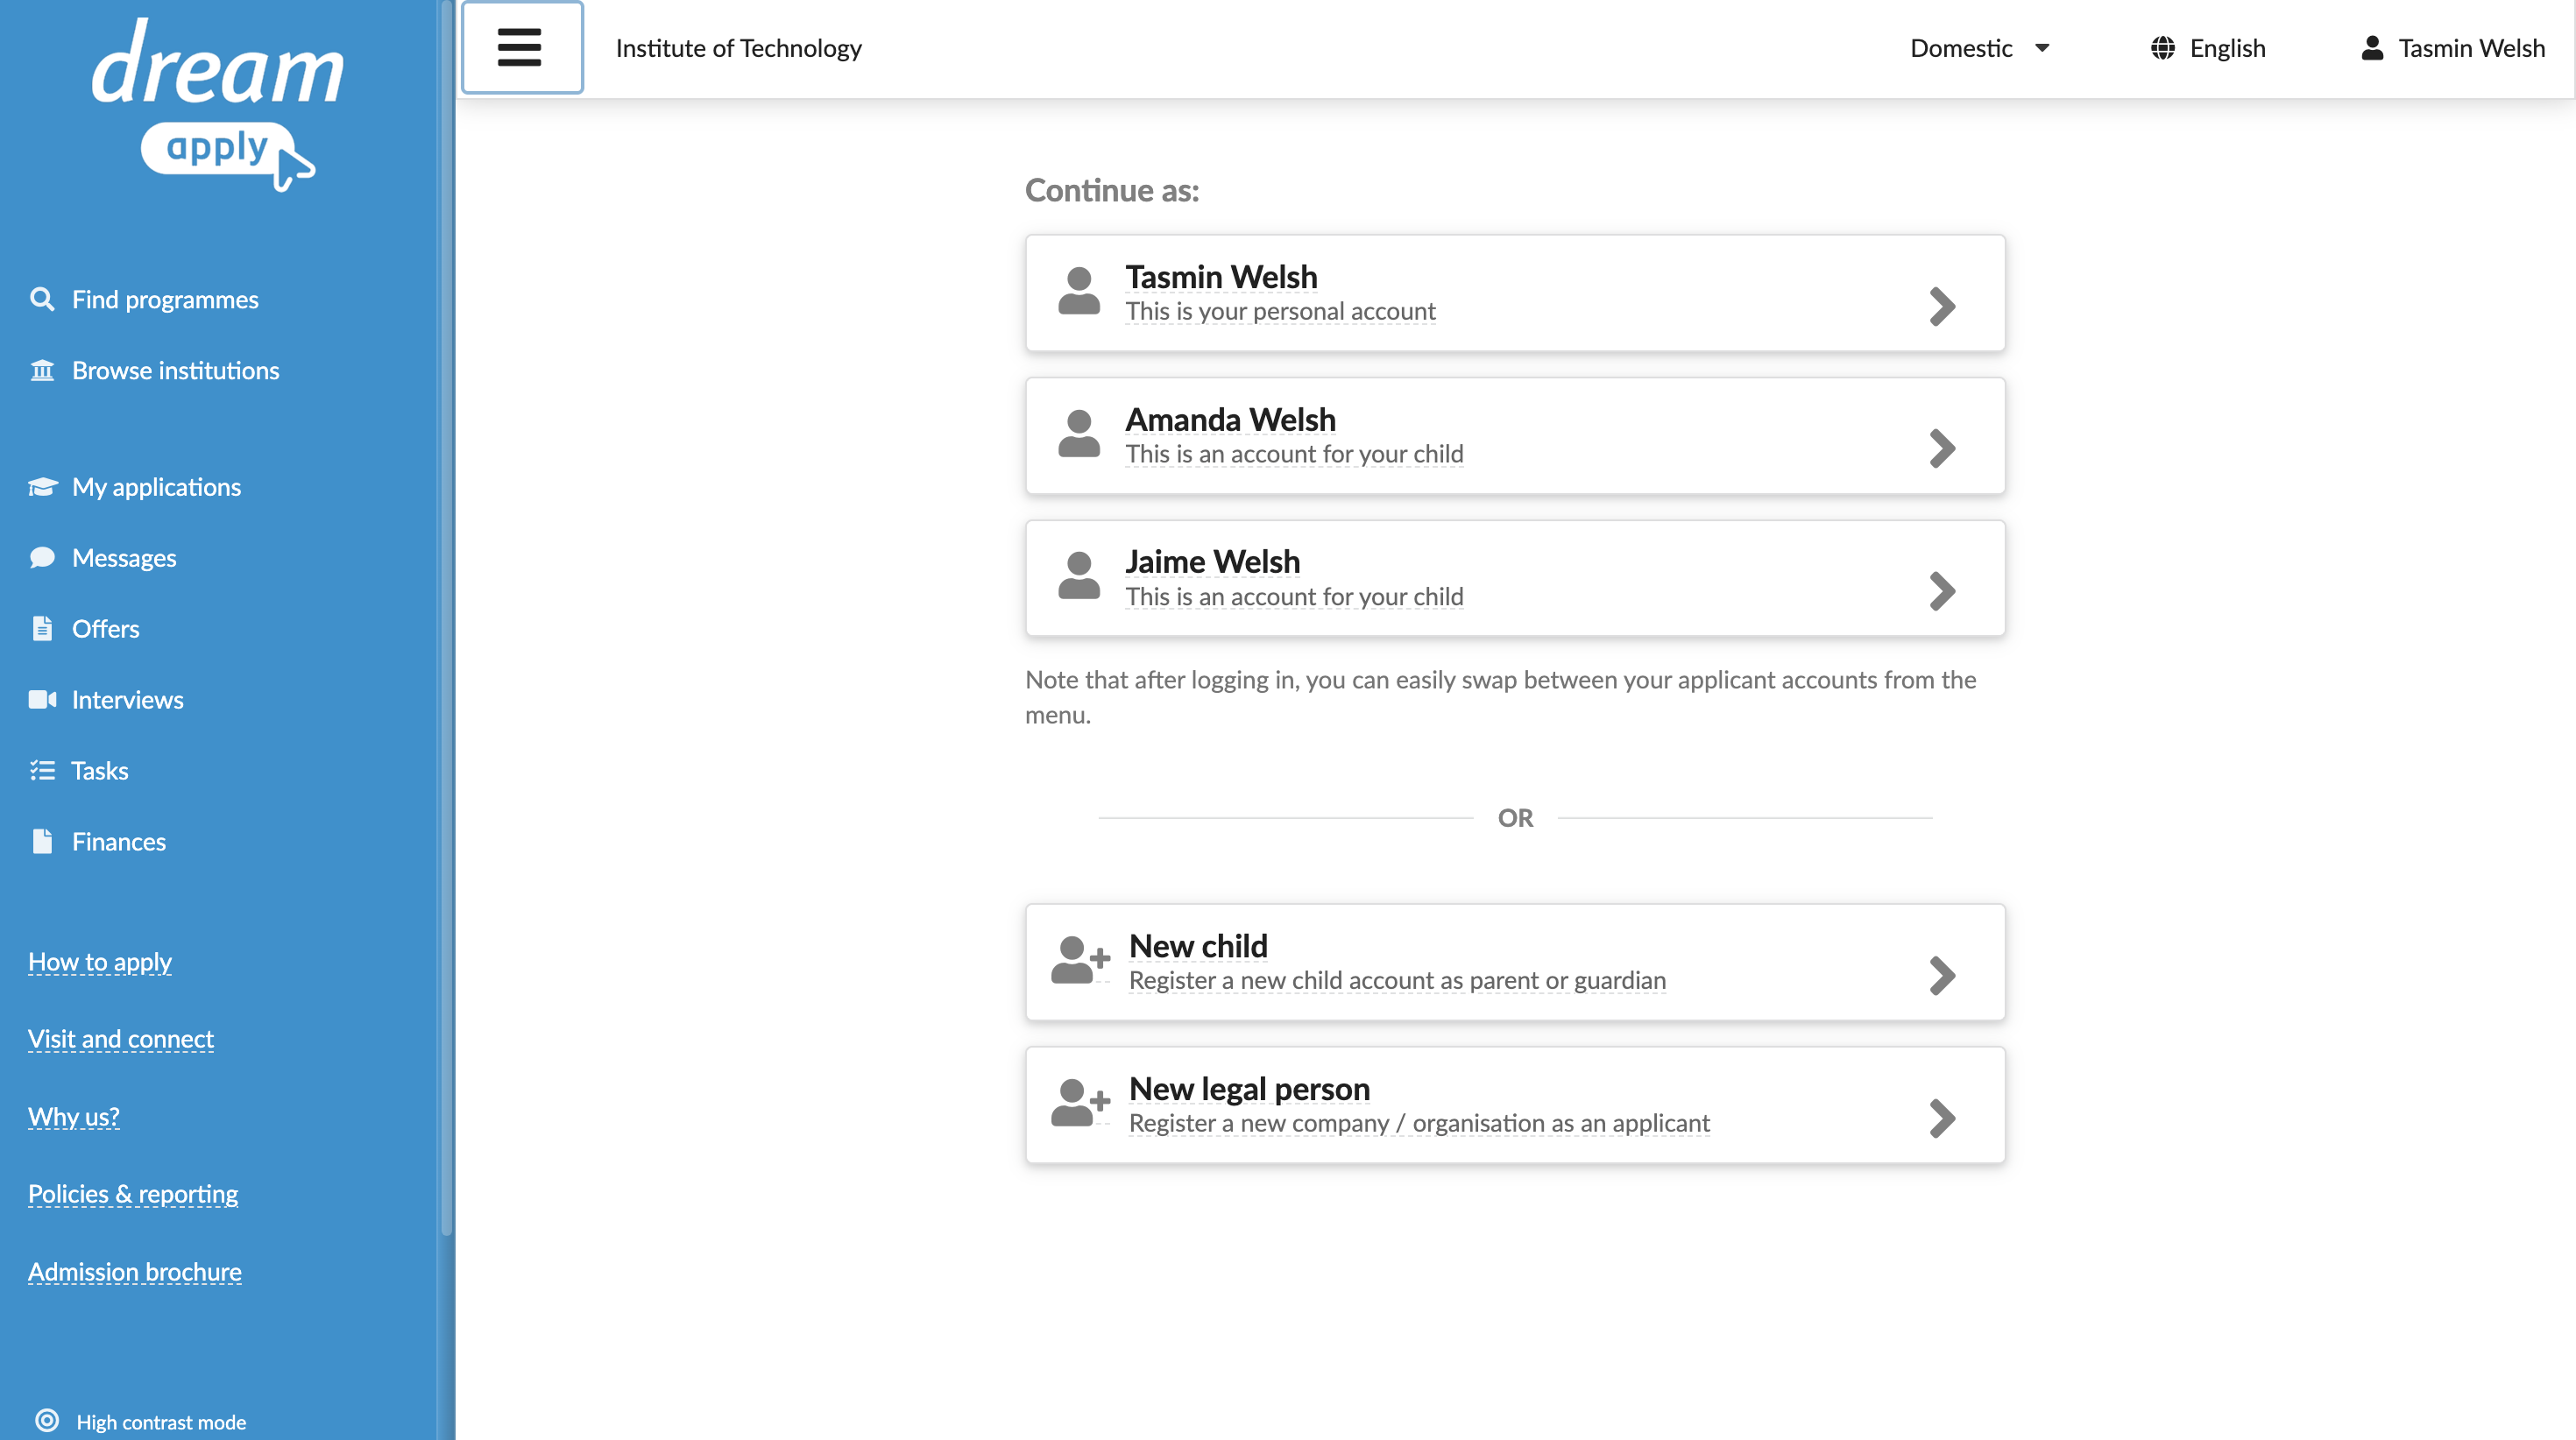
How can I register on behalf of someone else?
In the portal, you can register as a natural person, on behalf of your child or on behalf of an organization. These options are available only if your institution supports them during registration.
To register on behalf of a child or organization:
- In the top right corner of the portal, click the profile icon and select Switch applicant.
- Select to register as a new child or new legal person.
Login record
How can I change my password?
You may want to change your password if you have forgotten it, your account has been compromised or you want to keep your account secure.
You have two options for changing your password:
Use this option if you can log in to the portal with your current password.
To change your password:
- In the top right corner of the portal, click the profile icon and select Security settings.
- Enter your password or use a one-time link to re-authenticate in the system.
- In the security settings list, click Change your password.
- Specify your current password, your new password and click Save the new password.

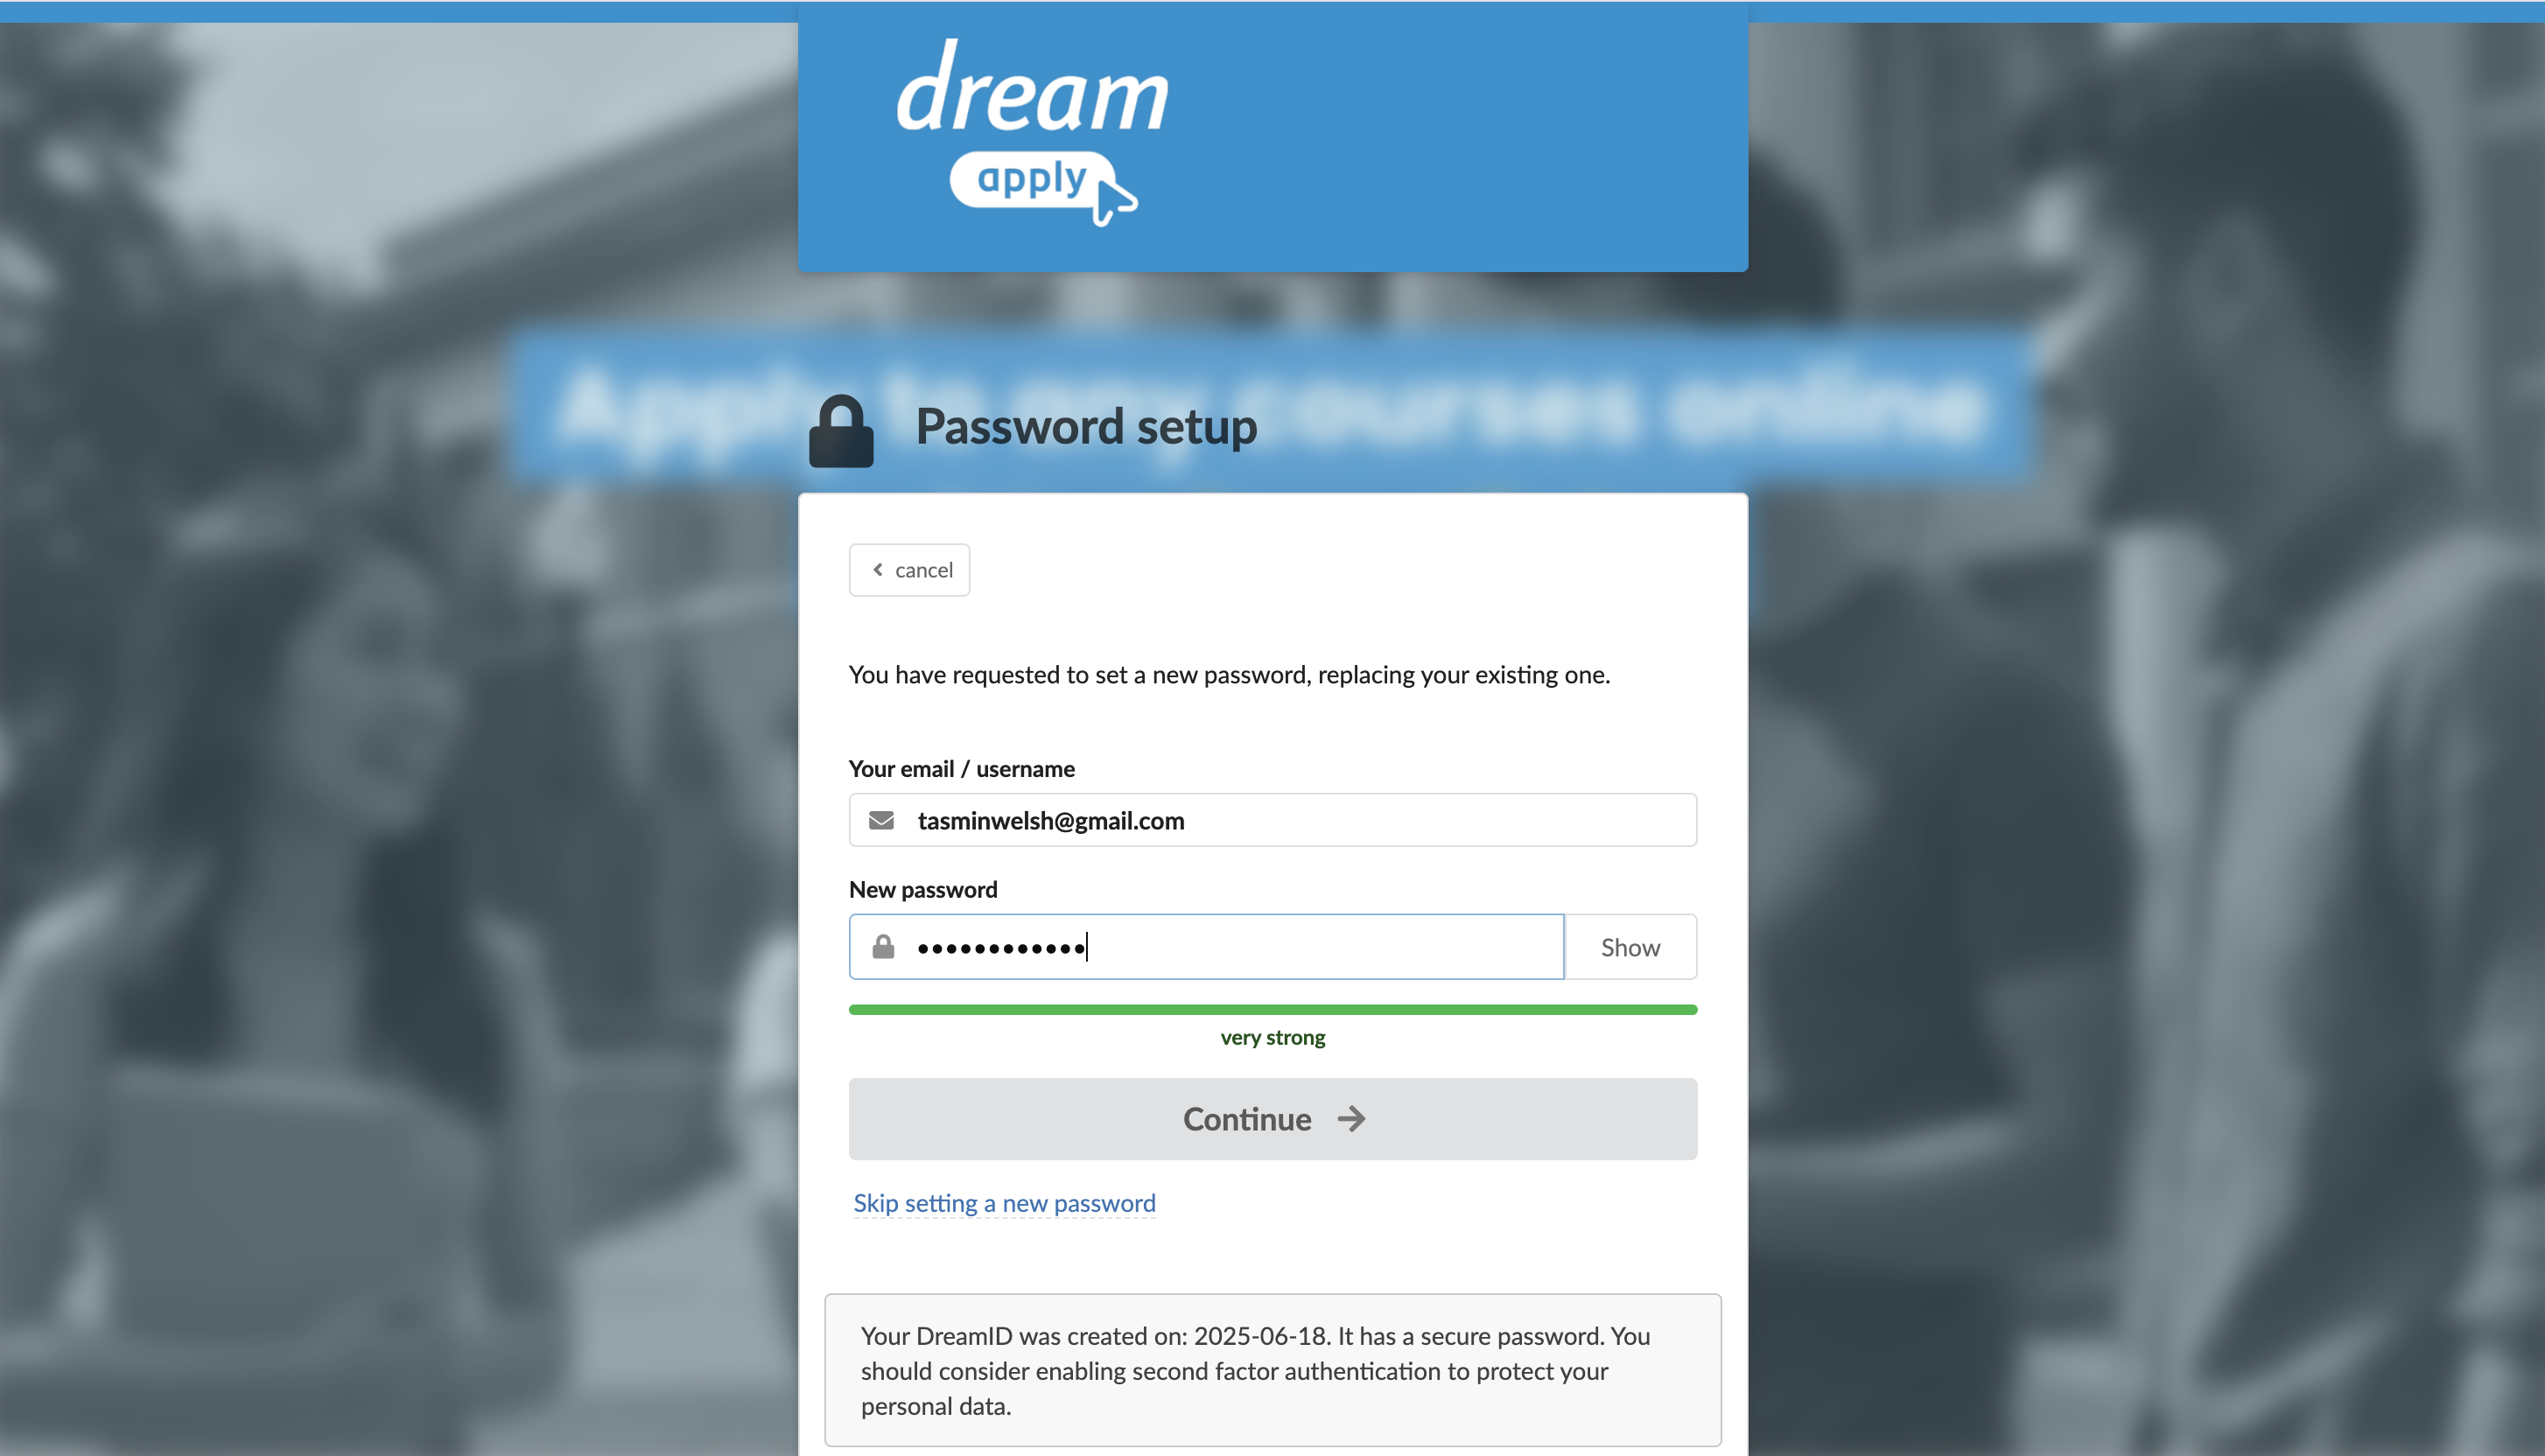
Use this option if you have forgotten your current password.
To reset your password:
- Log in to the portal using a one-time link.
- In the verification email sent to your email address, click Change your password.
- In the New password field, specify your new password and click Continue.
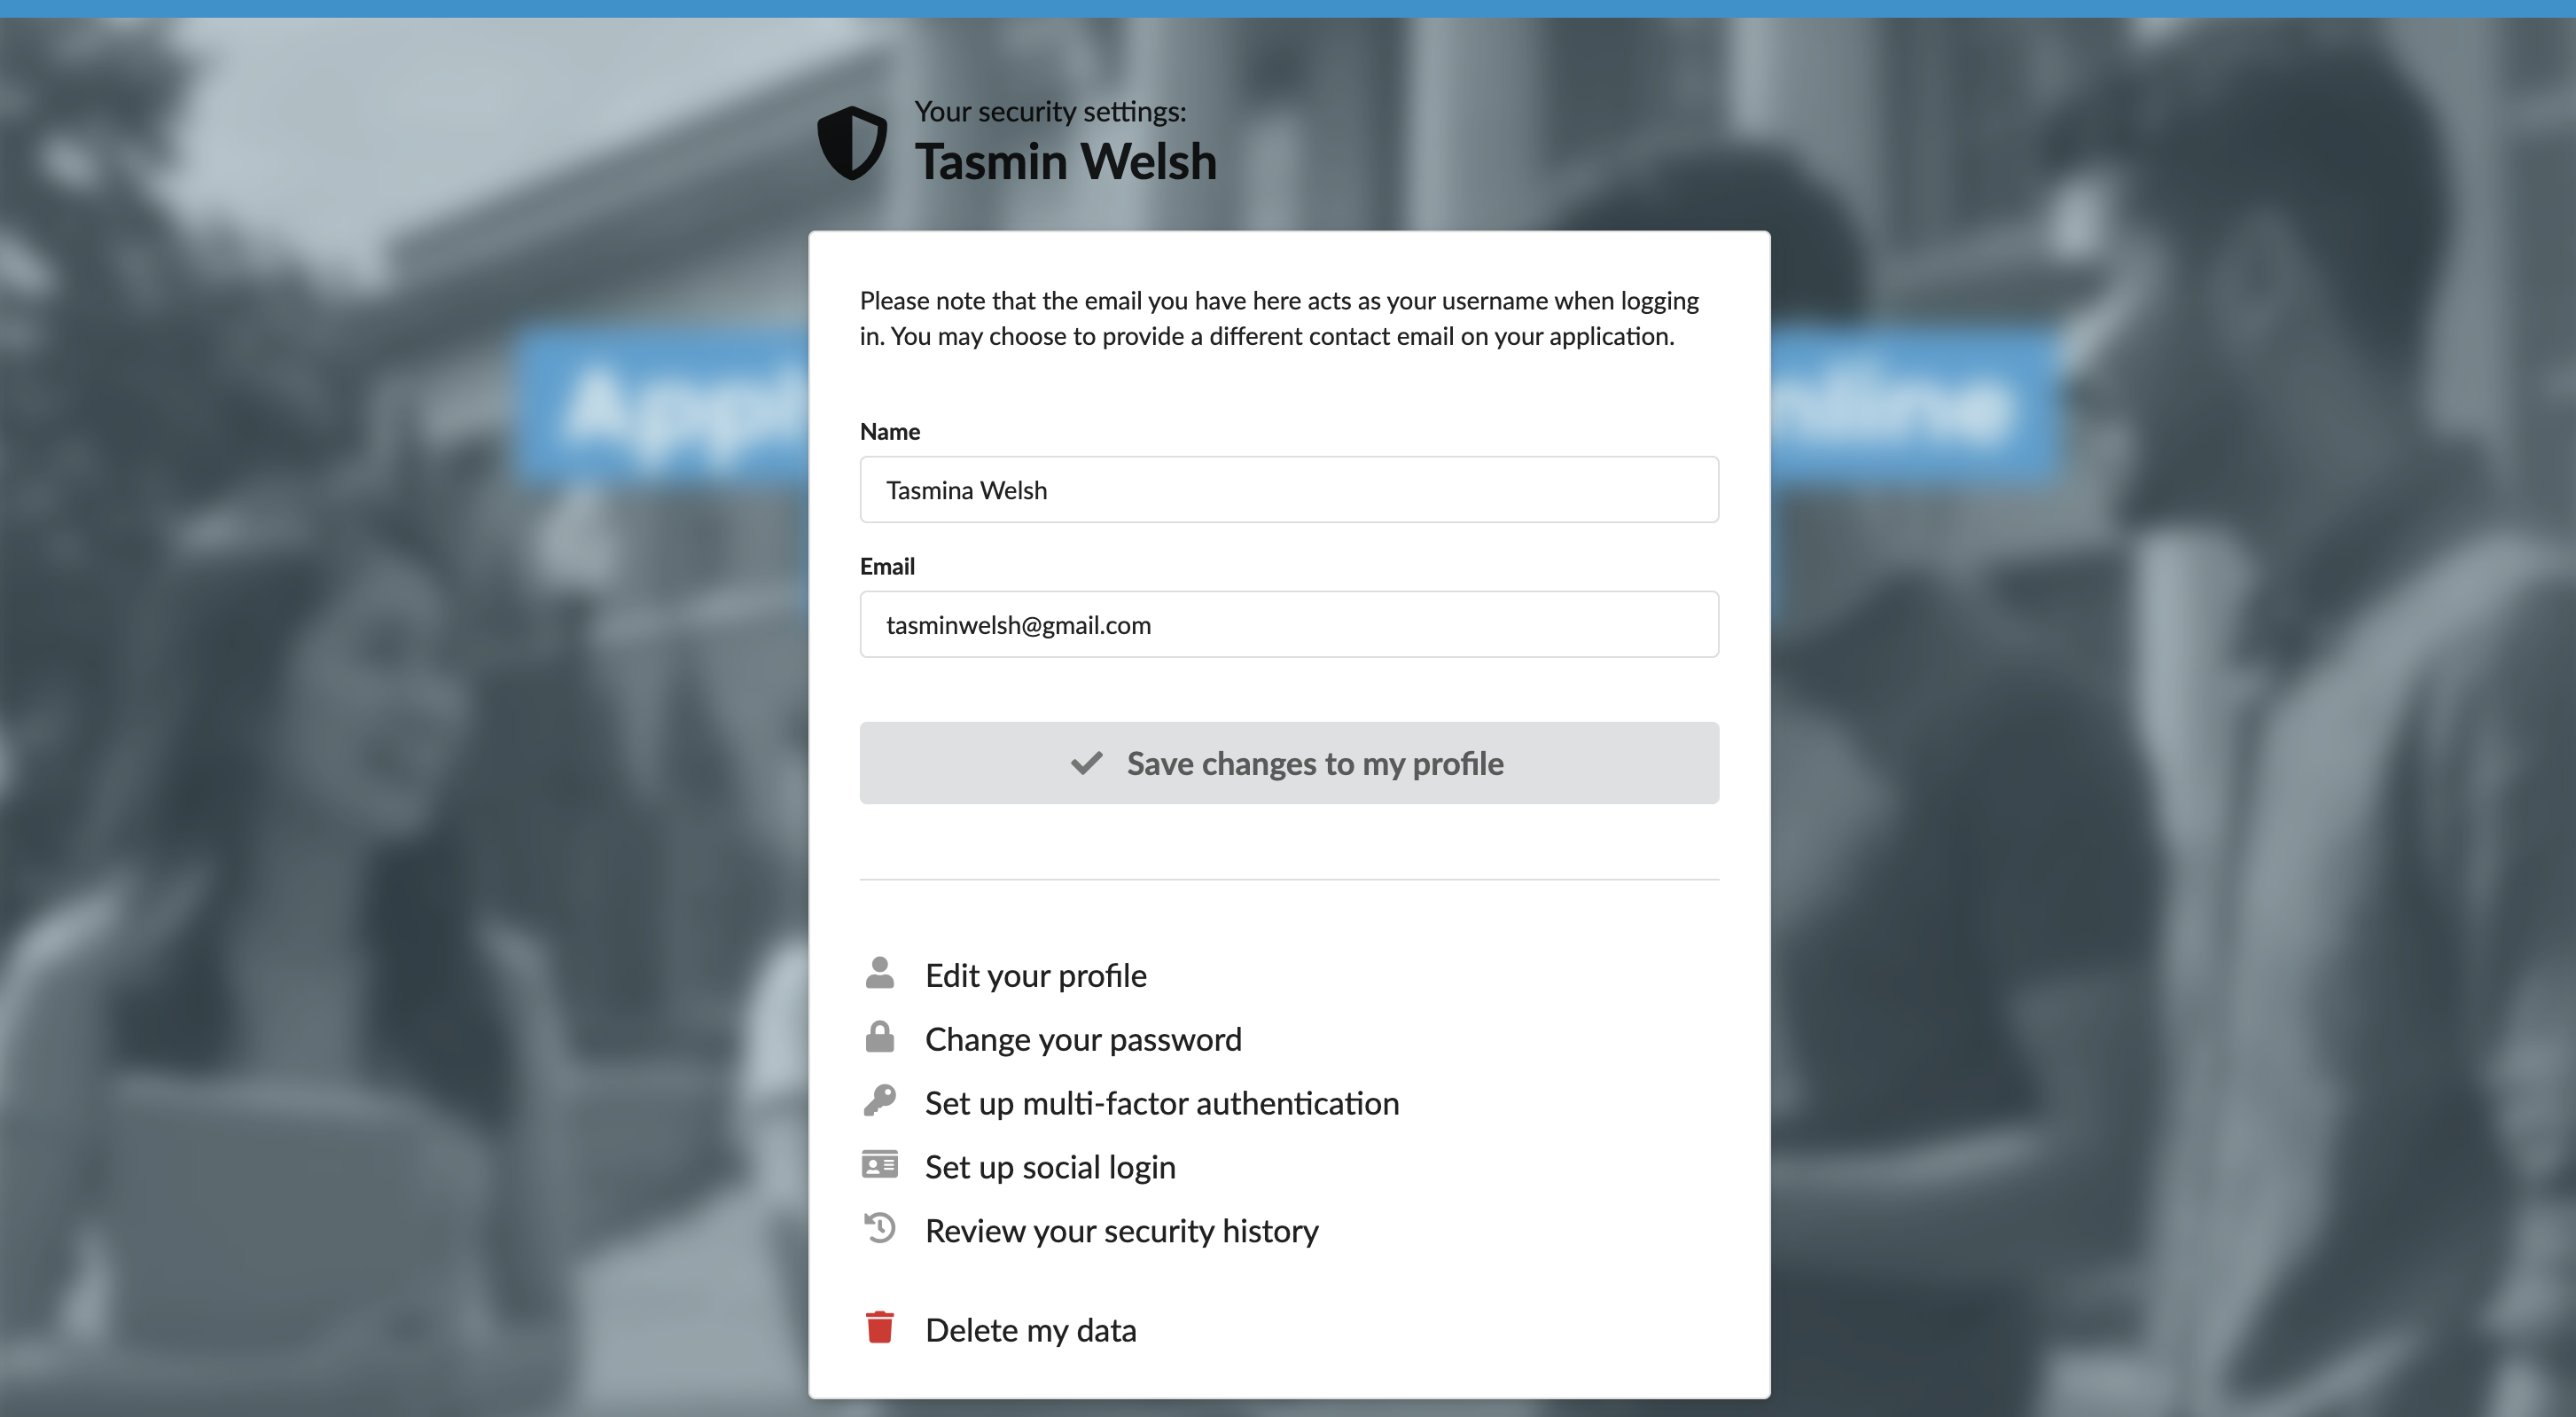
How can I change my name in my login record?
You may want to change your name in the information associated with your login record if you have noticed an error or your name has changed.
Changing your login record name affects only the record used to log in to the portal. It does not change your profile name or how your name appears in the portal and on your applications. To change your profile name, see How can I change my name in my profile?
To change your login record name:
- In the top right corner of the portal, click the profile icon and select Security settings.
- Enter your password or use a one-time link to re-authenticate in the system.
- In the security settings list, click Edit your profile.
- In the Name field, specify your new name and click Save changes to my profile.
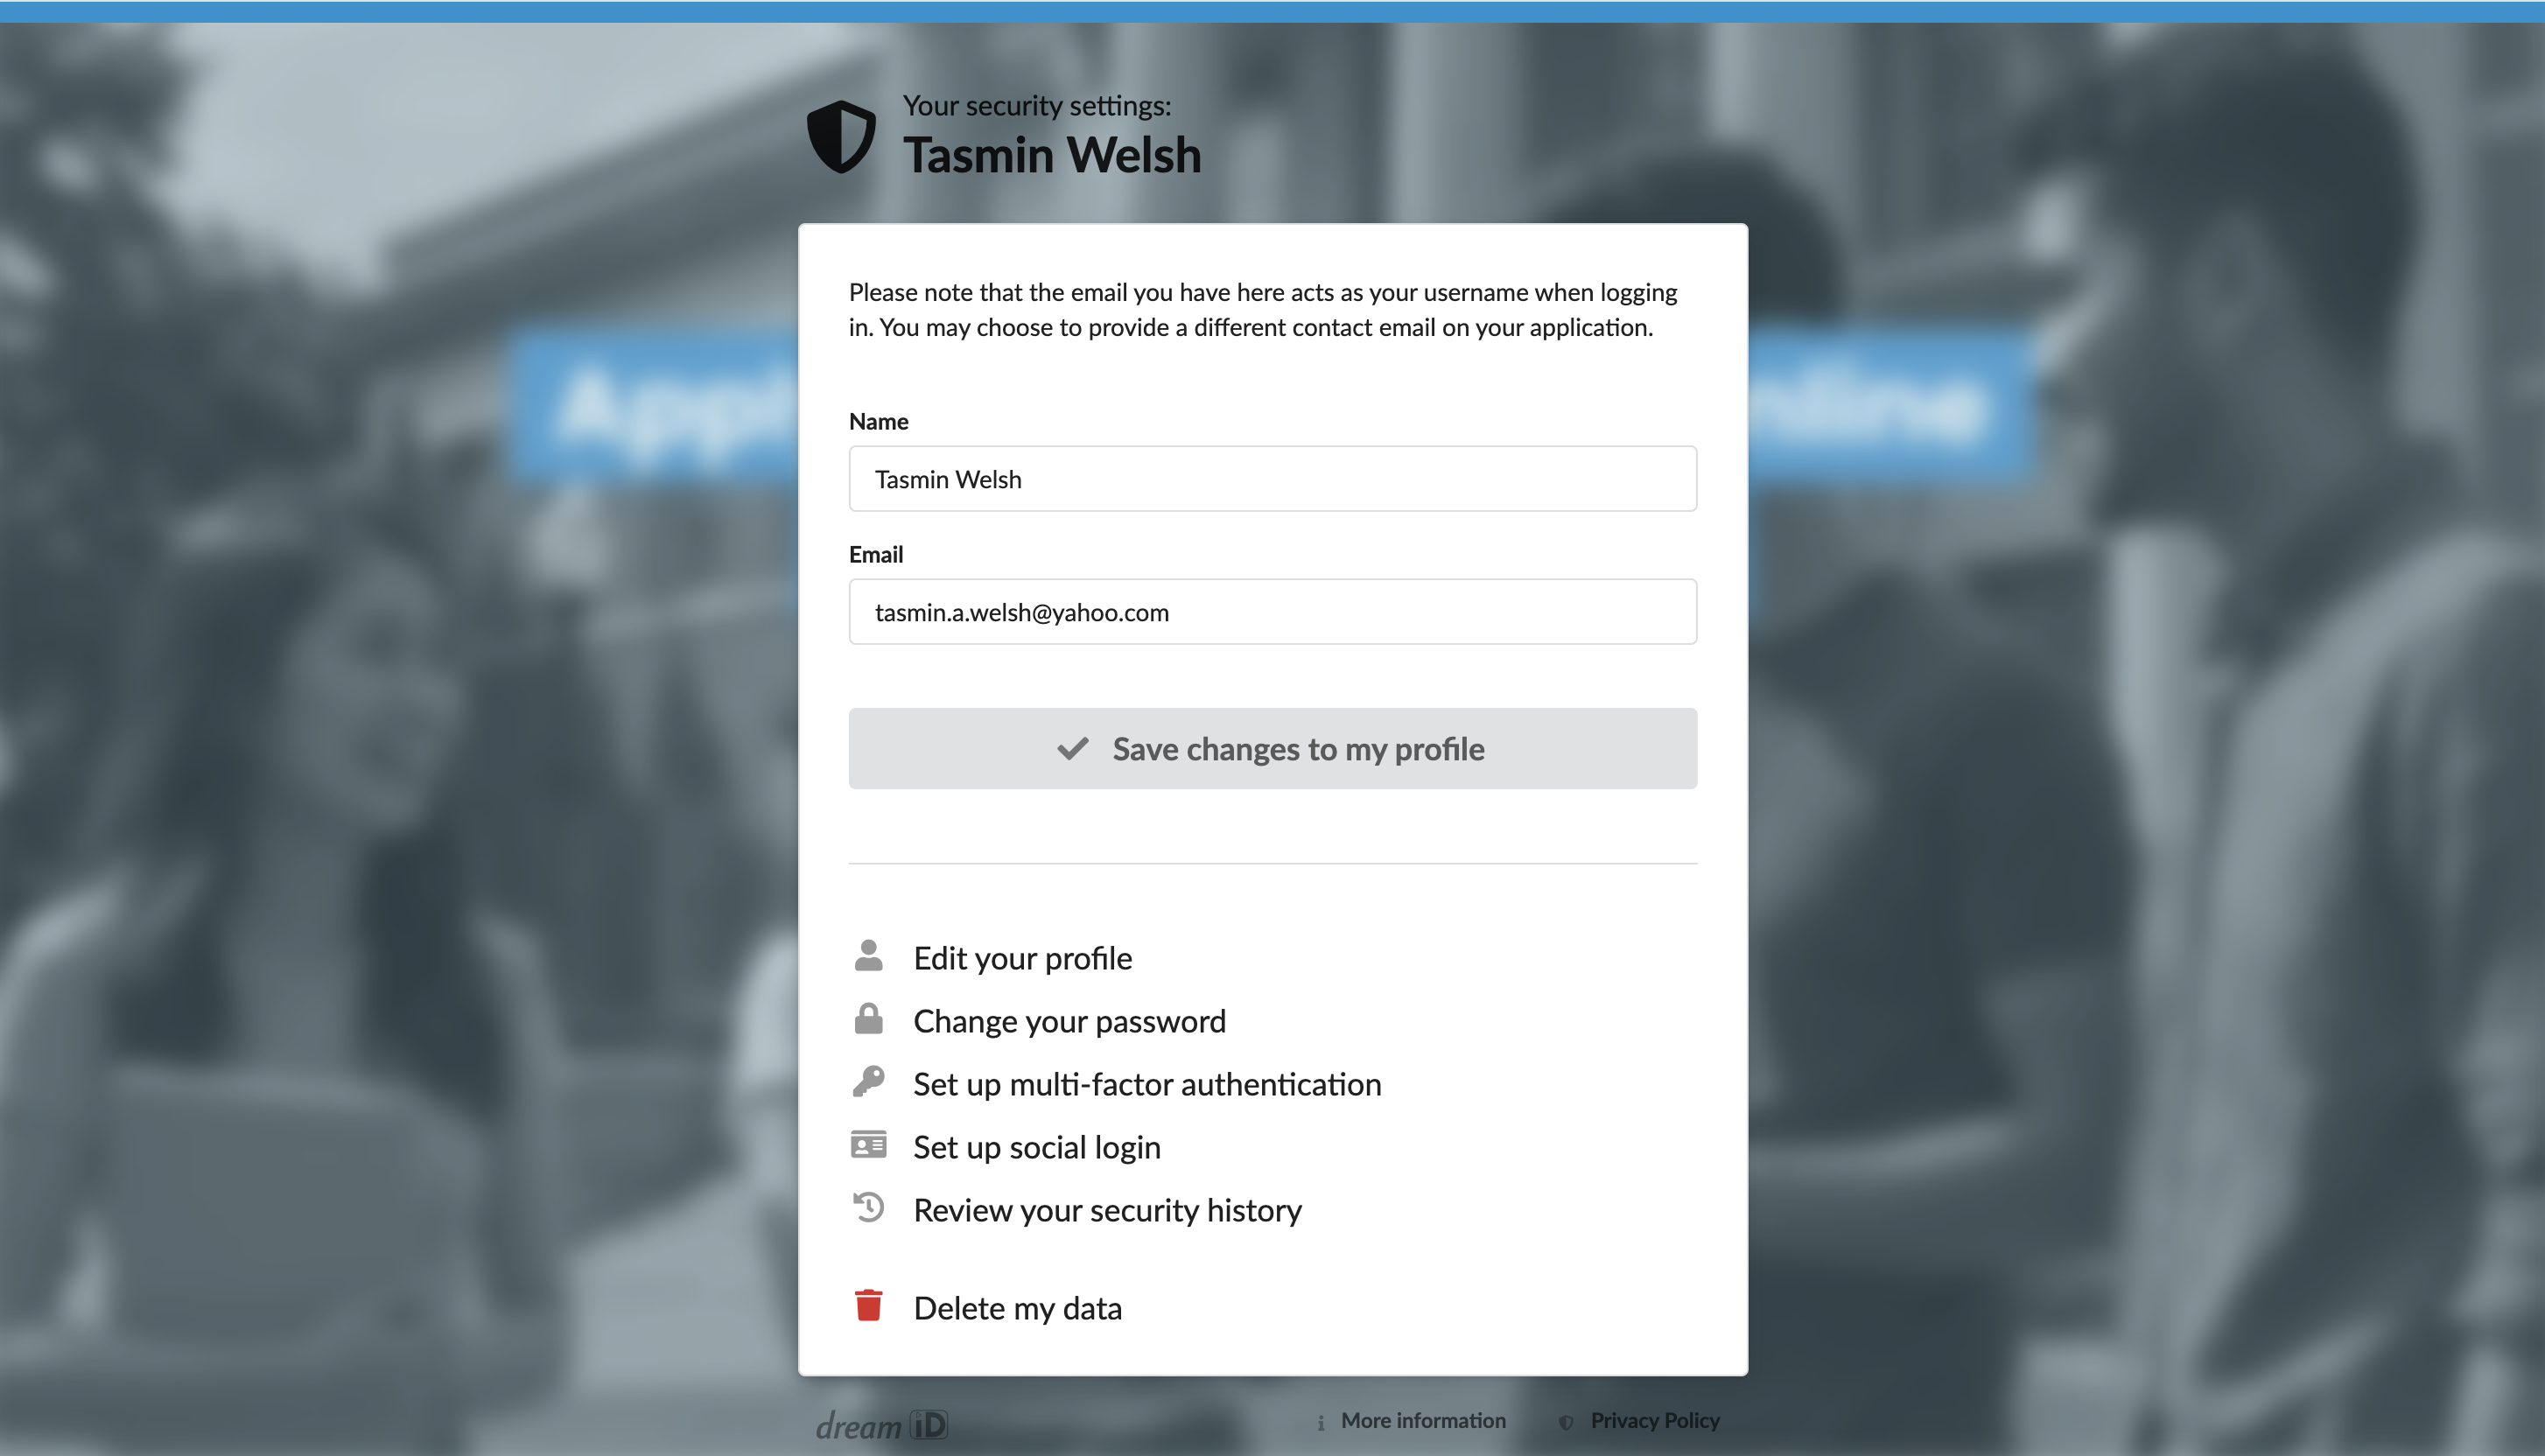
How can I change my login email address?
If you no longer use the email account you originally used to register at the portal, you can update your login email address.
Changing your login email address does not change your contact email address that is used to receive notifications and updates about the admission process. You can manage your contact email separately in the profile settings.
The portal offers two options for changing your login email address, depending on whether you still have access to your previous email account:
Use this option if you still can log in to the portal with your previous login email address.
To change your login email address:
- In the top right corner of the portal, click the profile icon and select Security settings.
- Enter your password or use a one-time link to re-authenticate in the system.
- In the security settings list, click Edit your profile.
- In the Email field, specify your new email address and click Save changes to my profile.
- You will receive a verification email at the new address. Once you verify the change, your login email address will be updated.
Use this option if you cannot log in to the portal because you no longer have access to your previous email account.
To change your login email address, please contact your institution's representative. They will verify your identity and transfer your account to a different email address.
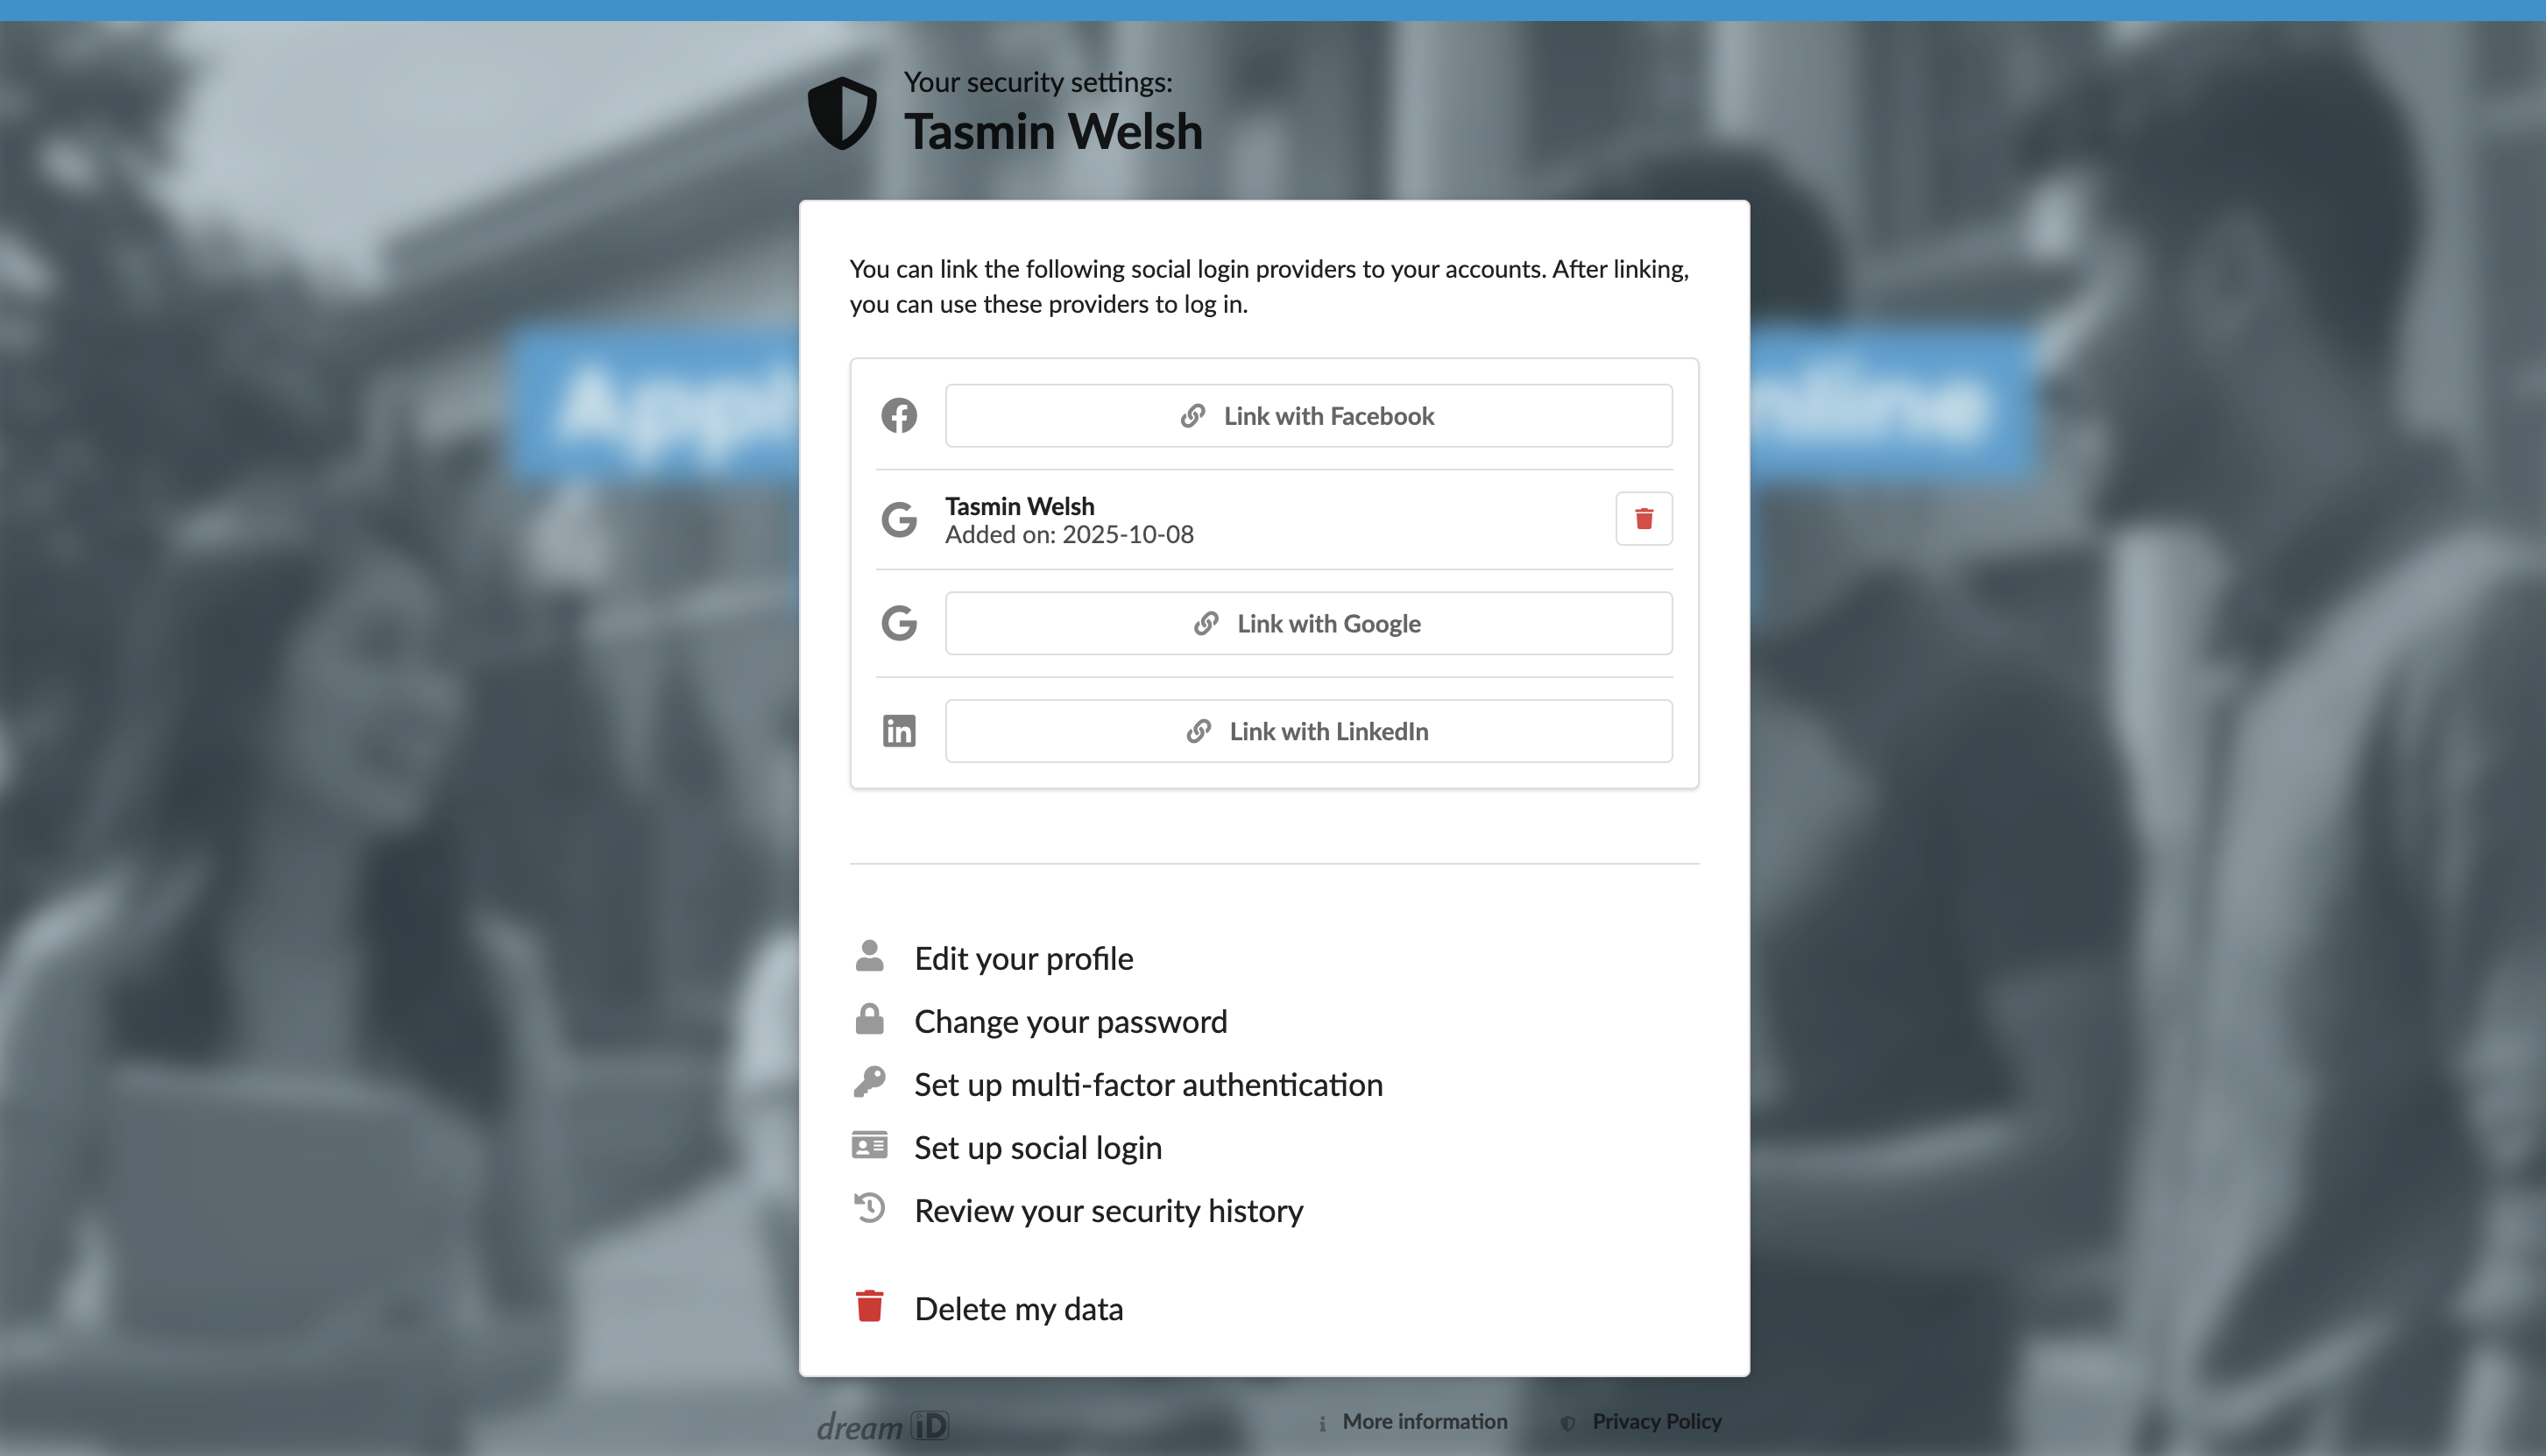
How can I use my social media account to log in?
To enable convenient, passwordless access to the portal, you can use a social media account, such as Google, Facebook or LinkedIn, to log in.
To set up social login:
- In the top right corner of the portal, click the profile icon and select Security settings.
- Enter your password or use a one-time link to re-log in to the system.
- In the displayed page, click Set up social login.
- Click the social media button and log in to your social media account.
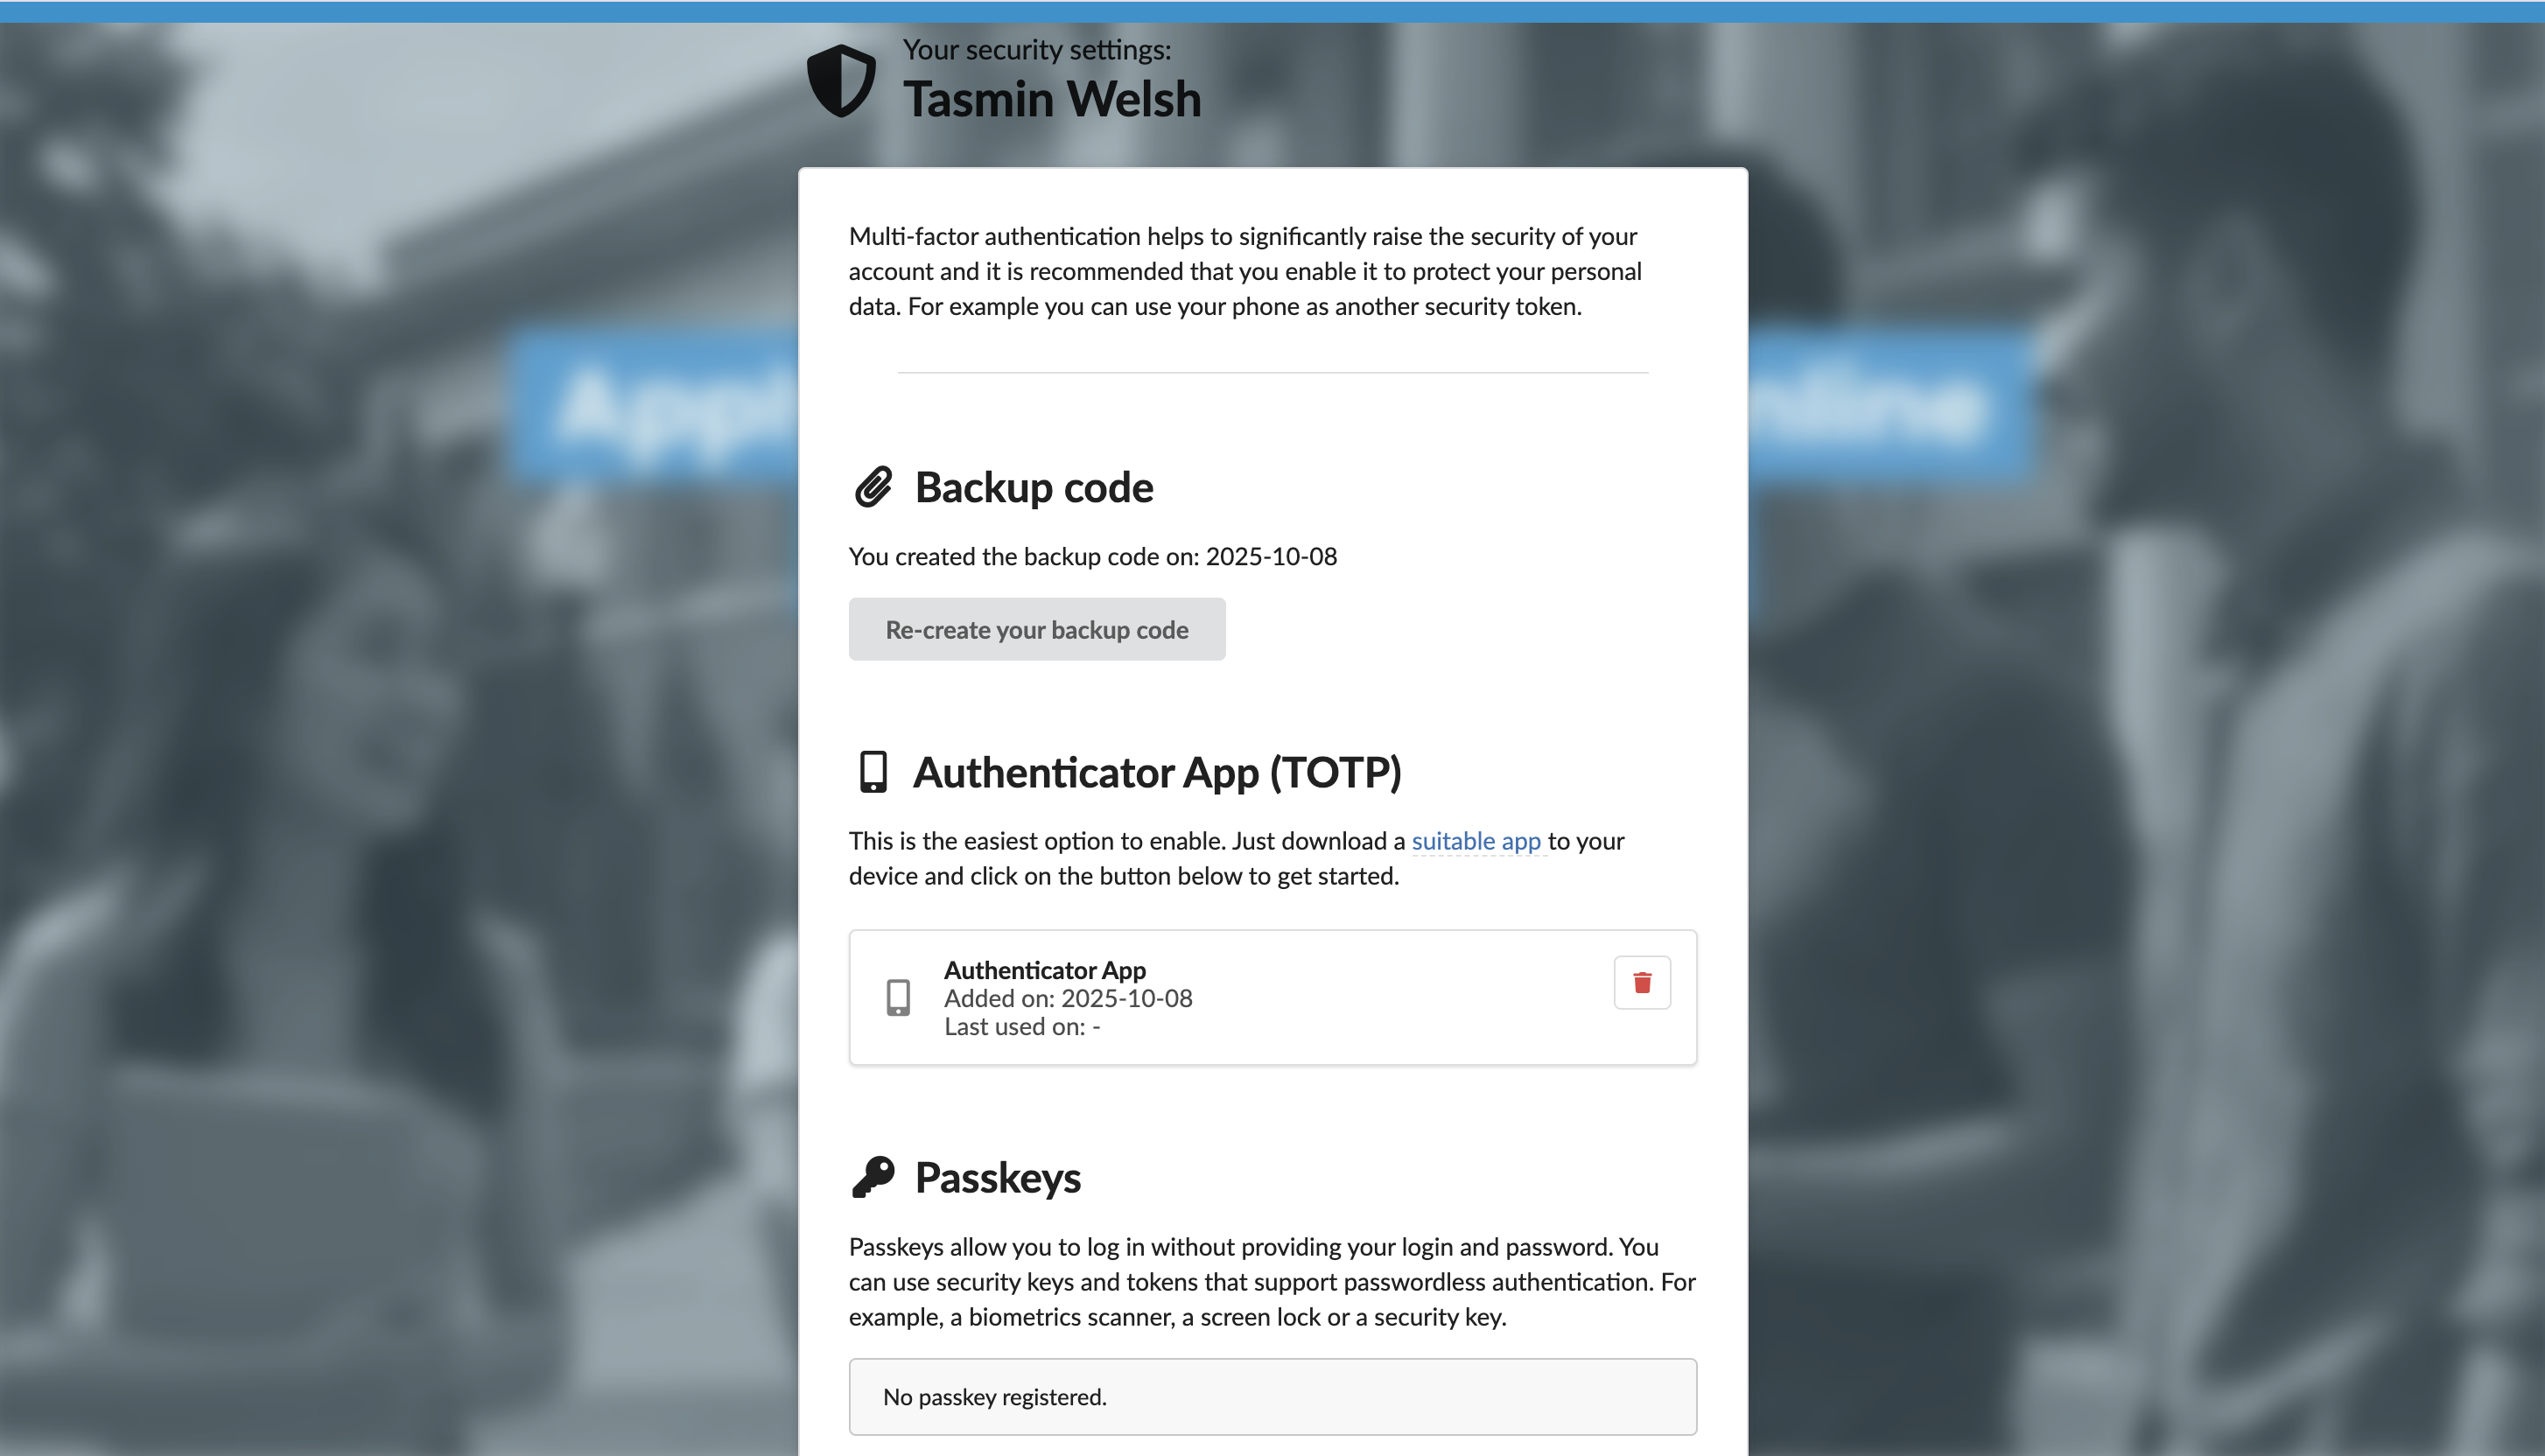
How can I enable multi-factor authentication?
To increase security, you can enable multi-factor authentication (MFA) for your login record.
When MFA is enabled, you must first enter your credentials and then provide an additional form of verification to log in to the portal. This verification method can be a code from an authenticator app, passkey or security key.
To enable multi-factor authentication:
- In the top right corner of the portal, click the profile icon and select Security settings.
- Enter your password or use a one-time link to re-log in to the system.
- In the displayed page, click Set up multi-factor authentication.
- Create a backup code and then choose to use an authenticator app, passkey or security key.
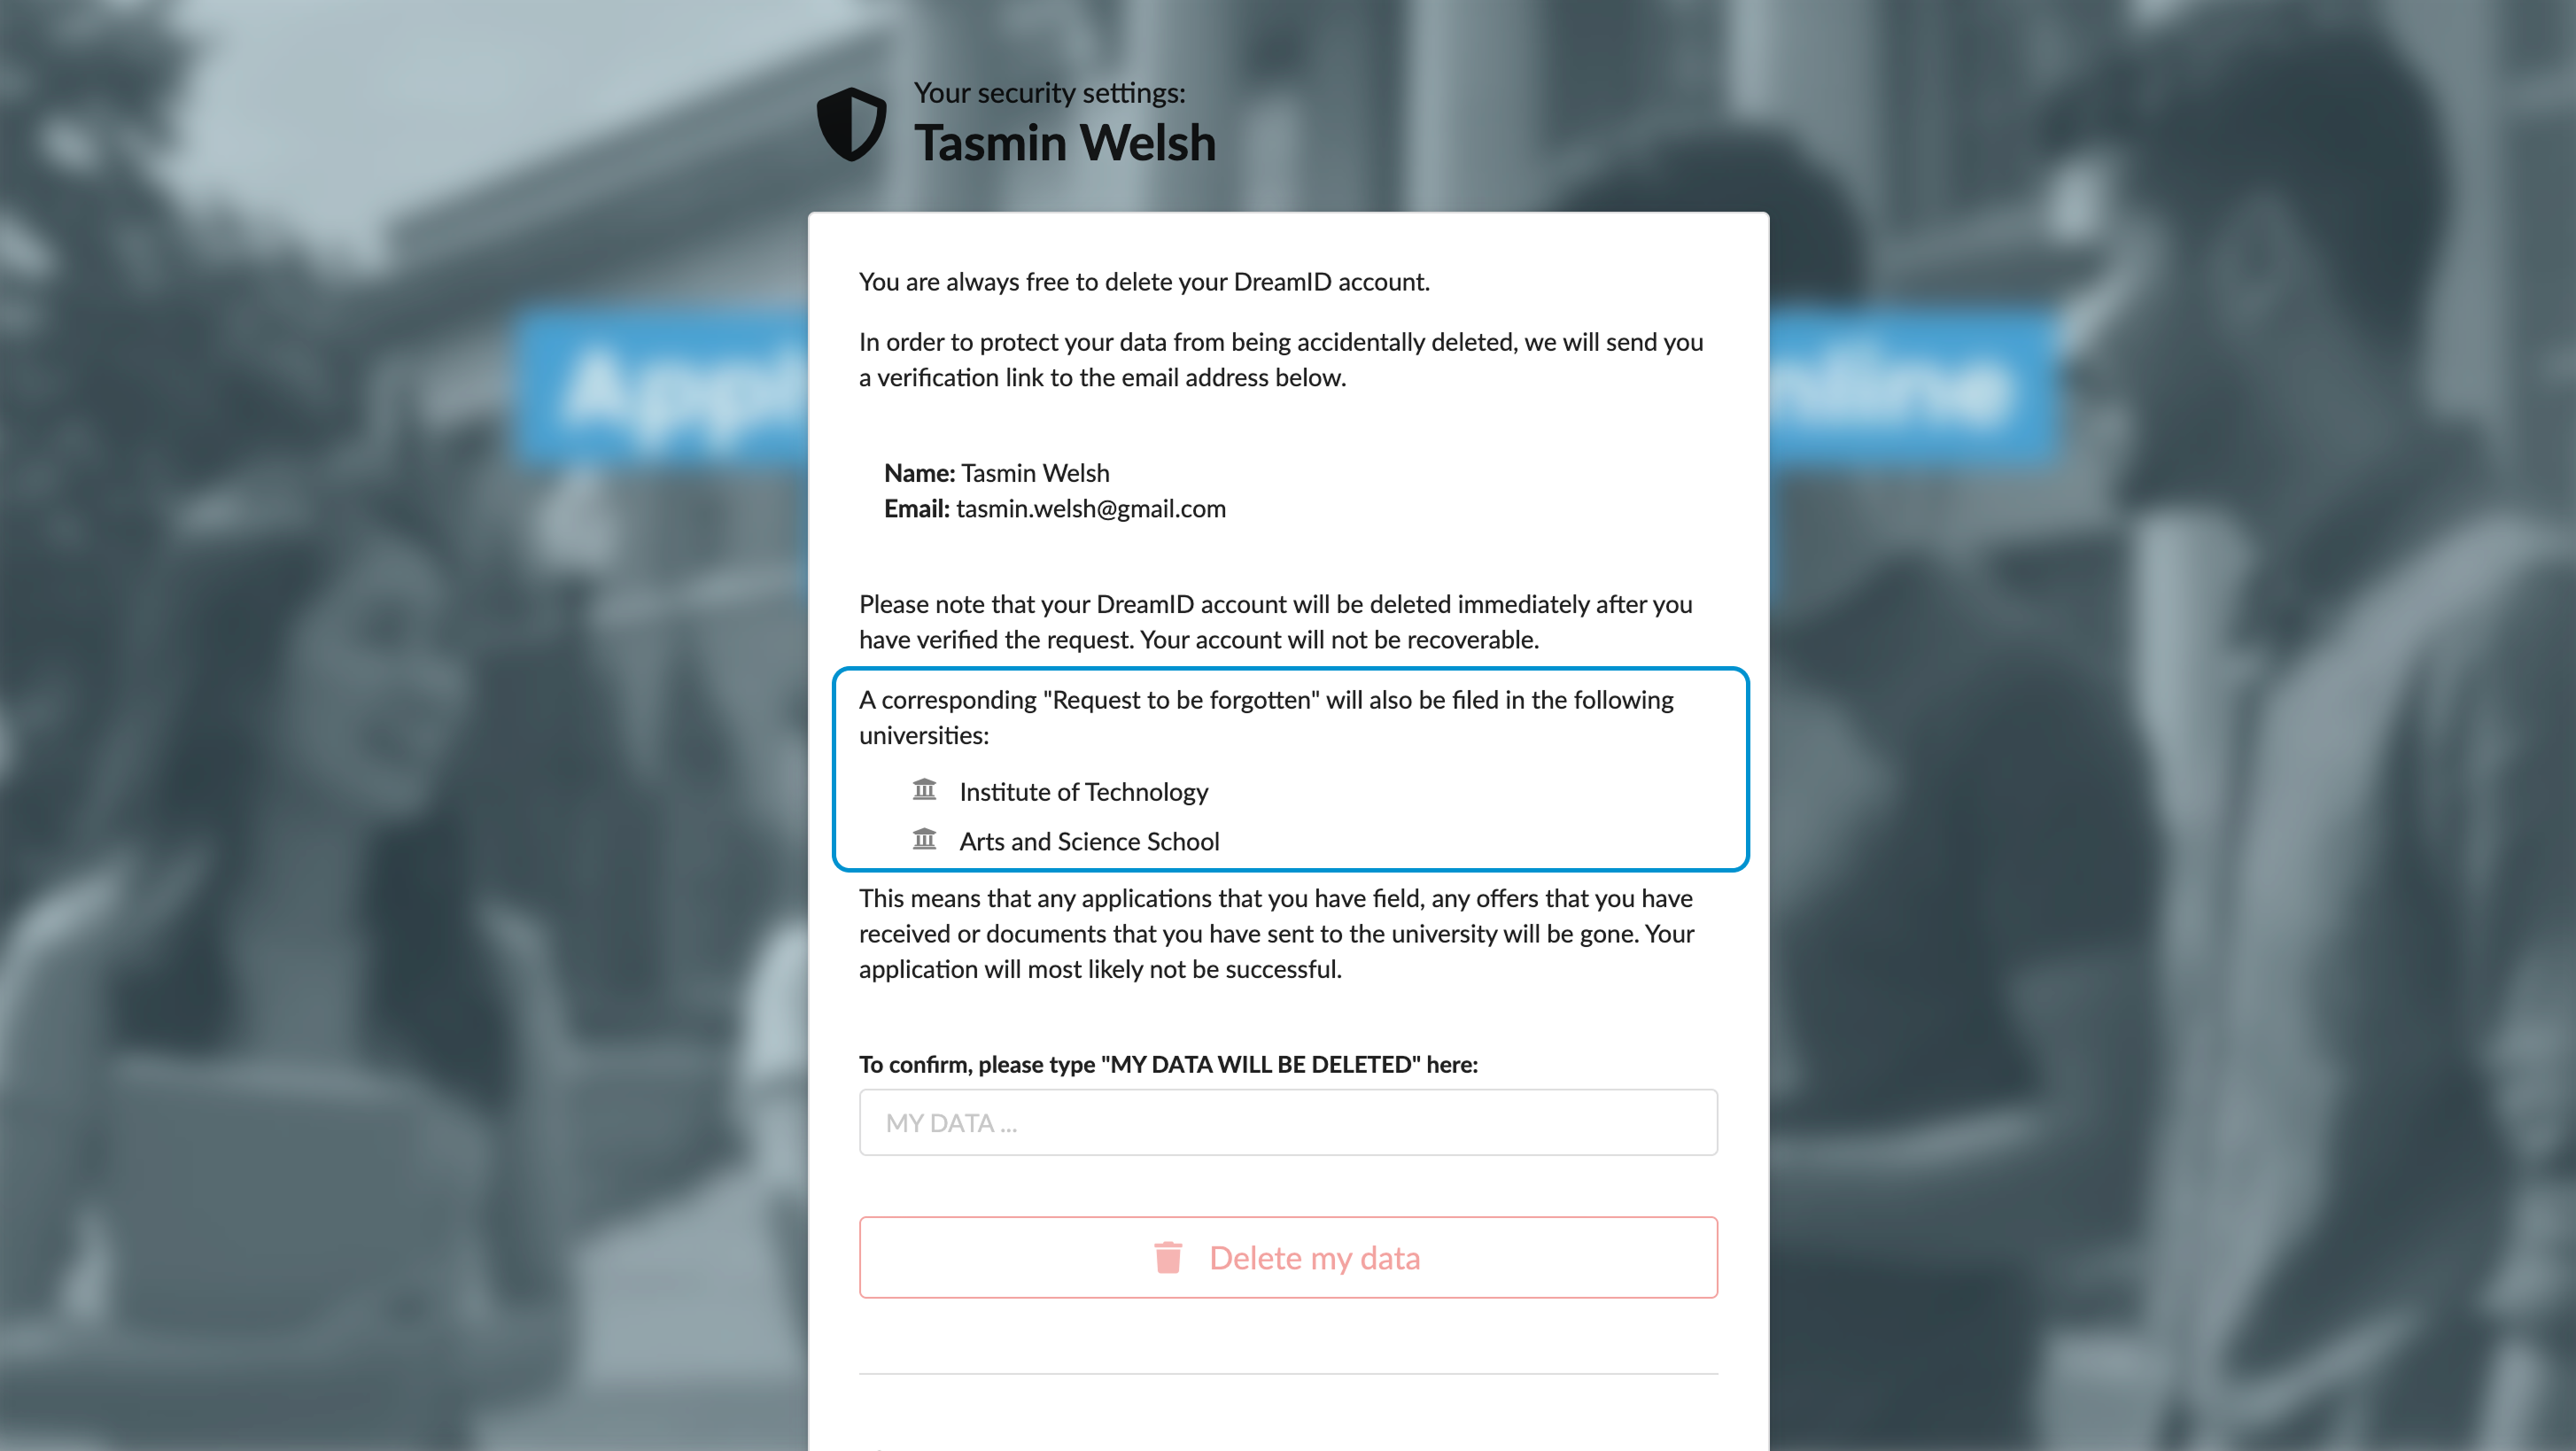
How can I check my linked institutions?
Your login record is linked to the institution where your applications are registered. If you have applied to multiple institutions, your record may be linked to more than one.
In some cases, you may need to check which institution your record is linked to. For example, you may need this information before requesting to delete your data from the portal.
An institution refers to the overall educational organization or instance. Do not confuse it with divisions within the same organization such as departments, schools or campuses. Your record is linked to the institution itself, not to its individual divisions.
To see your linked institutions:
- In the top right corner of the portal, click the profile icon and select Security settings.
- Enter your password or use a one-time link to re-log in to the system.
- In the displayed page, click Delete my data.
- On the displayed card, review a list of linked institutions.
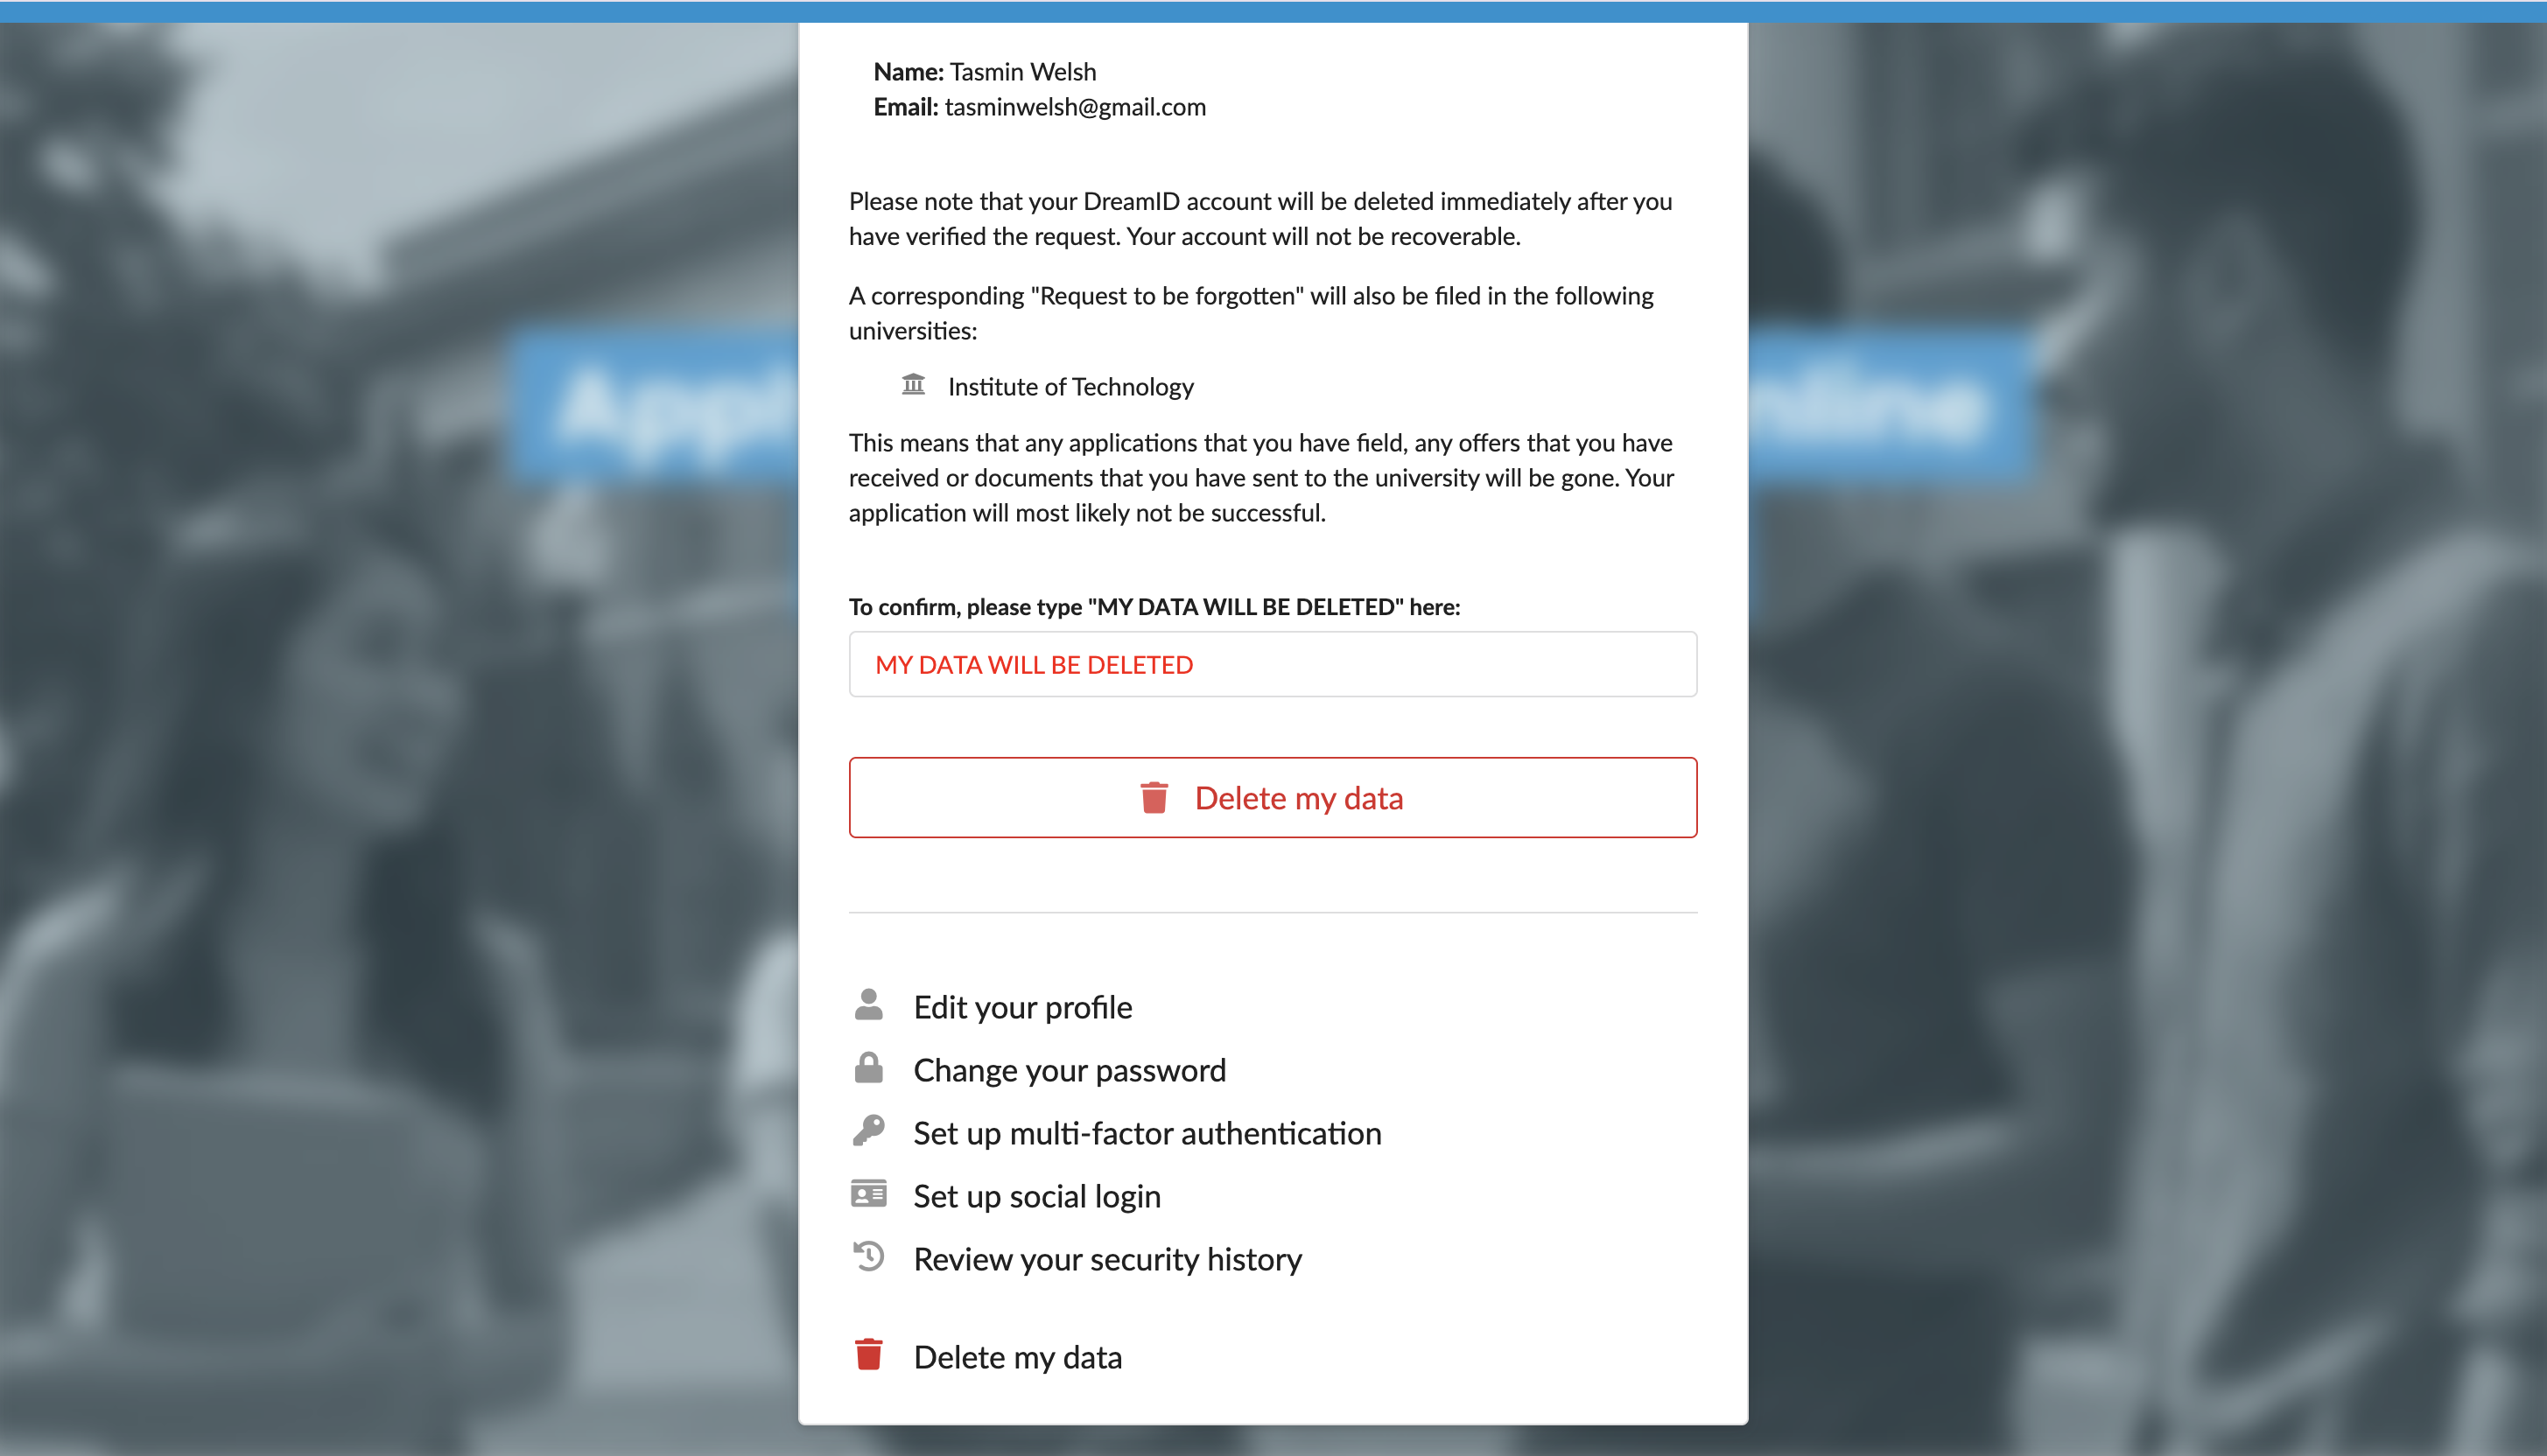
How can I delete my login record?
You can permanently delete your portal login record along with all associated data and documents. If you have applied to multiple institutions, this will remove your record and all related data from every institution you have applied to. Use this option to fully remove your presence from the system.
After you delete your login record, you will no longer be able to log in to the portal and will have to register again to access the system in the future.
To delete your login record:
- In the top right corner of the portal, click the profile icon and select Security settings.
- Enter your password or use a one-time link to re-log in to the system.
- In the displayed page, click Delete my data.
- In the displayed form, type MY DATA WILL BE DELETED and click Delete my data.
- You will receive a verification email at the email address. Once you verify deletion, your login record will be deleted.
What should I do if I deleted my login record by mistake?
If you have deleted your login record by mistake, you will not be able to log in to the portal and access your applications. However, your data may still be recovered if you act quickly.
When a login record is deleted, the system creates a data deletion request that your institution must review and confirm. Once this process is completed, all data linked to the login record will be permanently removed and cannot be recovered.
To recover your account, please contact your institution's representative as soon as possible. Explain that your login record was deleted by mistake. They will verify your identity and transfer your account to a different email address.