Use entry points (dynamic redirects)
Assume that you are running a social media campaign for Fall admissions. You want to place campaign materials on several external portals, such as:
- Institution website
- Partner portal
- Student forum
Your goals are:
- Use a single entry point for the entire campaign
- Compare the performance of each portal or website
- Track campaign performance in DreamApply and external marketing platforms
Before you begin
Make sure your account has the Superuser role. In a real case, roles can be configured differently.
Step 1. Create a tracker
First, we will create a tracker in DreamApply to identify leads who register as part of the Fall campaign.
- In the main menu, under Marketing, select Trackers.
- Click New tracker.
- In the Tracker code field, specify the code — FALL. If needed, you can add a year to the tracker, for example, FALL2026.
- Save the changes.
Step 2. Create an entry point
Next, we will create an entry point for the Fall campaign in DreamApply. An entry point is a special URL that will capture user tracking data and then redirect users to their destination.
In the main menu, under Marketing, select Entry points.
Click Add a new entry point.
Under How is the visitor identified?, select the Use a landing page check box.
In the Redirect the visitors to field, leave the default value.
Copy the displayed entry point URL and save it for later.
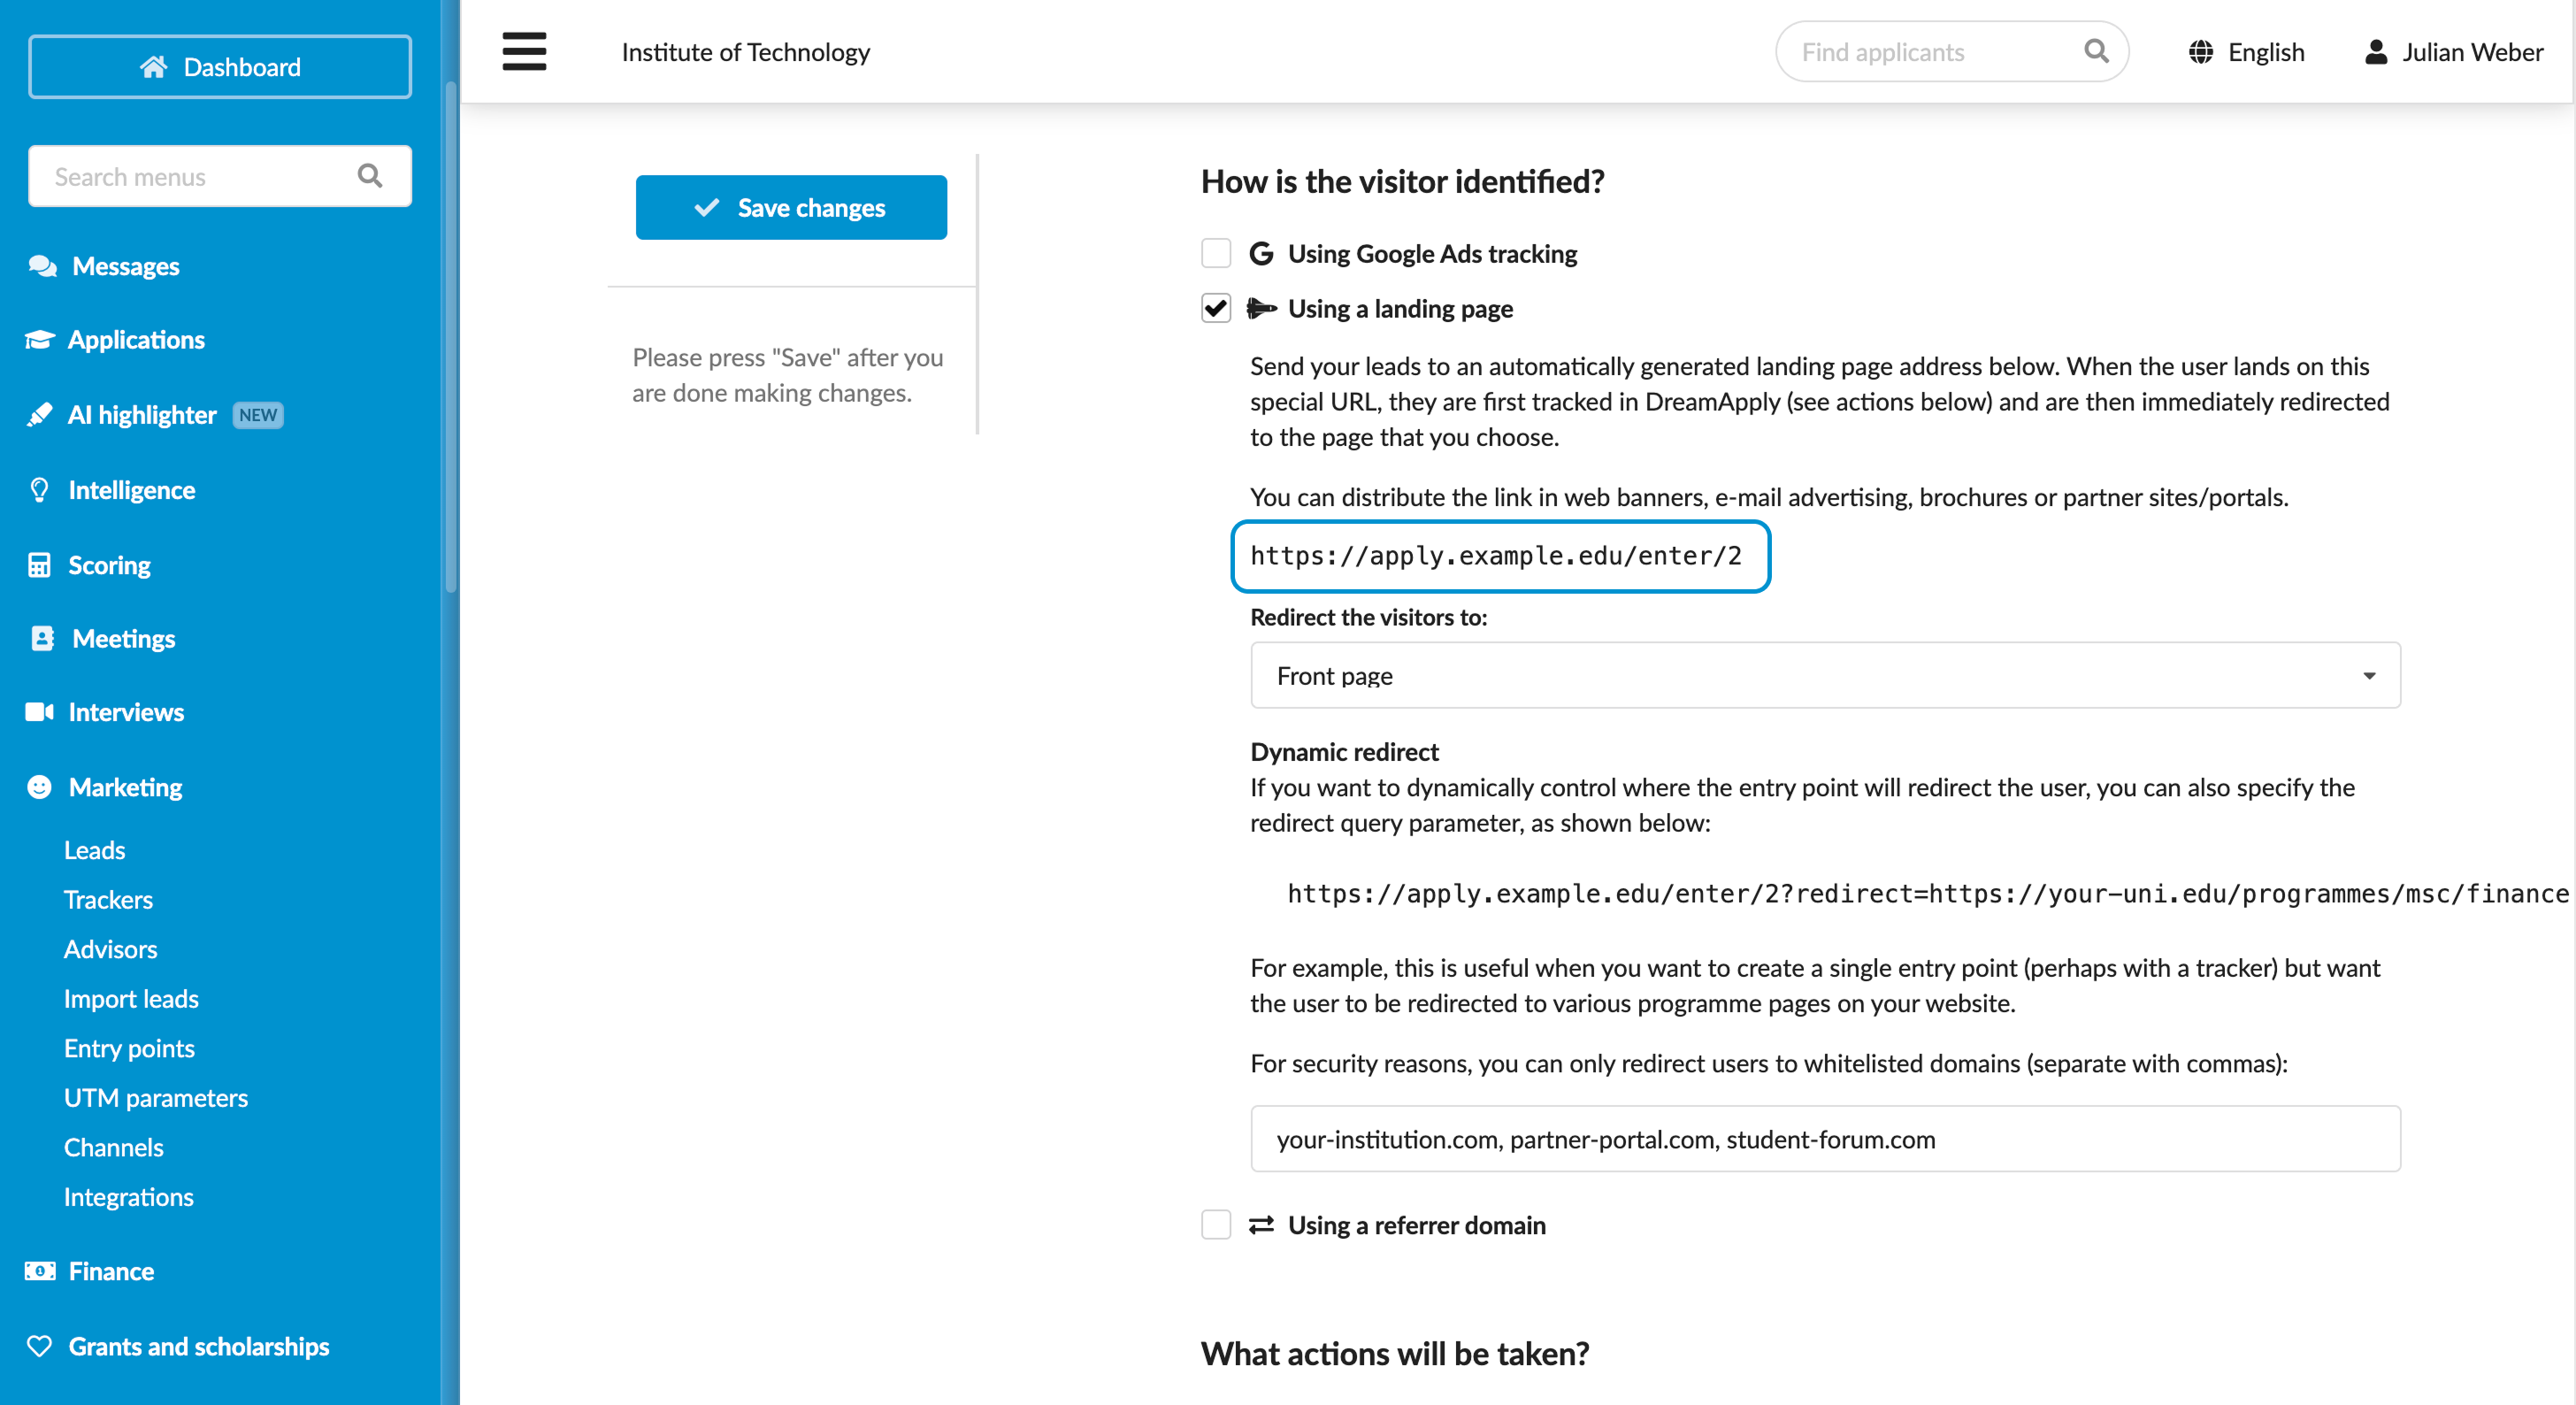
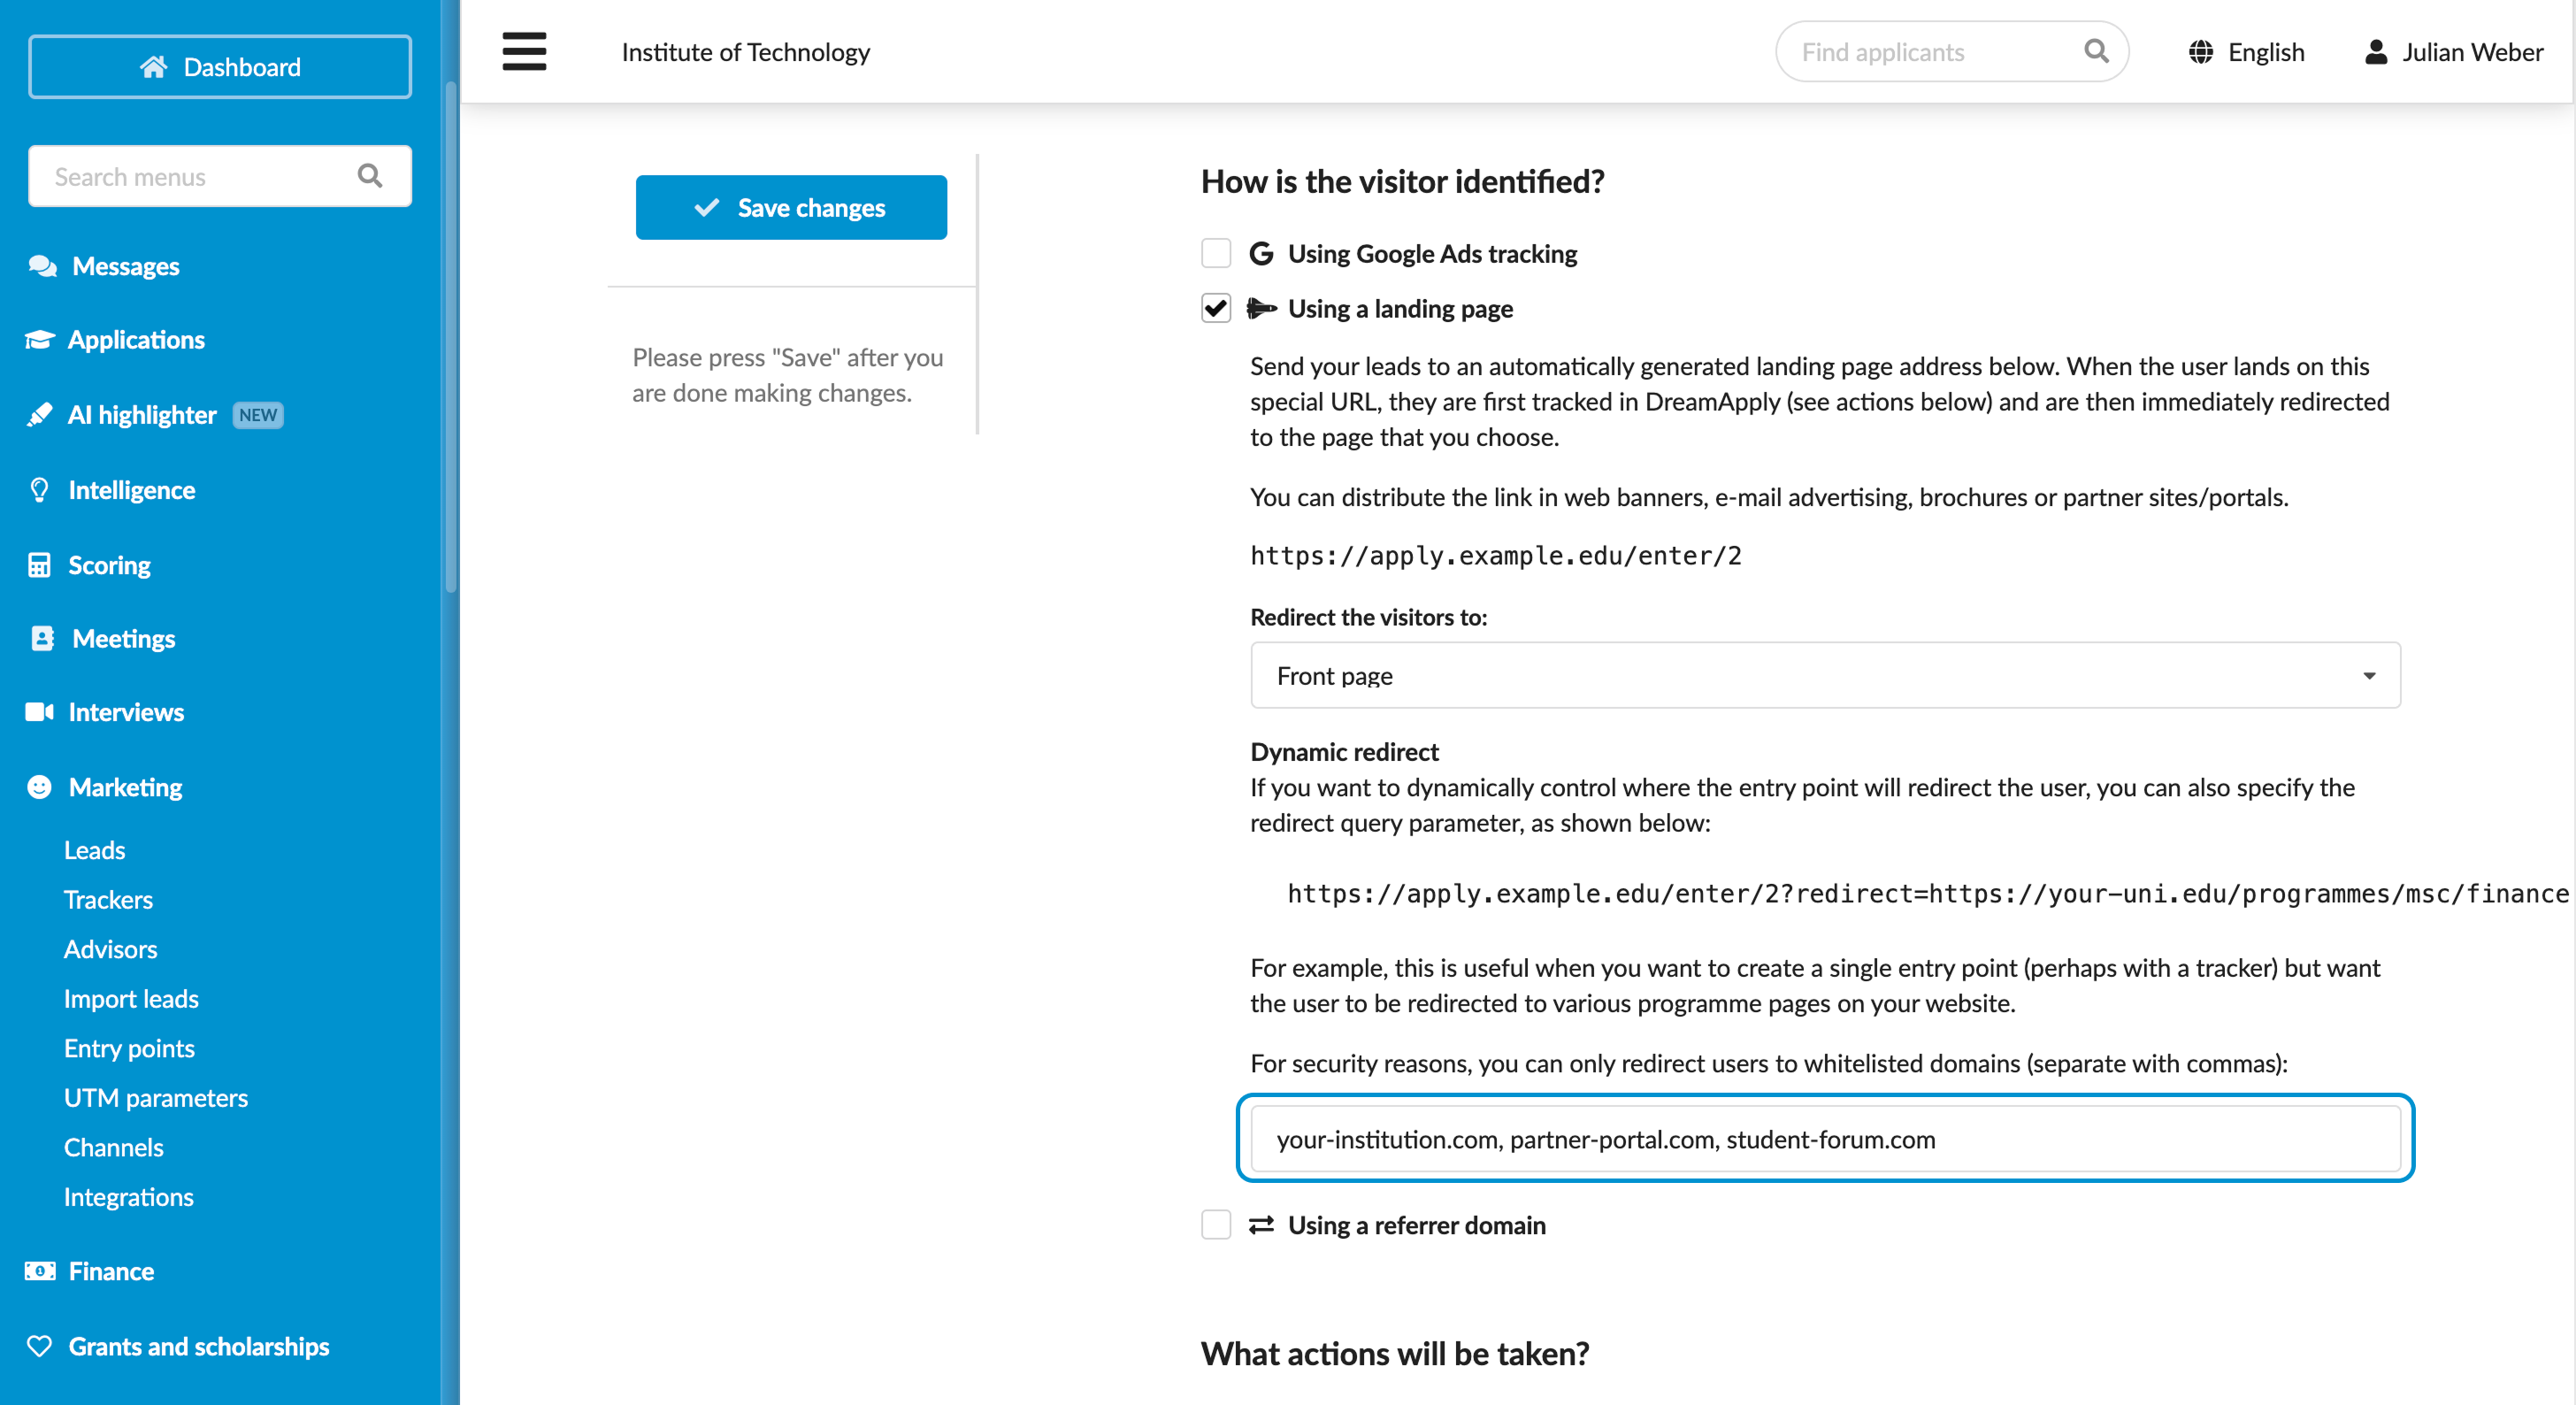
In the Dynamic redirect section, enter the domains where you plan to redirect users. Separate multiple domains with a comma.
Under What actions will be taken?, select the Add a tracker code to the applicant check box and select the created tracker.
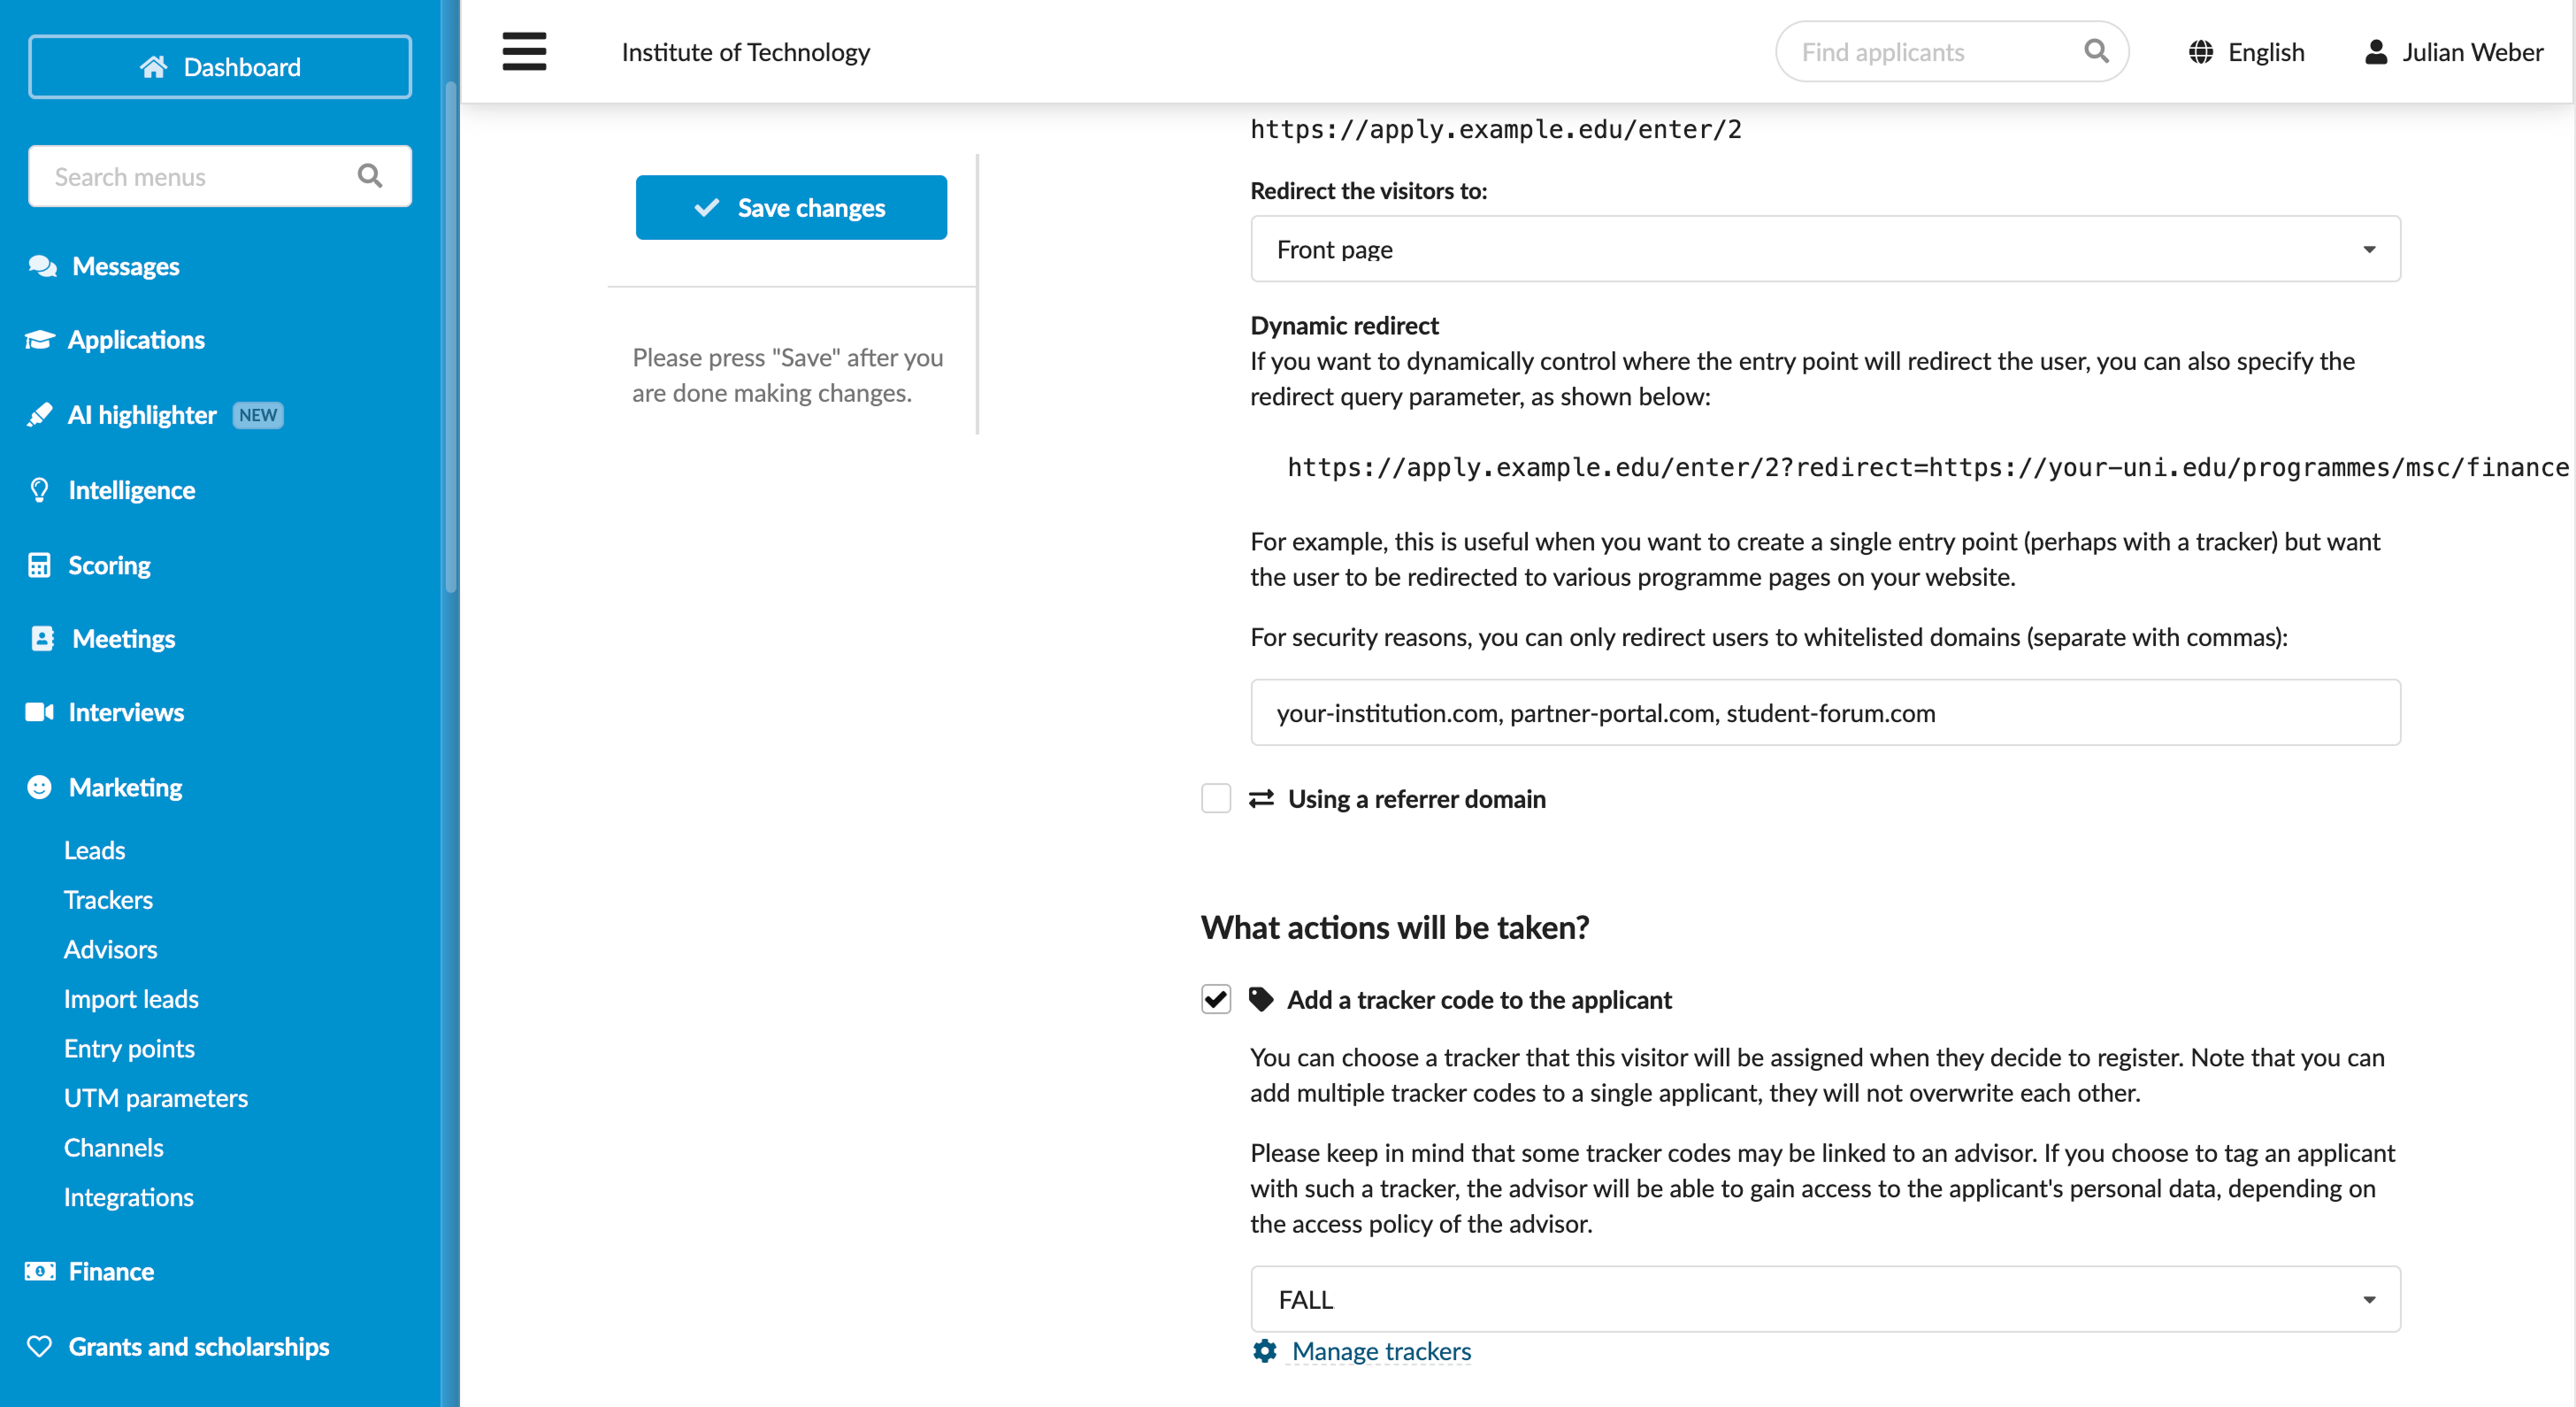
Save the changes.
Step 3. Set up the redirect destinations
We will use the same entry point for all Fall campaign materials. This will allow us to group all traffic under one campaign and get consistent reporting.
To send users to different destinations, append the ?redirect= parameter to the entry point URL:
Institution website:
https://apply.example.edu/enter/2?redirect=https://your-institution.com/admissionsPartner portal:
https://apply.example.edu/enter/2?redirect=https://partner-portal.com/admissionsStudent forum:
https://apply.example.edu/enter/2?redirect=https://student-forum.com
?redirect= parameter, use only the domains listed in the previous step. Other redirect destinations will be blocked.Step 4. Test entry point URLs
In a real campaign, we would normally distribute the configured entry point links through marketing materials. In this scenario, we will use it in the browser to simulate a user clicking the link.
Copy an entry point URL with a redirect created in the previous step:
https://apply.example.edu/enter/2?redirect=https://your-institution.com/admissionsOpen a new browser window using Incognito mode.
Paste the link into the address bar and press Enter. DreamApply will redirect you to the destination:
https://your-institution.com.Register as a new applicant (lead) or log in using an existing applicant account. DreamApply will assign the
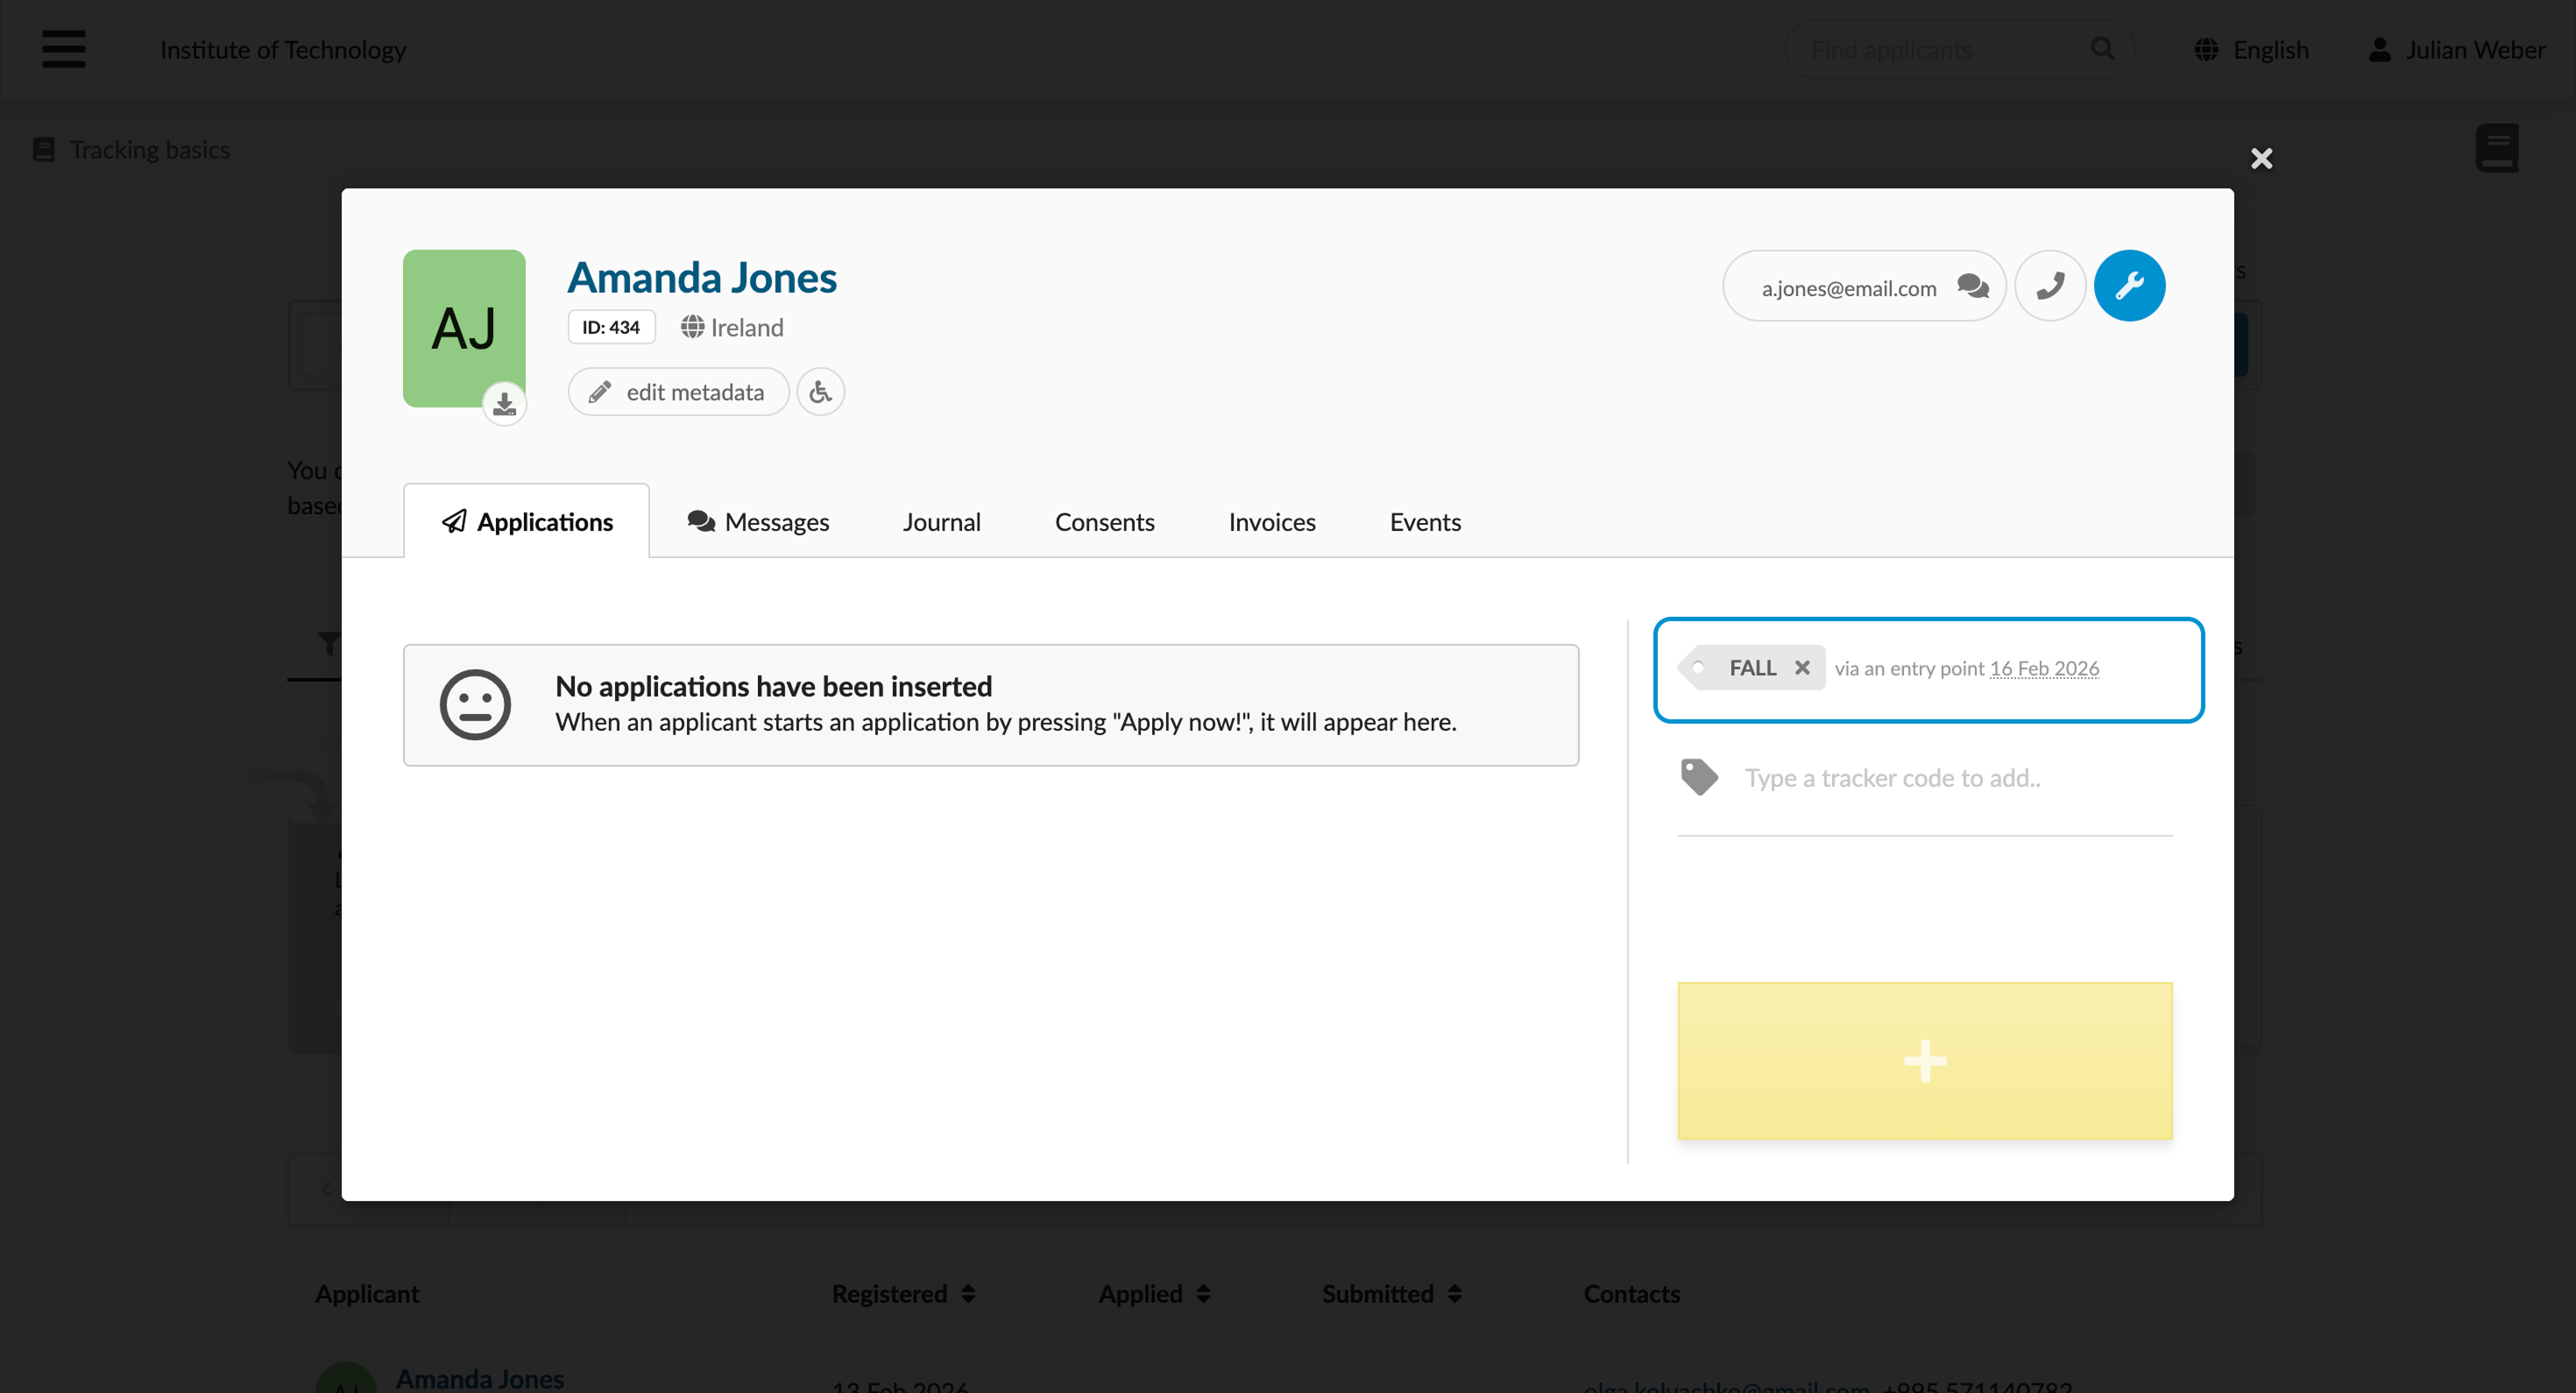
FALLtracker to the account.
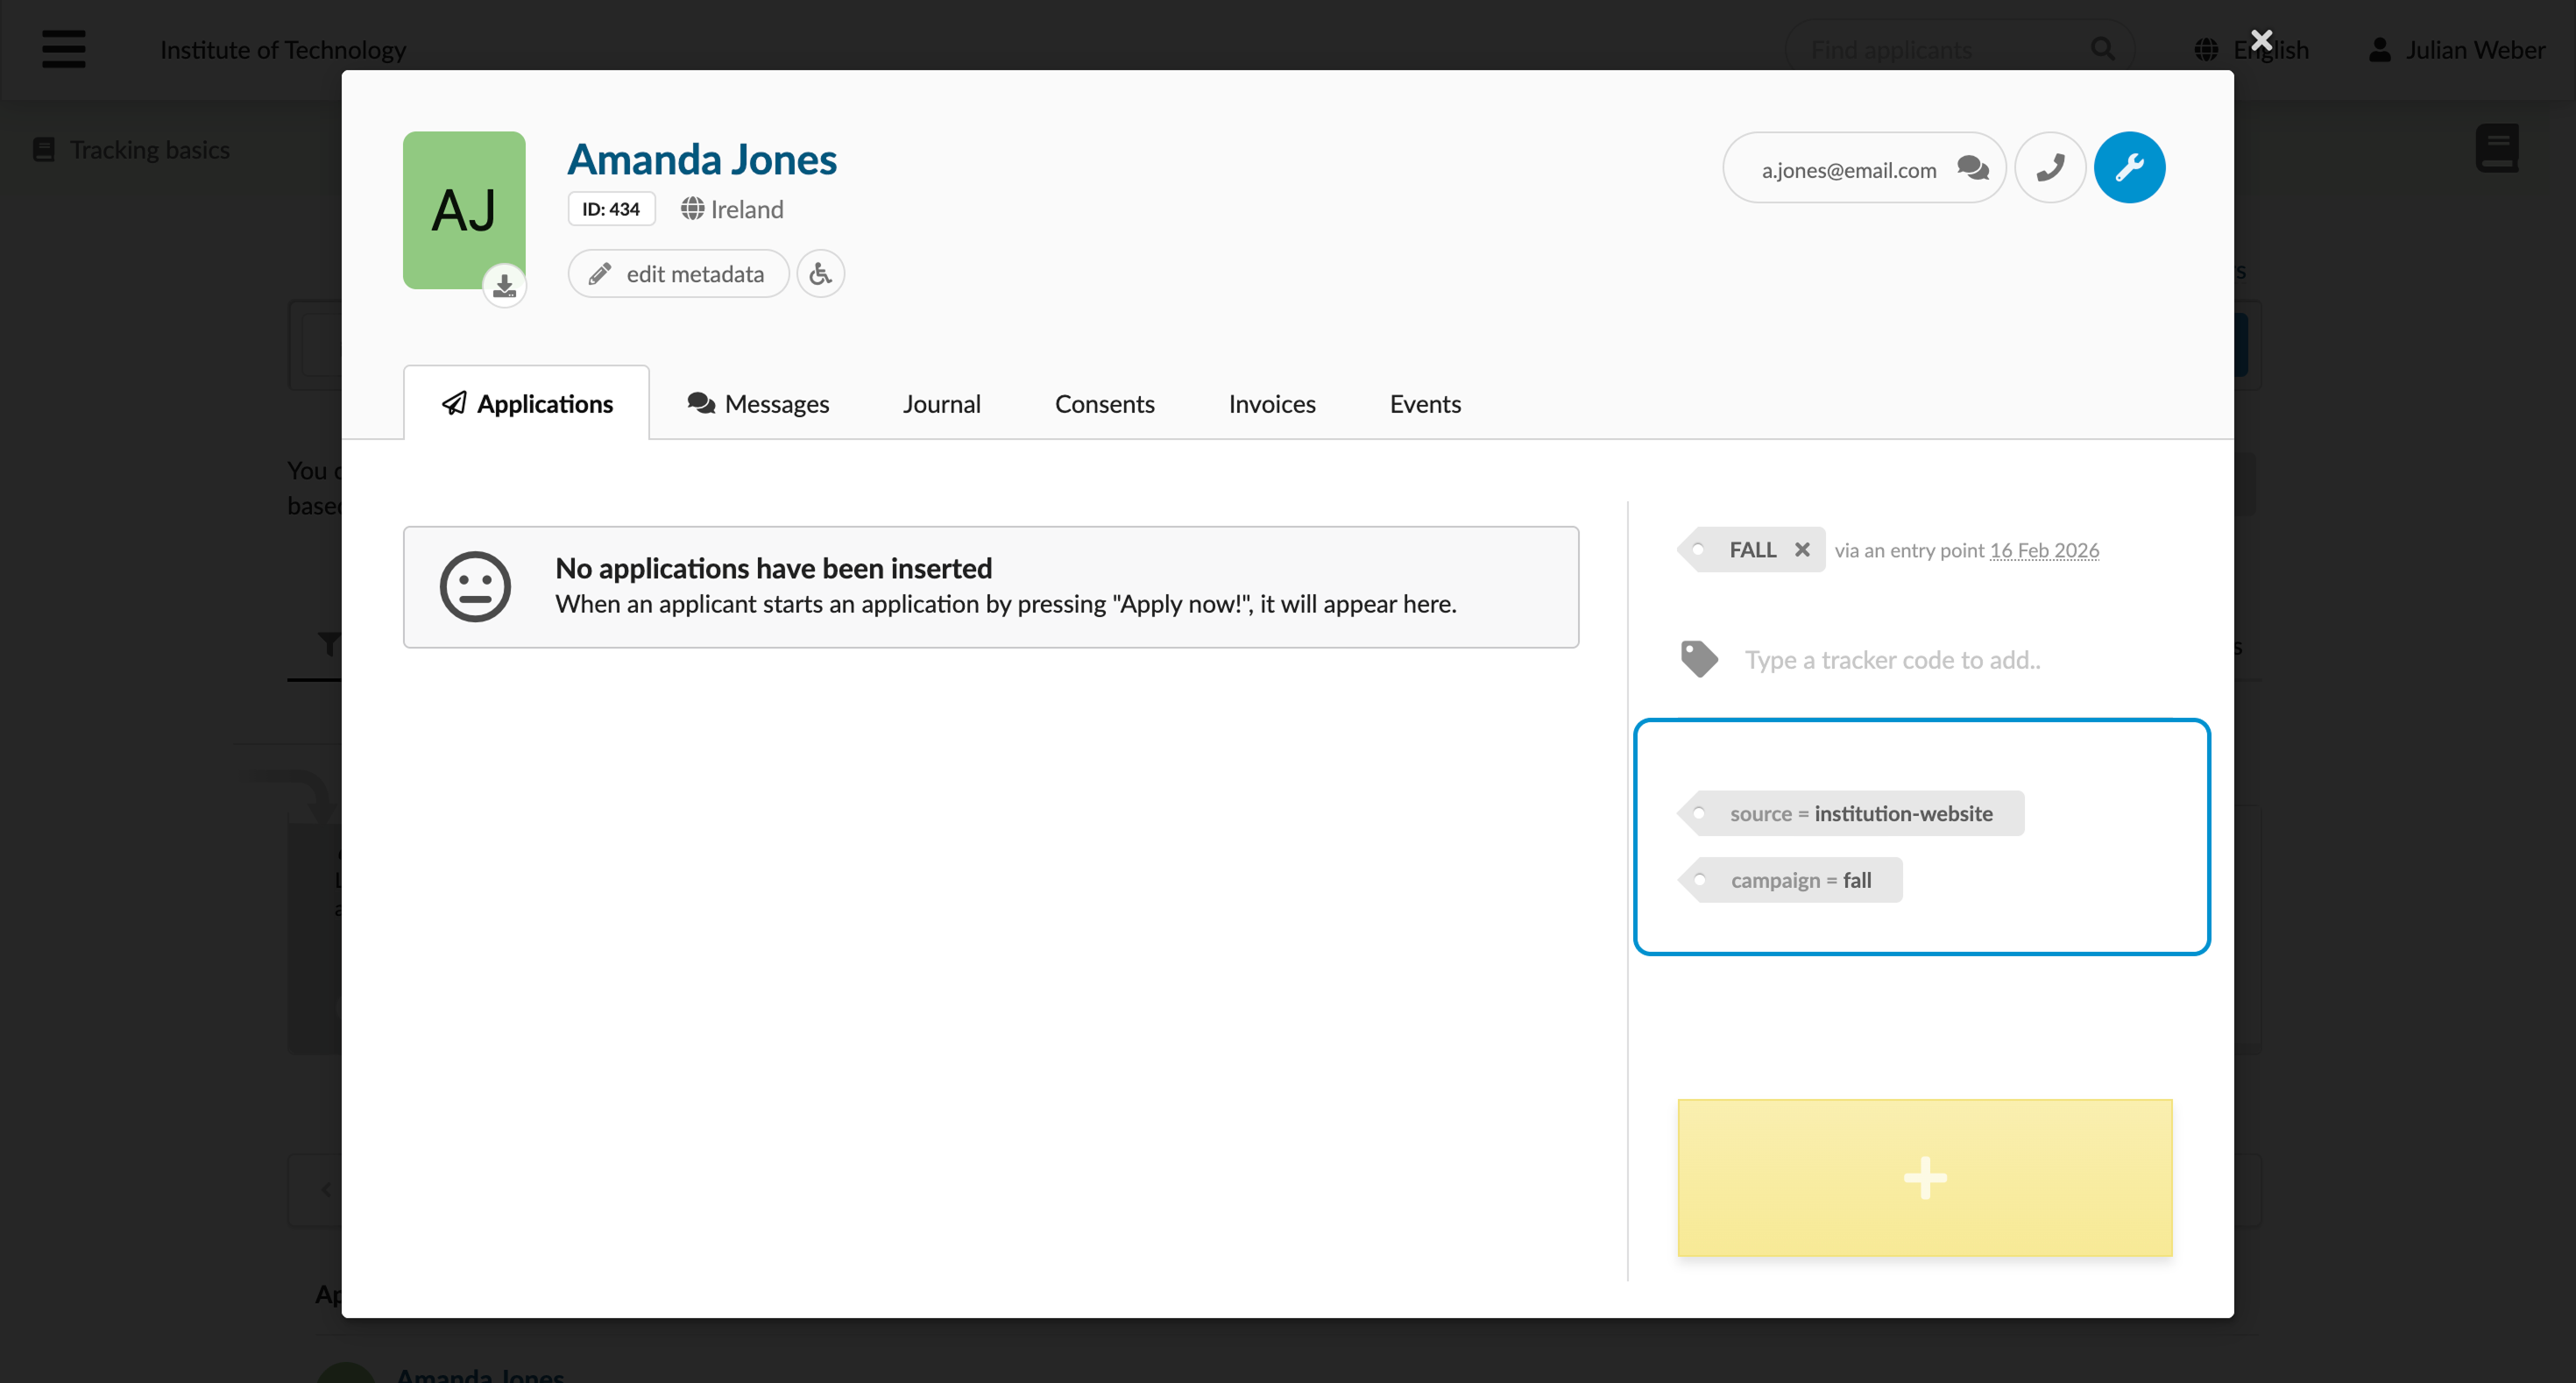
To review tracking data as an Administrator:
- For leads: In the main menu, under Marketing, select Leads, click the applicant’s name and check the right pane to see the assigned tracker.
- For existing applicants: In the main menu, under Applications, select Browse, click the applicant’s name and check the right pane to see the assigned tracker.
Step 5. Add UTM parameters (DreamApply reporting)
To capture more detailed campaign context, we will append UTM parameters to the entry point URL. As a result, when users click the link, DreamAppy will store the following tracking data:
- utm_source: institution-website
- utm_campaign: fall
Use this approach to analyze campaign performance and review attributions directly in DreamApply. To analyze performance using external platforms, see Step 7. Add UTM parameters (external platforms).
Add UTM parameters to the entry point URL:
https://apply.example.edu/enter/2?utm_source=institution-website&utm_campaign=fall&redirect=https://your-institution.com/admissions
Step 6. Check the results (DreamApply reporting)
To verify that DreamApply captures the data correctly, we will test the entry point URL.
Copy the entry point URL created in the previous step:
https://apply.example.edu/enter/2?utm_source=institution-website&utm_campaign=fall&redirect=https://your-institution.com/admissionsOpen a new browser window using Incognito mode.
Paste the link into the address bar and press Enter. DreamApply will redirect you to
https://your-institution.com/admissions.Register as a new applicant (lead) or log in using an existing applicant account. DreamApply will assign the
FALLtracker to the account and attribute the source and campaign parameters to it.
To review tracking data as an Administrator:
- For leads: In the main menu, under Marketing, select Leads, click the applicant’s name and check the right pane to see the assigned parameters.
- For existing applicants: In the main menu, under Applications, select Browse, click the applicant’s name and check the right pane to see the assigned parameters.
Step 7. Add UTM parameters (external platforms)
To measure campaign performance in external platforms like Google Analytics, you must include UTM parameters in the final landing page URL that follows the ?redirect= parameter.
If you add UTM parameters to the landing page URL without modification, the server may interpret special characters like & and ? as belonging to the entry point itself. As a result, the server may drop these UTM parameters before the user reaches the final page.
To avoid this, replace special characters in the URL with URL-safe characters:
| Name | Character | URL Encoded Value | Reason for Replacement |
|---|---|---|---|
| Space | %20 | Browsers do not allow literal spaces in URLs | |
| Ampersand | & | %26 | Used to separate different UTM parameters |
| Equals | = | %3D | Used to assign a value to a UTM key |
| Question mark | ? | %3F | Indicates the start of the query string |
| Hash/Fragment | # | %23 | Indicates the start of a URL anchor/fragment |
| Forward slash | / | %2F | Can be misinterpreted as a directory path |
| Percent | % | %25 | The escape character itself; must be encoded to be read literally |
| Plus | + | %2B | Often interpreted as a space in query strings |
| Colon | : | %3A | Used in protocol and port identification |
| At sign | @ | %40 | Used for user authentication in URLs |
For example, if you use the following UTM parameters:
- utm_source: institution-website
- utm_campaign: fall
the resulting URL will look like:
https://apply.example.edu/enter/2?redirect=https%3A%2F%2Fyour-institution.com%2Fadmissions%3Futm_source%3Dinstitution-website%26utm_campaign%3Dfall
To track UTM parameters in both DreamApply and an external platform, compose the following URL:
https://apply.example.edu/enter/2?utm_source=institution-website&utm_campaign=fall&redirect=https%3A%2F%2Fyour-institution.com%2Fadmissions%3Futm_source%3Dinstitution-website%26utm_campaign%3Dfall
Step 8. Check the results (external platform)
We need to verify that the UTM parameters persist after the redirect.
Copy the entry point URL created in the previous step:
https://apply.example.edu/enter/2?redirect=https%3A%2F%2Fyour-institution.com%2Fadmissions%3Futm_source%3Dinstitution-website%26utm_campaign%3DfallOpen a new browser window using Incognito mode.
Paste the link into the address bar and press Enter.
Confirm that DreamApply redirects you to the destination and that the parameters remain in the address bar:
https://your-institution.com/admissions?utm_source=institution-website&utm_campaign=fall